Is a premium outdoor lighting project being undermined by flickering lights, discoloration, or dead sections? These failures can ruin a client’s trust and damage your professional reputation.
Most outdoor LED strip issues stem from three areas: water ingress due to improper IP ratings, voltage drop causing dimming on long runs, and physical damage from poor installation. The solutions lie in choosing the right high-quality materials, correct power planning, and professional installation techniques.

As a factory owner, I see more than just the final, beautiful installations. I also see the aftermath of projects that went wrong. I’m often the one a new client calls after they’ve been burned by a cheap, unreliable product from another supplier. They come to me with photos of lights that are half-dead, yellowed, or filled with condensation. It’s frustrating for them and costly for their business. The good news is that nearly every one of these common failures is completely avoidable. It starts with understanding the root cause, and that’s exactly what I’m going to break down for you in this guide, based on years of manufacturing and troubleshooting experience.
Why Is My Outdoor LED Strip Flickering or Dead in Sections?
Are you facing the nightmare of a partially failed installation, with angry calls from a client? This common and highly visible failure often points to one critical weakness: water.
Water ingress is the #1 killer of outdoor LED strips. If the strip’s protective jacket is not a high-quality, IP67-rated material like silicone, or if connections are not perfectly sealed, moisture will corrode the electronic components, causing flickering, shorts, and dead sections.
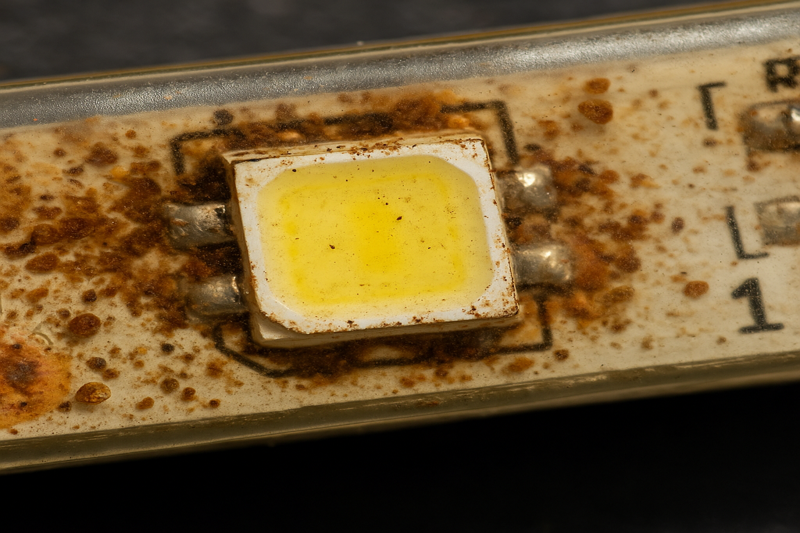
I’ll never forget a call from a contractor in Florida. He had installed hundreds of meters of outdoor strip lighting around a pool deck at a resort. After just six months and one rainy season, sections of the lights were flickering like a horror movie. His supplier had sold him an "outdoor" strip that was just a standard indoor strip with a thin epoxy coating. Epoxy is cheap, but it’s not truly waterproof, and it cracks under UV exposure. Water got in, and the salty, humid air did the rest. The entire installation was a loss. He had to tear it all out and replace it at his own cost. It was a brutal lesson in the importance of specifying the right materials. He’s now a loyal Rhlite client because he knows our IP67 strips are sealed in solid, UV-stable silicone designed to withstand those exact conditions.
Diagnosing the Root Cause: The Water Pathway
When an outdoor strip fails, water is the first suspect. Here’s how to think like an engineer to find the failure point:
-
The Strip Body: This is the most common failure point for low-quality products.
- Poor Material: PVC and epoxy coatings will yellow, harden, and crack when exposed to sunlight and temperature changes. These micro-cracks are all it takes for water to seep in.
- Solution: Insist on LED strips fully encased in high-grade silicone1. Silicone remains flexible, is naturally UV resistant, and provides a truly waterproof seal for the life of the product. Ask the supplier for material specification sheets2.
-
The End Caps: Where the strip begins and ends, it must be sealed with a cap.
- Poor Seal: If the end caps are simply glued on with a low-quality adhesive, the seal will eventually break down, allowing moisture to wick inside.
- Solution: Use factory-sealed end caps3 or, for field cuts, use purpose-made caps with a high-quality, non-acidic silicone sealant. The cap must be completely filled with sealant to create a durable, waterproof plug.
-
The Connection Points: Any place where a wire is soldered to the strip is a potential weak spot.
- Poor Protection: Simply covering a solder joint with electrical tape or basic heat shrink is not enough for outdoor use.
- Solution: All connections must be made waterproof. Use adhesive-lined "marine grade" heat shrink tubing. When heated, this tubing not only shrinks but also releases a hot-melt adhesive that creates a watertight seal around the wire and connection point.
Here’s a table comparing poor and professional waterproofing methods:
| Component | Common (Failing) Method | Professional (Reliable) Method | Why It Matters |
|---|---|---|---|
| Strip Jacket | Thin epoxy or PVC coating | Solid, co-extruded IP67 silicone | Provides long-term UV stability and prevents cracking. |
| End Caps | Basic plastic cap with generic glue | Silicone cap filled with neutral-cure silicone sealant | Creates a permanent, flexible, waterproof seal. |
| Solder Joints | Electrical tape or standard heat shrink | Marine-grade, adhesive-lined heat shrink tubing | Encapsulates the joint in a waterproof adhesive barrier. |
By specifying and using these professional-grade materials and techniques, you can eliminate over 90% of flickering and partial failure issues. It transforms the installation from a short-term gamble into a long-term, reliable asset for your client.
Why Does My Long LED Strip Run Get Dimmer at the End?
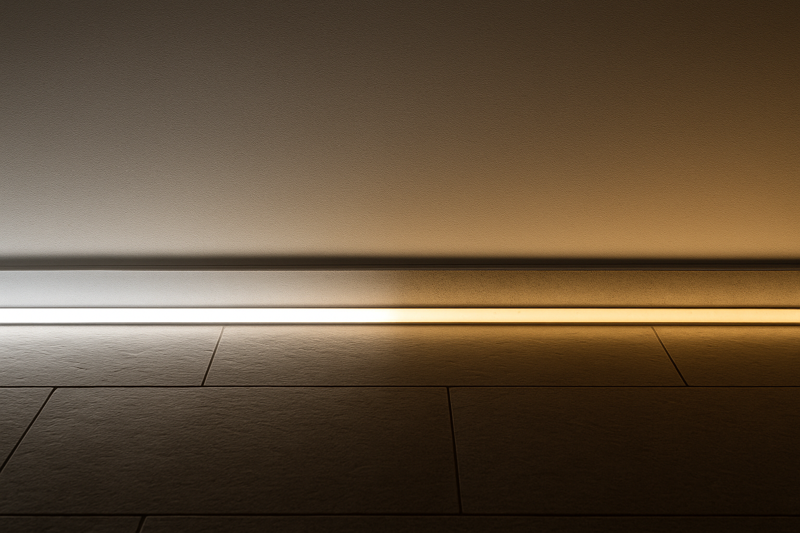
Have you installed a long, beautiful line of light only to find it fades to a pathetic glow at the far end? This amateur mistake, called voltage drop, can ruin the look of an entire project.
Voltage drop is a natural loss of electrical pressure over the length of a wire or LED strip. On long runs (typically over 5-10 meters), this causes the LEDs farthest from the power supply to receive less voltage, making them visibly dimmer and sometimes causing a color shift.
This is a problem rooted in the physics of low-voltage electricity, and it catches many installers by surprise. A landscape contractor I work with now, Tom, once lost a big job because of this. He installed a single 20-meter run of LED strip light along a retaining wall, powered from one end. The first few meters looked great, but by the end, the light was weak and had shifted to a dingy yellow-orange color. The client, a discerning homeowner, refused to pay until it was fixed. Tom had to buy all new material and reinstall the entire job using the correct techniques. Understanding voltage drop isn’t just a technical detail; it’s fundamental to being able to deliver a professional result on large-scale projects.
Understanding and Preventing Voltage Drop
Here’s how to manage voltage drop effectively so your installations look perfect from end to end.
-
- The Problem: A 12V system is more susceptible to voltage drop than a 24V system over the same distance.
- The Solution: For any run longer than 5 meters, I strongly recommend using a 24V LED strip and a matching 24V power supply. The higher voltage "pushes" the current more efficiently, significantly reducing the effects of voltage drop. Many professionals use 24V as their standard for all outdoor work. We at Rhlite produce a full range of 24V strips for this exact reason.
-
Power from Both Ends or the Middle5:
- The Problem: Powering a long strip from only one end maximizes the distance the electricity has to travel.
- The Solution: For a run of up to 10 meters, a simple fix is to run an extra pair of wires from the power supply to the end of the strip, powering it from both ends simultaneously. For even longer runs, it’s best to place the power supply in the middle and power two separate strips running in opposite directions. This cuts the effective length of each run in half.
-
Use Thicker Gauge Wire6:
- The Problem: The "lead wires" that connect the power supply to the strip also have resistance. Using thin, undersized wire is a major cause of voltage drop7 before the power even reaches the strip.
- The Solution: Use a thicker wire, which has less resistance. This is measured by American Wire Gauge (AWG), where a lower number means a thicker wire. For long lead wires, you must use a thicker gauge (e.g., 16AWG or 14AWG) to ensure full voltage reaches the strip.
This planning chart helps illustrate the best approach:
| Strip Length | Best System Voltage | Recommended Powering Method | Lead Wire Consideration |
|---|---|---|---|
| 0 – 5 meters | 12V is acceptable; 24V is better | Power from one end | Standard 18AWG is usually fine. |
| 5 – 10 meters | 24V is highly recommended | Power from one end (if using 24V) or from both ends | Use thicker 16AWG wire for leads. |
| 10 – 20 meters | 24V is mandatory | Power from the middle, creating two opposing runs | Use thick 14AWG wire for leads. |
By planning your power and wiring strategy before installation, you can completely eliminate voltage drop as a problem. It shows your client that you are a true professional who understands the technical details required for a flawless, high-end installation.
Why Is My LED Strip Peeling Off or Changing Color?
Is your carefully installed LED strip sagging, peeling, or turning a strange color? These issues signal a failure not of the LEDs themselves, but of the physical materials and adhesives holding everything together.
Adhesive failure is common with cheap strips using low-quality tape. Color shifting or yellowing is caused by low-grade jacketing material, like PVC or epoxy, that cannot withstand outdoor UV radiation and heat, leading to premature degradation.
A common pain point I hear from buyers is that their previous supplier’s strips looked great out of the box but failed physically on site. An installer from North America told me he had a project where he mounted strips under the capstones of a beautiful new stone wall. A few months later, in the summer heat, the adhesive on the back of the strips let go, and the strips were hanging down. It looked terrible. Around the same time, he noticed the "waterproof" coating on the strips was turning yellow and cloudy, making the light output look dull and inconsistent. These are classic signs of a product built with cheap materials. The LEDs might have been fine, but the physical structure of the product failed.
Solution 1: Professional Mounting Techniques
The peel-and-stick adhesive on the back of any LED strip should never be considered a permanent outdoor mounting solution.
-
The Problem: Temperature cycles of hot and cold, moisture, and rough surfaces (like wood or concrete) will cause even the best adhesive tape to fail over time.
-
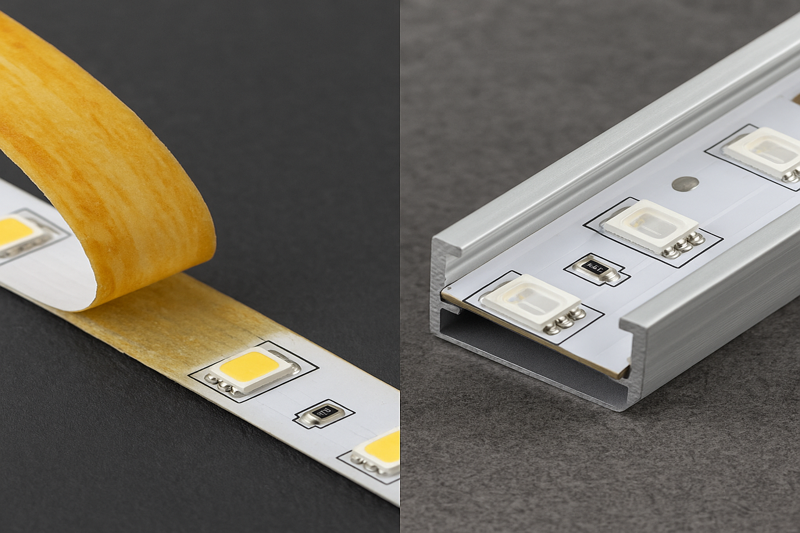
The Solution – Mounting Channels: The single best way to mount outdoor strips is to use aluminum mounting channels8 (extrusions). These provide multiple benefits:
- Secure Mounting: The channel is screwed directly to the surface, providing a permanent mechanical hold.
- Heat Dissipation: The aluminum acts as a heat sink, drawing heat away from the LEDs and prolonging their lifespan.
- Protection: The channel and its diffuser cover provide an extra layer of physical protection against impacts, dirt, and debris.
- Aesthetics: It gives the installation a clean, finished, professional look.
-
The Solution – Mounting Clips: If a channel is not feasible, the next best option is to use silicone or plastic mounting clips9 every 30-50cm. These clips are screwed to the surface and hold the strip securely in place, supporting the adhesive tape.
Solution 2: Specifying High-Quality Materials
The material the strip is made from is just as important as the LEDs inside.
- The Problem – Yellowing: Cheap PVC or epoxy coatings are not UV-stable. Sunlight breaks down the plastic polymers, causing them to turn yellow or brown. This not only looks bad but also blocks light and can cause the strip to overheat.
- The Solution – Silicone Encapsulation: Always specify strips that are encased in high-grade, UV-stable silicone10. As I mentioned before, silicone is an inert material that does not react to sunlight. It will remain clear, flexible, and stable for many years outdoors. All of Rhlite’s IP67 products use this superior material.
Here’s how to ensure physical durability:
| Problem | Common Low-Cost Cause | Professional Solution | Long-Term Benefit |
|---|---|---|---|
| Peeling/Sagging | Relying solely on adhesive tape | Use aluminum mounting channels or screw-in mounting clips | Permanent, secure fixture that won’t fail in heat or cold. |
| Color Shift/Yellowing | PVC or epoxy resin coating | Full encapsulation in UV-stable silicone | The strip remains clear and flexible, ensuring stable color and light output. |
| Physical Damage | Exposed strip is vulnerable to impacts | Aluminum channel with a diffuser cover | Protects the strip from being hit, stepped on, or damaged by gardening tools. |
When you source your product, don’t just ask about lumens and watts. Ask about the jacket material and recommended mounting methods. A supplier who can give you detailed answers on these points is one who understands the requirements of professional outdoor installations11. It’s a key indicator of a quality-focused partner.
Conclusion
Preventing outdoor LED strip failures is simple: specify quality IP67 silicone strips, plan for voltage drop, and use professional mounting. This ensures a reliable, long-lasting installation for your clients.
-
Explore the advantages of high-grade silicone, which offers superior flexibility and UV resistance, ensuring long-lasting waterproofing. ↩
-
Understand the significance of material specification sheets in ensuring product quality and performance in waterproofing. ↩
-
Discover how factory-sealed end caps provide a reliable waterproof solution, preventing moisture ingress effectively. ↩
-
Explore how higher voltage systems can enhance efficiency and reduce voltage drop in your projects. ↩
-
Learn the advantages of this method to ensure optimal performance in long electrical runs. ↩
-
Understand the significance of wire gauge in maintaining voltage levels and improving installation quality. ↩
-
Discover comprehensive strategies to manage voltage drop and enhance your electrical installations. ↩
-
Explore the advantages of aluminum mounting channels for LED strips, including secure mounting and heat dissipation. ↩
-
Discover how mounting clips can enhance the installation of LED strips, providing secure and reliable support. ↩
-
Learn why UV-stable silicone is crucial for outdoor LED strips to prevent yellowing and ensure longevity. ↩
-
Find out the best practices for professional outdoor installations to ensure durability and performance of LED strips. ↩


