Your client just spent a fortune on custom cabinets and stunning quartz countertops. But when the main lights are on, the work surfaces are still cast in shadow. The beautiful new space feels dark, cramped, and nothing like the designer’s rendering.
The solution is layered lighting, starting with flawless under-cabinet task illumination. This single addition banishes shadows, makes the kitchen safer and more functional, and provides the high-end, architectural feel that every modern homeowner desires. It’s the most impactful lighting upgrade you can make.
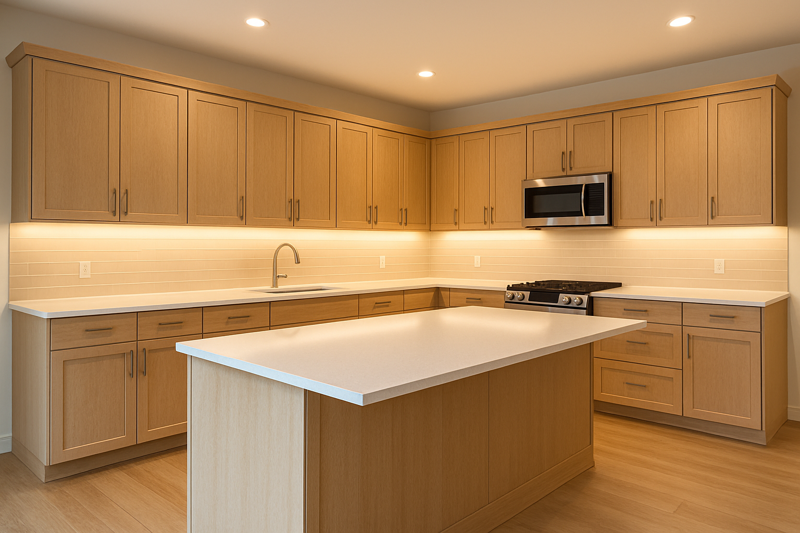
I remember a project with a high-end home builder. He called me, sounding frustrated. "Jermey," he said, "we’ve built a million-dollar kitchen, but it feels… dull. The client isn’t happy." I went to the site, and the craftsmanship was incredible, but the lighting was just a grid of recessed ceiling lights. It was flat. We spent an afternoon installing our high-CRI COB strips under every upper cabinet, inside the glass-fronted display cabinets, and under the lip of the huge central island. That evening, we turned off the main lights and switched on the strips. The builder was silent for a moment, then he just said, "Wow. Now that is a million-dollar kitchen." It wasn’t about the cost of the strips; it was about how they revealed the value of everything else in the room.
What’s the Best LED Strip for Under Cabinet Lighting?
You installed new under-cabinet lights, but the excitement fades when the client points out the ugly reflection of bright dots on their polished granite. The result looks cheap and DIY, not like the seamless, professional installation you promised.
For under-cabinet lighting, your default choice should be a COB (Chip on Board) LED strip with a Color Rendering Index (CRI) of 90 or higher. The COB technology delivers a completely smooth, dotless line of light, while the high CRI ensures that food, wood grains, and paint colors look rich and natural.
A designer I work with refuses to specify any product with a CRI below 90 for her kitchens. She once told me a story about a previous project where the contractor used cheap, low-CRI strips. The client’s expensive, custom "greige" cabinets ended up looking a sickly, yellowish-green under the lights. It was a disaster. They had to tear it all out. She learned then that light quality isn’t a luxury; it’s a necessity. The color of a red tomato, the grain of an oak cabinet, the veining in a marble countertop – it’s all defined by the quality of light hitting it. Selling a high-CRI product isn’t about selling a spec; it’s about guaranteeing your client’s beautiful and expensive material choices will actually look the way they are supposed to.
Decoding the Perfect Strip: The Three Pillars
Selecting the right strip is the most critical step. Get this wrong, and the entire project is compromised. For flawless kitchen under-cabinet lighting, you need to focus on three key technical specifications.
-
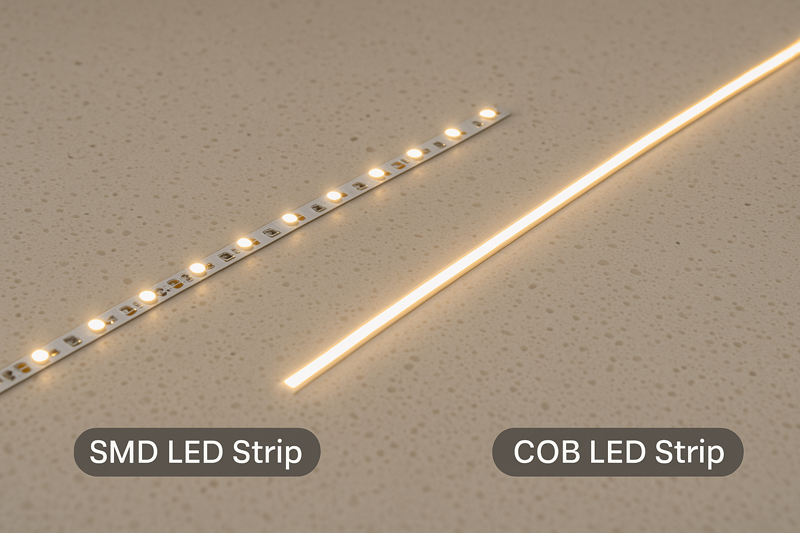
Light Source Technology: COB is King1.
For years, standard LED strips used Surface Mounted Diodes (SMD), like the 5050 or 2835 chips. These are individual, visible light points spaced out along the strip. When placed close to a reflective surface like a polished stone countertop or a glossy backsplash, you see a series of distracting "dots" or "hotspots." COB (Chip on Board) technology solves this problem. It uses hundreds of tiny LED chips mounted directly to the flexible circuit board and covers them in a continuous line of phosphor. The result is a completely uniform, seamless line of light with no visible dots, even without a diffuser. For under-cabinet applications, this is the new professional standard. -
Light Quality: CRI is Non-Negotiable2.
CRI, or Color Rendering Index, measures how accurately a light source reveals the true colors of objects compared to natural sunlight. The scale is 0-100, with 100 (the sun) being perfect. A low-CRI light (below 80) can make colors look dull, washed-out, or even shift their hue. In a kitchen, this is critical. A 90+ CRI light makes red vegetables look vibrant, salmon look fresh, and the complex tones of wood and stone appear exactly as the designer intended. It’s a measure of light quality that separates professional-grade installations from cheap alternatives. -
Color Temperature (CCT)3: Setting the Mood.
CCT is measured in Kelvin (K) and describes how "warm" or "cool" the white light appears. There’s no single "right" answer, as it depends on the kitchen’s design style and the client’s preference.- 2700K – 3000K (Warm White): Creates a cozy, inviting, traditional feel. Excellent for classic kitchens with wood cabinets.
- 4000K (Neutral White): A clean, bright, modern look. It’s great for contemporary kitchens with white or gray cabinets and feels more like natural daylight.
- Tunable White4: For clients who want it all, a tunable white strip allows them to adjust the CCT from warm to cool using a remote or app. It’s the ultimate in flexibility.
| Feature | My Recommendation | Why It Matters for Kitchens |
|---|---|---|
| Technology | COB (Chip on Board) | Eliminates dots/hotspots on reflective countertops for a clean, high-end look. |
| Light Quality | CRI 90+ | Renders colors of food, cabinets, and countertops accurately and vibrantly. |
| Brightness | 400-600 Lumens/ft5 | Provides ample light for tasks (chopping, reading recipes) without being overpowering. |
| Voltage | 24V DC6 | Runs cooler and allows for longer, continuous runs with less voltage drop than 12V. |
| Color Temp | 3000K or 4000K | Match 3000K to warm, traditional designs and 4000K to cool, modern designs. |
How Do You Install Under Cabinet Lighting Perfectly?
The strips are installed, but the job looks messy. Wires are visible, the light is uneven, and there’s a dark spot in every corner. The client is unhappy with the finish, and you’re facing a time-consuming fix-it list.
A professional installation is all about placement and planning. Mount the strip at the front of the cabinet, facing the backsplash, and use interconnect cables or soldered jumpers to create clean, continuous light around corners and breaks. The goal is an invisible light source, not visible hardware.

I often see contractors place the strip at the back of the cabinet, right against the wall. This is a huge mistake. It creates a harsh "grazing" light that highlights every tiny imperfection in the backsplash tile or grout, while leaving the front half of the countertop in shadow. The best practice is to mount the strip on the underside of the cabinet, about 1-2 inches back from the front edge. This placement directs the light cone towards the center of the workspace, providing the most even and useful illumination. It also keeps the light source itself out of the direct line of sight for anyone seated at a kitchen island. It’s a small detail that makes a massive difference in the final result.
Blueprint for a Flawless Finish
A clean installation is what separates a pro from an amateur. It’s not just about making the light work; it’s about making the hardware disappear.
-
Placement is Paramount7: As mentioned, always mount the strip towards the front of the cabinet. If the cabinet has a lip or light rail molding, tuck the strip right behind it. This hides the source and creates a beautiful, indirect glow. Most of our strips come with high-quality 3M adhesive backing. For a permanent, worry-free installation, always clean the mounting surface with an alcohol wipe first to remove any dust or grease.
-
Managing Wires8: Visible wires are the sign of a sloppy job. Plan your wire runs before you start peeling and sticking. The goal is to get the low-voltage wire from the power supply to the start of the strip run as discreetly as possible. This often means drilling a small hole inside a cabinet, running the wire up and over, and then down to the start of the strip. Use adhesive cable clips to secure wires and keep them tidy.
-
Navigating Corners: Kitchens are full of corners. You have two professional options for making a 90-degree turn:
- Solderless Connectors9: These are quick and easy clip-on L-shaped connectors. They are great for fast installs but can sometimes be a point of failure if not secured properly. They are also bulkier than a soldered connection.
- Soldering: Soldering a small jumper wire between two sections of strip is the most reliable and low-profile method. It requires more skill and time, but it creates a robust, permanent connection that will never come loose. This is the method preferred by high-end installers.
-
Dealing with Sinks and Stoves10: You will have gaps in your cabinet runs over sinks and microwaves. Don’t just stop and start new power feeds. Instead, run a continuous low-voltage wire (typically 18/2 AWG) behind the wall or through the soffit to link the sections. This ensures that all the lights are on the same circuit, controlled by the same switch, and have the same brightness. It creates a single, seamless system.
Where Else Can You Use Strips in the Kitchen?
The under-cabinet lights look fantastic, but the rest of the kitchen still feels a bit flat. The island feels like a dark block in the middle of the room, and the upper cabinets disappear into the ceiling. The client feels like the job is only half-done.
Think in layers. Use LED strips for toe-kicks, above-cabinet uplighting, and in-cabinet displays. This "three-layer" approach (task, accent, ambient) adds architectural depth, makes the room feel larger, and creates a truly custom-designed look.
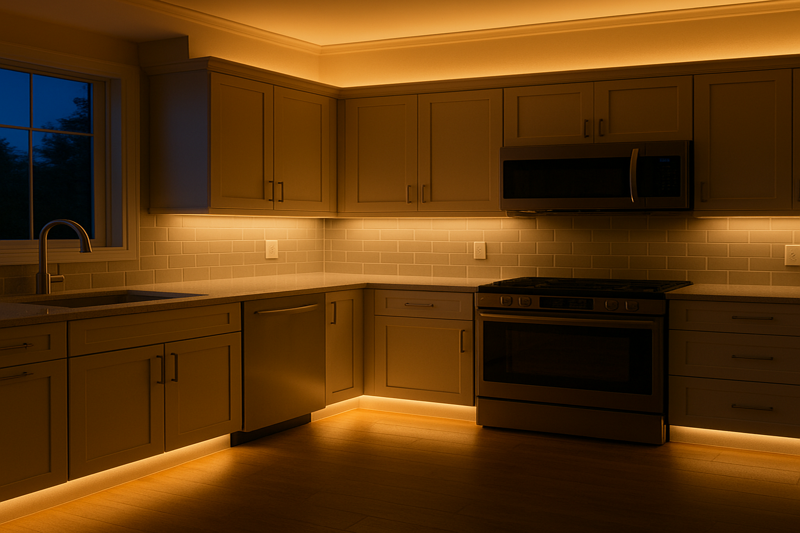
I worked on a project where the client had very tall ceilings and dark-colored cabinets that ran all the way to the top. At night, it felt like a dark, heavy mass looming over the room. The designer’s solution was simple but brilliant. We installed a warm white LED strip on top of the upper cabinets, pointing up at the ceiling. The effect was transformative. It created a soft, ambient glow that not only eliminated the dark, shadowy void but also made the ceiling feel even higher. It highlighted the crown molding and turned the top of the cabinets from a "dead zone" into an architectural feature. This simple uplighting completely changed the feel of the entire room.
Beyond the Countertop: Building Layers of Light
A truly well-lit kitchen uses multiple layers of light to add function, drama, and dimension. Under-cabinet lighting is just layer one.
-
Layer 2: Toe-Kick Accent Lighting11.
This is one of the most cost-effective "wow" features you can add. By placing an LED strip under the base cabinets, in the recessed toe-kick area, you create the illusion that the cabinets are floating. It’s a modern, high-end look that also serves a practical purpose as a low-level nightlight. It’s perfect for navigating the kitchen for a midnight snack without turning on the blinding overhead lights. A lower brightness strip is usually best here. -
Layer 3: Above-Cabinet Ambient Lighting12.
As in my story, placing strips on top of the upper cabinets provides beautiful, indirect uplighting. This ambient light bounces off the ceiling, filling the room with a soft, glare-free glow. It makes the space feel larger and more open and is perfect for entertaining or general background light. This is an especially effective technique in rooms with vaulted or interesting ceilings. -
Layer 4: In-Cabinet & Shelf Lighting.
For cabinets with glass doors or for open floating shelves, installing vertical strips along the inside front edge is a perfect way to turn everyday dishes and glassware into a curated display. It draws the eye upward, adds a layer of depth, and breaks up large banks of cabinetry. Using a low-output strip is key here; the goal is to make the contents glow, not to blast them with light. Often, these are connected to a door sensor, so they turn on automatically. -
Layer 5: Island & Peninsula Accent.
The kitchen island is often the centerpiece of the room. Wrapping an LED strip under the lip of the countertop overhang is a fantastic way to define the seating area and add a dramatic, welcoming glow. It anchors the island in the space and turns it into a true focal point.
What Power Supply and Controller Do You Need?
The lights are installed, but they’re flickering. Or maybe the ones at the end of the run are dimmer than the ones at the beginning. You used a cheap power supply from an online marketplace, and now you have to troubleshoot the problem and replace the faulty component on your own dime.
Always use a high-quality, UL-listed, Class 2 power supply from a reputable supplier. Calculate your total wattage demand, then add a 20% "safety headroom." For control, a simple wall dimmer designed for low-voltage lighting is the professional standard for reliability.
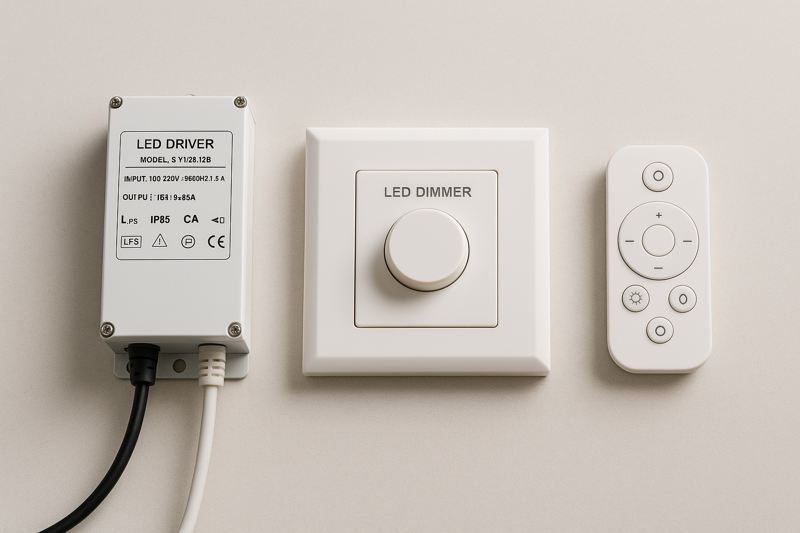
Nothing is more frustrating for a contractor than a callback for a failed power supply. I had a client, a large cabinet maker, who tried to save a few dollars per kitchen by buying cheap, uncertified power supplies online. He ended up with a 30% failure rate within the first year. It was a nightmare. He was spending all his time and profit driving back to job sites to fix flickering lights. I finally convinced him to switch to our UL-listed drivers. They cost more upfront, but his failure rate dropped to virtually zero. He told me, "That extra $20 per driver is the cheapest insurance I’ve ever bought." Don’t let the power supply be an afterthought. It’s the heart of the entire system.
The Engine Room: Power and Control Made Simple
This is the part of the system your client will never see, but it’s the most critical for performance and safety.
-
Choosing the Right Power Supply (Driver).
- Calculate Your Load: This is simple math. Look at the wattage-per-foot spec on your LED strip. Let’s say it’s 3 watts/foot. If you have a 15-foot run, your total load is 3 watts/ft * 15 ft = 45 watts.
- Add Headroom: Never run a power supply at 100% of its capacity. It will get hot and fail prematurely. Always add a 20% safety margin. So, for your 45-watt load, you need a power supply of at least 45 * 1.2 = 54 watts. In this case, a 60-watt driver would be the perfect choice.
- Certification Matters: Insist on UL-listed or ETL-listed drivers. This means they have been independently tested for safety and performance. It’s critical for passing electrical inspections and for your own peace of mind. A Class 2 rating is also important for low-voltage safety.
-
Choosing the Right Control System.
- Hardwired Dimmer: For most kitchens, the most reliable and intuitive solution is a hardwired wall dimmer compatible with your LED driver. This provides smooth, flicker-free dimming from a familiar wall control. You’ll need a dimmable driver for this to work.
- Remote Control (RF/IR): Simple radio frequency (RF) remotes can offer dimming and on/off control without needing to run new wires to a wall switch. They are a good solution for retrofits.
- Smart Controls (Wi-Fi/Zigbee): For clients who want to integrate their kitchen lighting into a smart home system (like Alexa or Google Home), a smart controller is the answer. This allows for voice control, scheduling, and app-based scene creation. It adds complexity but also offers the most modern user experience.
| Component | Key Consideration | Professional Tip |
|---|---|---|
| Power Supply | Calculate Total Wattage + 20% Headroom | Choose a UL-Listed, Class 2 driver. Never buy uncertified components. |
| Dimmer Control | Match the dimmer to your power supply type (e.g., MLV, ELV) | A hardwired wall dimmer is the most reliable and user-friendly option. |
| Wiring | Use the correct gauge wire (e.g., 18AWG) for your run length | Plan all wire runs before installation to keep them hidden and neat. |
| Connectors | Solder connections for maximum reliability | While solderless clips are fast, soldering prevents future connection issues. |
Conclusion
Proper kitchen lighting is not an expense; it’s an investment that pays off in daily functionality and stunning aesthetics. Move beyond simple under-cabinet lighting. By layering light, you can transform any kitchen from a basic workspace into the true heart of the home.
-
Explore this link to understand how COB technology enhances lighting quality and eliminates hotspots. ↩
-
Learn why a high CRI is essential for accurate color representation in kitchens and other spaces. ↩
-
Discover how color temperature affects the mood and aesthetics of your kitchen lighting. ↩
-
Find out how tunable white lighting offers flexibility in creating the perfect ambiance. ↩
-
Get insights on optimal lumens for kitchen tasks to ensure safety and efficiency. ↩
-
Understand the advantages of using 24V DC for longer runs and cooler operation in lighting. ↩
-
Explore this link to learn how proper placement can enhance your cabinet lighting and create a stunning ambiance. ↩
-
Discover effective wire management techniques that will keep your installation neat and professional. ↩
-
Find out why solderless connectors can be a quick solution for your lighting projects and their potential drawbacks. ↩
-
Learn how to create a seamless lighting system around challenging areas like sinks and stoves for a polished look. ↩
-
Explore this link to discover how Toe-Kick Accent Lighting can enhance your kitchen’s aesthetics and functionality. ↩
-
Learn more about Above-Cabinet Ambient Lighting and how it can transform your kitchen into a more inviting space. ↩


