A dark staircase is one of the most hazardous areas in a home. At night, it’s a major trip risk, especially for children or older adults. Your client wants a solution, but traditional wall sconces create glare and don’t illuminate each step evenly.
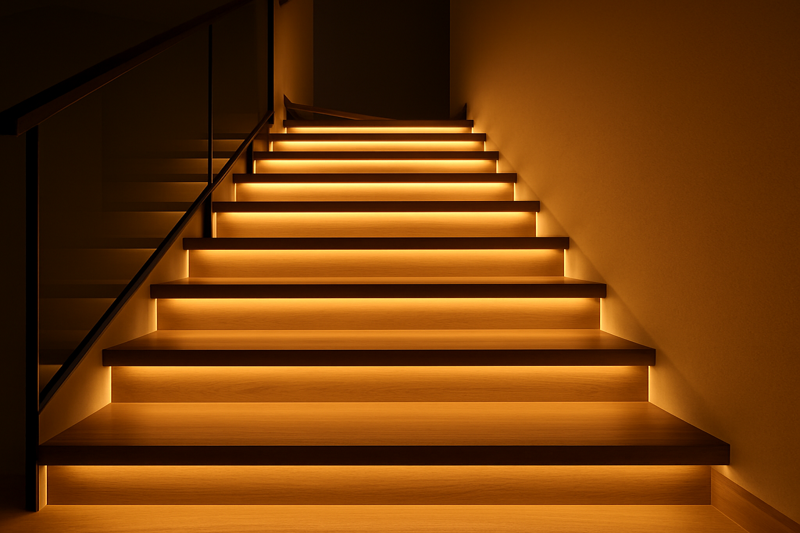
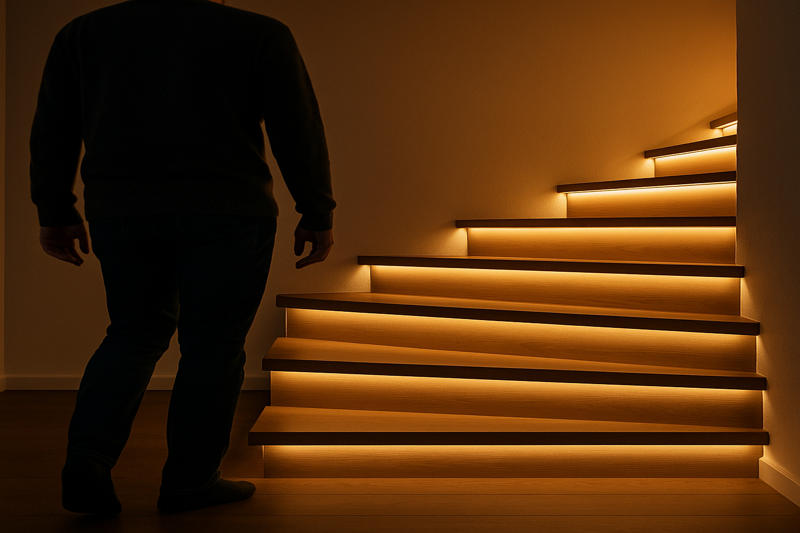
The solution is to integrate low-voltage LED strips directly into the staircase’s architecture. By concealing the light source, you create a seamless, glare-free path that illuminates every single tread, turning a dangerous passage into a stunning and safe design feature.
A few years ago, I was working with a home builder on a custom family home. The client, a young father, told me his biggest worry was his five-year-old son getting up at night and trying to navigate the main staircase in the dark. He wanted a nightlight, but a simple plug-in wasn’t enough. We designed a system using our durable LED strips in channels under each stair tread, all linked to motion sensors at the top and bottom. The first time he saw it in action—walking to the stairs and having the whole path gently light up ahead of him—he was sold. He told me, "This is more than just lighting. This is peace of mind." That’s when I truly understood that this application is where safety and style meet perfectly.
Where is the Best Place to Install Staircase LED Lighting?
Your client loves the idea of lit stairs, but you’re unsure where to place the strips. Do they go on the steps? The wall? The handrail? The wrong choice could result in a difficult installation, glare, or an effect that doesn’t meet their expectations.
For maximum safety and visual impact, install the LED strip in a channel under the nosing of each stair tread. This directs light down and back onto the step below, providing the best illumination for footing while keeping the light source itself hidden from view.
I often see installations where the strip is placed on the vertical riser of the stair. This is a mistake. When you’re walking up the stairs, the bright, exposed LEDs are shining directly into your eyes, creating uncomfortable glare. The goal of architectural lighting is to see the effect of the light, not the source. By tucking the strip under the front lip of the tread and pointing it slightly backward, you hide the source completely. The light grazes down the riser and illuminates the tread of the step below. It’s an elegant, indirect lighting technique that is both more comfortable for the eyes and far more effective at making the staircase safe to navigate. It’s a small detail in placement that makes a huge difference in the quality of the final result.
Three Professional Placement Options
While under the tread is the most popular, there are three primary methods for integrating LED strips1 into a staircase. Each has its own aesthetic and installation challenges.
| Placement Method | Primary Benefit | Best For | Installation Difficulty |
|---|---|---|---|
| 1. Under the Treads2 | Best safety, clear step definition | All stair types, especially open riser | Medium |
| 2. In the Handrail | Sleek, continuous modern look | Modern, minimalist designs | High |
| 3. Along the Stringer/Wall3 | Subtle, guiding path of light | Enclosed staircases with walls on both sides | Medium to High |
1. Under the Treads2
This is the workhorse method. It provides direct, functional light on the walking surface.
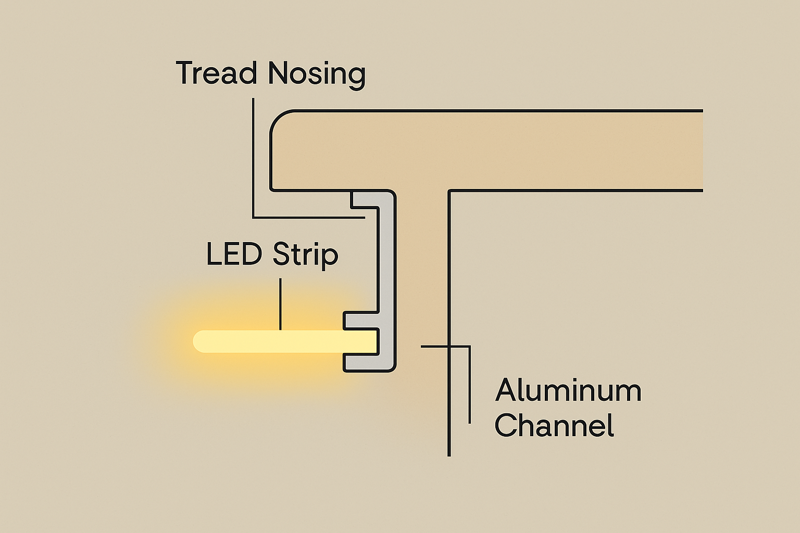
- How it Works: A slim aluminum channel is routed or surface-mounted on the underside of each tread, right behind the front nosing. The LED strip is placed inside. This protects the strip from kicks and diffuses the light for a smooth glow.
- Pro-Tip: Use a channel with a 45-degree angle or an asymmetrical lens. This helps direct the light more effectively onto the tread below and minimizes any potential glare for people walking up the stairs.
2. Integrated into the Handrail4
This produces a very clean, high-end architectural look.
- How it Works: A channel is routed into the underside of the handrail itself. The LED strip is installed inside, creating a continuous, unbroken line of light that follows the angle of the stairs.
- Challenges: This is the most complex method. It requires precise woodworking to create the channel and is very difficult to wire, as the low-voltage cables must be fished through the handrail posts. It’s best suited for new construction or major renovations where the handrail is being custom-built.
3. Along the Stringer or Wall
This method creates a lower-level "pathway" of light.
- How it Works: The strip is mounted along the stringer (the sawtooth-shaped board on the side of the stairs) or low on the wall next to the stairs. This defines the edge of the staircase.
- Best Application: This is a good option for retrofitting existing staircases, especially carpeted ones where installing on the treads is not feasible. Using a slim, paintable channel can help it blend into the wall during the day.
How Do You Hide the Wires on a Finished Staircase?
The client wants lights on their existing staircase, but it’s a finished space. There’s no easy way to run the wires. The thought of drilling dozens of holes and trying to fish wires through finished walls and floors is a nightmare.
Plan a central "channel" for your wires. For a staircase with a hollow space underneath, you can drill down from each tread and run the wires below. For a fully enclosed staircase, the best method is to route a shallow channel or groove in the stringer or wall, lay the wires in it, and then conceal it.
This is where planning separates the pros from the amateurs. I worked with an installer who had a brilliant technique for enclosed staircases. He would carefully remove the baseboard that ran up the wall alongside the stairs. Then, he would use a router to cut a shallow groove (about 1/4 inch deep) into the drywall just below where the baseboard sat. He’d run all the low-voltage wires from each tread down into this single groove. After all the wires were in place, he simply re-installed the baseboard, and the groove—and all the wires—were completely hidden. The amount of drywall patching was minimal. It was a clean, efficient, and genius solution to the biggest headache of retrofitting stair lights.
A Pro’s Guide to Invisible Wiring5
Wiring is 90% of the challenge. Your approach will depend on the construction of the staircase.
-
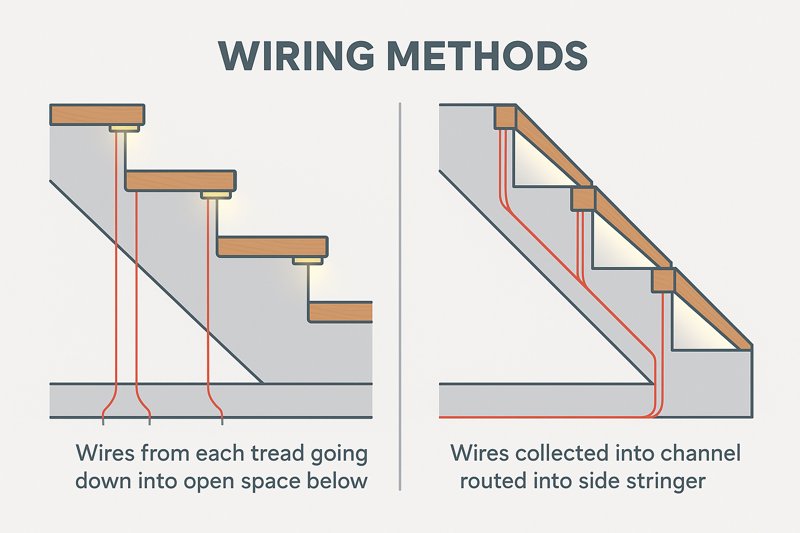
For Stairs Open Underneath (e.g., Basement Stairs): This is the easiest scenario.
- Drill: From the installation point on each tread, drill a small hole directly down into the open space below.
- Run Wires: Feed the wire from each LED strip segment through its corresponding hole.
- Consolidate: Underneath the stairs, gather all the wires and run them neatly (using staples or clips) to a central point where you have placed the power supply. Use wire connectors or a terminal block to connect all the parallel circuits.
-
For Enclosed Stairs (Drywall/Plaster Underneath): This is more complex and requires a methodical approach.
- Choose Your Path: Your best bet is almost always along the side stringer. This is the wooden board the treads and risers are set into.
- Create a Groove: Use a router with a guide jig to cut a clean, shallow channel (e.g., 1/4" wide by 1/4" deep) along the stringer. This will be your main wire raceway.
- Connect the Treads: For each step, you will need to cut a smaller connecting groove from the tread’s light position to the main raceway on the stringer.
- Lay and Conceal: Place all the low-voltage wires in the grooves. You can then conceal the channel. On a painted stringer, you can fill the groove with wood filler, sand it smooth, and paint over it. For a stained wood stringer, the best method is to inlay a matching thin strip of wood over the groove.
-
Power Supply Location6: In all cases, the main power supply (the driver that converts 120V AC to 24V DC) must be in an accessible location for future service, not sealed behind a wall. A nearby closet, the basement utility room, or an access panel under the stairs are all excellent choices.
How Can You Make the Stair Lights Smart and Automated?
The client has their new stair lights, but they have to remember to flip a switch at the top and bottom of the stairs. It feels dated. They want a "wow" factor that is seamless and automatic.
Install smart motion sensors at the top and bottom of the staircase. This allows the lights to turn on automatically when someone approaches, light their way, and then turn off after a set time. This provides the ultimate in convenience, safety, and energy efficiency.
The most advanced systems use a special multi-channel controller that works with motion sensors. The effect is incredible. When you approach the bottom step, the controller triggers the first step to light up, then the second, then the third, creating a "cascade" of light that flows up the stairs ahead of you. When you reach the top, the lights hold for a minute and then fade out in the same sequence. It feels like something out of a futuristic movie. This is a huge upsell opportunity for a contractor like Tom. It takes the project from a simple lighting installation to a truly smart and interactive home feature. While it requires a more complex controller, the dramatic effect and added convenience make it a highly desirable a premium feature.
From a Simple Switch to a Smart System
Automating the lights is what elevates the project from good to great.
-
Level 1: Standard Switches: The most basic setup. Place 3-way switches at the top and bottom of the stairs, so the lights can be controlled from either end. This is reliable and familiar to all users. A dimmer should be included to allow the client to set the perfect brightness level.
-
Level 2: Motion Sensors (On/Off)7: This is the most popular upgrade.
- How it Works: Two low-voltage Passive Infrared (PIR) motion sensors are installed, one aimed at the approach to the top step and one at the bottom. These are wired to a smart controller or a relay connected to the power supply.
- Function: When either sensor detects motion, it triggers the controller to turn on all the stair lights simultaneously. After a pre-set time with no motion (e.g., 60 seconds), the lights turn off.
- Benefit: This is hands-free, safe, and saves energy. No one has to remember to turn the lights off.
-
Level 3: Sequential Cascade Controller8: The ultimate "wow" effect.
- How it Works: This requires a dedicated, multi-channel stair lighting controller. Each individual step’s light strip is wired back to its own channel on the controller. The motion sensors are also wired to the controller.
- Function: When the bottom sensor is triggered, the controller activates channel 1, then channel 2, and so on, creating the cascading "on" effect. It does the reverse when triggered from the top. It can also be programmed to cascade "off."
- Benefit: This provides an unparalleled level of customisation and high-tech luxury. Speed, brightness, and timing can all be adjusted. It is the pinnacle of smart stair lighting.
Conclusion
Staircase lighting is the perfect fusion of form and function. It solves a real safety problem with an elegant, architectural solution. By planning your installation carefully, you can deliver a high-impact feature that dramatically improves your client’s home and your bottom line.
-
Explore this link to discover top-rated LED strips that enhance staircase safety and aesthetics. ↩
-
Discover why this popular method is favored for safety and visibility on staircases. ↩ ↩
-
Find out how this method can create a subtle yet effective lighting solution for your stairs. ↩
-
Learn the best practices for a sleek handrail installation that elevates your staircase design. ↩
-
Explore this link to learn effective techniques and tips for implementing invisible wiring in your home lighting projects. ↩
-
This resource will guide you on optimal power supply placement for safety and accessibility in your electrical installations. ↩
-
Explore how motion sensors enhance safety and energy efficiency in lighting systems. ↩
-
Learn about the advanced features of sequential cascade controllers for a luxurious lighting experience. ↩


