You’ve sold a client on a beautiful lighting design, but the final installation looks messy. Wires are visible, connections are failing, and the lights are flickering. A botched installation can ruin a perfect product and destroy your reputation.
A professional installation is about clean preparation and secure connections. Meticulously clean all surfaces, use aluminum channels for heat sinking and diffusion, and favor soldering over solderless connectors for maximum long-term reliability.
I get calls all the time, not just from my direct clients like lighting designers and distributors, but from their clients—the installers in the field. One electrician called me in a panic. He was on a high-end residential job and was having trouble with some solderless connectors he bought online. The connection would work on his test bench, but once he installed the strip under a cabinet, it would flicker or fail. He had already wasted half a day. I explained that the tiny pins in those connectors don’t always make perfect contact, especially after the strip is handled and flexed. I walked him through the process of soldering a simple lead wire—a skill he hadn’t used in years. It took him 10 minutes to learn, and the connection was permanent and perfect. He finished the job that day and never looked back. This guide contains that advice and more. It’s the installation playbook that separates the amateurs from the pros and ensures your work will last for years.
How Do You Prepare the Surface for a Secure Bond?
The LED strip looks great for the first week, but then it starts to peel away from the surface, especially in a kitchen or a high-heat area. The adhesive fails, the strip sags, and the whole job looks unprofessional.
Adhesive failure is almost always due to improper surface preparation. The bond is only as strong as the surface is clean. Vigorously clean the surface with isopropyl alcohol to remove all dust, grease, and residue. For difficult surfaces like wood or textured paint, use a channel.

An installer who works with one of my distributors in North America called me about a frustrating problem. He was installing under-cabinet lighting in dozens of newly built apartments. On about 20% of the installations, he would get a call back a month later because the strips were falling down. He was using our strips with authentic 3M adhesive, so he couldn’t understand the problem. I asked him about his process. He said, "I just wipe the bottom of the cabinet with a dry rag and stick it on." I knew the issue immediately. New cabinets are often coated with a thin layer of finishing wax, grease from handling, or fine sawdust. A dry rag just smears this around. I told him to switch his process: give every surface a thorough wipe-down with isopropyl alcohol and a clean cloth until the cloth comes away perfectly clean. He was skeptical but tried it on the next building phase. He never had another callback for peeling strips. Preparation isn’t just a step; it’s the most important step.
The Blueprint for a Permanent Bond
The adhesive on the back of a quality LED strip is incredibly strong, but it needs a perfect surface to work.
- Inspect the Surface: Is it smooth, painted metal, or finished laminate? Or is it rough wood, porous concrete, or textured plaster? The texture determines the method.
- Clean, Clean, Clean: This is non-negotiable. Don’t use household cleaners, which can leave a film. Use a solvent that evaporates completely.
- Best: Isopropyl Alcohol (70% or higher)1. It’s cheap, effective, and safe on most surfaces.
- Good: Denatured Alcohol.
- Test the Surface: After cleaning, run a clean, dry finger over the area. Does it feel squeaky clean? If it still feels slick or dusty, clean it again.
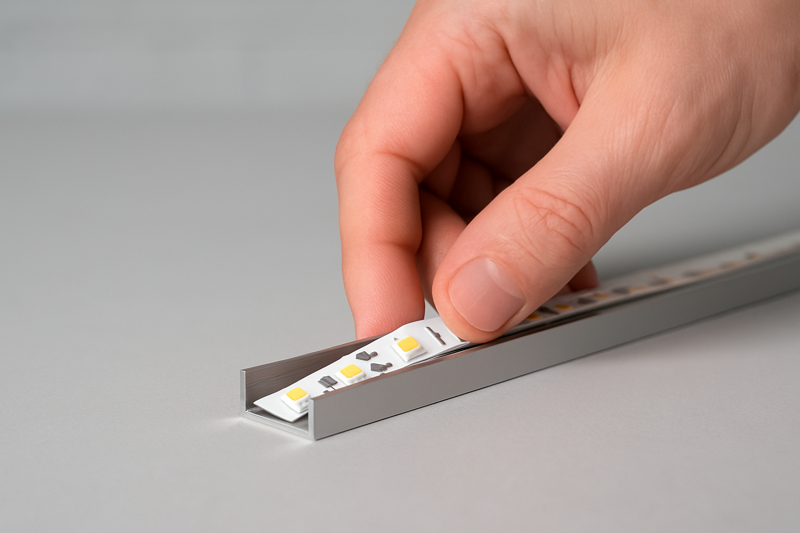
- The Channel is Your Best Friend: For difficult surfaces, stop fighting the adhesive.
- Porous/Rough Surfaces (Wood, Concrete): The adhesive has nothing to grab onto. Screw an aluminum channel2 into the surface first, then stick the strip inside the channel. The channel provides the ideal smooth surface.
- High-Heat Areas: Even the best adhesive can soften with heat. A channel acts as a heat sink, drawing heat away from the strip and the adhesive, keeping the bond secure.
Here’s your decision-making process for surface prep:
| Surface Type | Cleaning Method | Installation Method | Why It Matters for Installers |
|---|---|---|---|
| Smooth Metal/Plastic/Laminate | Isopropyl Alcohol Wipe | Direct application of strip to surface | Ensures the 3M adhesive performs as intended, preventing costly callbacks. |
| Painted Drywall | Isopropyl Alcohol Wipe | Direct application (if paint is clean and stable) | Avoids peeling paint, which is a common point of failure. |
| Unfinished Wood/Plywood | N/A | Mount in Aluminum Channel | Bypasses the impossible task of sticking to a porous, dusty surface. |
| Concrete/Brick | N/A | Mount in Aluminum Channel | Provides a secure, straight mounting point on an uneven, rough surface. |
Spending an extra 60 seconds on surface prep3 can save you hours of work fixing a failed installation later.
What Is the Most Reliable Way to Cut and Connect Strips?
You’re using solderless connectors to join strips at a corner or to add a power lead. The connection is finicky, flickers when touched, and some of the colors don’t work. This is the weakest link in your installation.
Soldering is the gold standard for all permanent LED strip connections. While solderless connectors are fast, they are prone to failure from vibration, expansion, and oxidation. Learning to make a simple soldered joint is the skill for creating a bulletproof installation.
I was visiting the workshop of a client who builds custom retail displays. His team was working against a deadline for a major brand, and they were getting frustrated. They were using RGBW strips and a series of solderless "clamp-style" connectors to make complex shapes. The lead installer showed me a finished display where the green channel wasn’t working on one segment. He wiggled the connector, and it flickered on and off. The tiny metal pins inside the plastic connector were just not making a solid connection with the copper pads on the strip. I asked for a soldering iron. In less than 30 seconds, I soldered the four wires directly to the pads. The connection was solid, permanent, and lower-profile. The manager saw this and immediately had his whole team switch to soldering. They finished the project without another connection failure. For a professional, the marginal time saved by a connector is not worth the risk of a callback.
Blueprint for Bulletproof Connections
Whether cutting to length or joining segments, precision and method matter.
- Cutting the Strip:
- Always cut directly on the marked cut line, straight down the middle of the copper pads. Use sharp scissors for a clean cut. A sloppy cut can damage the pads, making connection difficult.
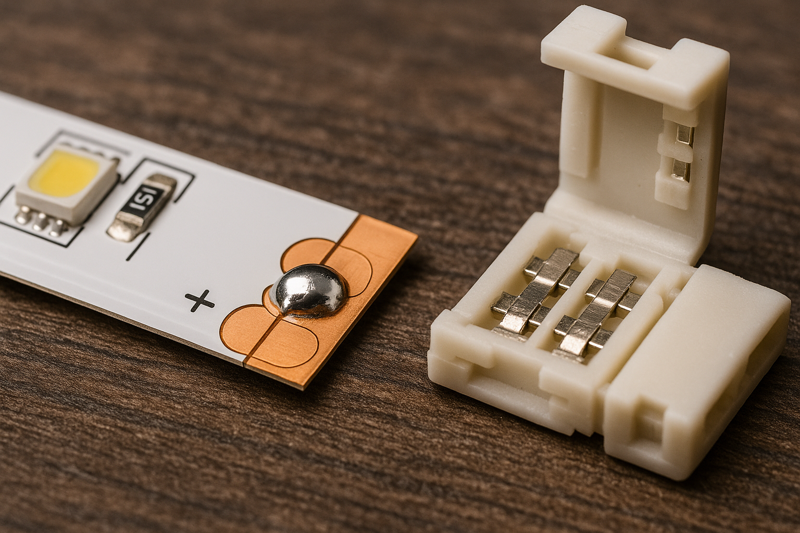
- Choosing Your Connection Method:
- Soldering (The Professional Choice)4: This creates a direct, fused electrical and mechanical bond. It is not affected by vibration and has the lowest electrical resistance. This is the required method for mission-critical, high-end, and outdoor installations.
- Solderless Connectors (The Pro-Am Choice)5: Best for DIY projects, temporary mockups, or situations where soldering is impossible. If you must use them, use high-quality ones and understand their limitations. They are a point of failure.
- How to Solder (The Basic Process):
- Prepare: "Tin" both the wire ends and the copper pads on the strip by applying a small amount of solder to each.
- Join: Hold the tinned wire onto the tinned pad and briefly touch the soldering iron to the joint. The solder will flow together instantly.
- Protect: Cover the finished joint with heat-shrink tubing to insulate it and provide strain relief.
Here is a comparison of connection methods:
| Feature | Solderless Connectors | Soldered Connections | Why Professionals Choose Soldering |
|---|---|---|---|
| Reliability | Low to Medium. Prone to flickering and failure over time. | High. A permanent, fused bond that does not degrade. | Eliminates the source of callbacks and intermittent faults. |
| Electrical Resistance6 | Medium. The physical contact can add resistance, causing slight dimming. | Very Low. The best possible electrical connection. | Ensures maximum brightness and color consistency, especially on RGB(W) strips. |
| Size / Profile | Bulky. Can be difficult to hide and may not fit in slim channels. | Low-Profile. The smallest possible connection, fits anywhere. | Allows for cleaner, more discreet installations inside tight architectural details. |
| Environmental Seal7 | Poor. Offers no protection from moisture or corrosion. | Excellent. When covered with heat-shrink, it is well-protected. | Essential for any installation in humid areas (bathrooms, outdoors). |
Investing a few hours to become proficient at soldering will pay dividends for the rest of your career. It elevates your work from amateur to professional.
How Do You Manage Wires and Power for a Clean Finish?
The LED strips look fantastic, but you have messy wires running everywhere to connect them to the power supply. The final look is cluttered and unfinished, ruining the sleek, minimalist effect you were aiming for.
Plan your wiring before you install. Hide power supplies in ventilated closets, cabinets, or ceiling voids. Run low-voltage wires inside walls before they are finished or use wire-hiding channels and raceways for a clean post-construction installation.
An interior designer I partner with was frustrated with the execution of his vision in a luxury condo. He had designed a beautiful floating bookshelf with a warm glow coming from each shelf. The concept was perfect, but the electrician who installed it just ran the exposed wires down the back of the bookshelf to a power supply sitting on the floor. It completely ruined the "floating" illusion. For the next project, we planned it differently from the start. We worked with the electrician to place a single, larger power supply in a nearby utility closet. Then, before the drywall was even up, he ran all the low-voltage wiring through the walls to the exact locations of the shelves. The result was magical—the shelves just glowed. There were no visible wires, no bulky power adapters. Proper wire management is the difference between a light fixture and integrated architectural lighting.
Blueprint for Invisible Wiring
A clean installation is a planned installation. Think about power and wiring from day one.
- Power Supply Location8: The power supply is the heart of the system. It needs to be accessible but hidden, and it needs ventilation.
- Ideal Locations: Utility closets, inside ventilated cabinetry (e.g., above kitchen cabinets), basement or attic joists, AV racks.
- Bad Locations: Sealed, unventilated boxes, buried in insulation, anywhere it can’t be reached for service.
- Running the Low-Voltage Wire9:
- Pre-Construction: This is the best time. Run appropriately-gauged, in-wall rated (CL2 or CL3) wire from the power supply location to the strip location. It’s easy and cheap when the walls are open.
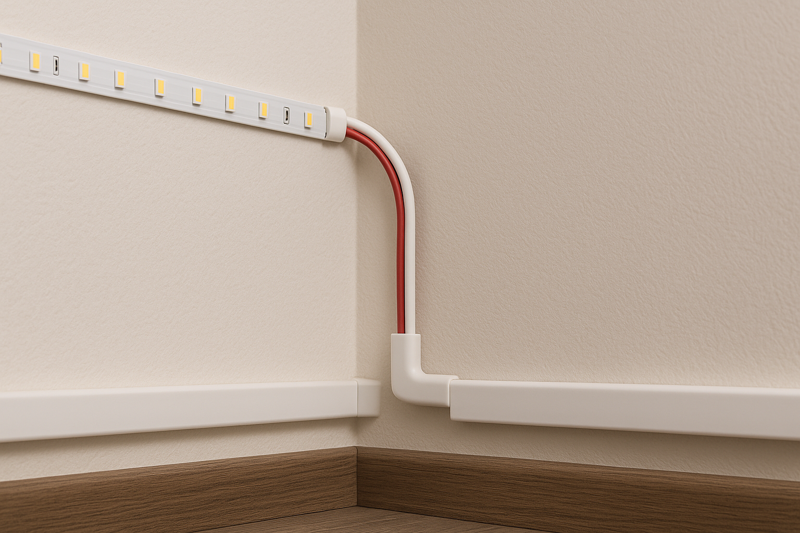
- Post-Construction: You need to hide the wire. Use surface-mounted wire channels (raceways) that can be painted to match the wall, run wire behind baseboards, or use furniture to conceal the run.
- Wire Gauge Matters (Voltage Drop)10: Don’t use thin, cheap speaker wire for long runs. Use a voltage drop calculator online to determine the correct AWG (American Wire Gauge) wire needed based on the strip’s wattage and the length of the run. Using wire that’s too thin will cause the strip to be dim.
Plan your power strategy:
| Installation Stage | Wiring Strategy | Key Tools & Materials | Benefit to the Installer |
|---|---|---|---|
| New Construction / Remodel | Run wires inside walls before drywall. | In-wall rated low-voltage wire (e.g., CL2 18/2). | The cleanest possible result. Minimal labor and zero visible wires. |
| Post-Construction (Surface)11 | Use adhesive-backed or screw-in wire raceways. | Raceways, corner ducts, quarter-round molding. | A fast and clean way to hide wires on existing surfaces. |
| Inside Cabinetry | Drill small holes and run wires along interior corners. | Drill, wire staples, zip ties. | Keeps wires for under-cabinet or in-cabinet lighting completely out of sight. |
| Connecting to Power Supply | Use a proper terminal block or wire nuts inside a junction box. | Junction box, terminal blocks. | Ensures a safe, code-compliant, and serviceable high-voltage connection. |
Thinking like an electrician and a finisher, not just a strip installer, is the key to creating a truly professional look.
Conclusion
A successful LED strip installation is a craft. It depends on meticulous surface prep, reliable soldered connections, and thoughtful wire management. Master these three areas, and your work will look professional and last for years.
-
Discover why Isopropyl Alcohol is the top choice for surface cleaning and how it ensures a strong adhesive bond. ↩
-
Learn how using an aluminum channel can enhance your LED strip installation, ensuring durability and effectiveness. ↩
-
Understand the critical role of surface preparation in achieving successful adhesive applications and preventing failures. ↩
-
Explore the advantages of soldering for reliable and long-lasting electrical connections, especially in critical installations. ↩
-
Learn about the best scenarios for using solderless connectors and their limitations in DIY projects. ↩
-
Understand the impact of electrical resistance on performance and how to achieve optimal connections. ↩
-
Discover the significance of environmental sealing for protecting connections from moisture and corrosion. ↩
-
Understanding optimal power supply locations can enhance your installation’s efficiency and safety. ↩
-
Learn effective techniques for running low-voltage wire to ensure a clean and efficient installation. ↩
-
Discover the importance of wire gauge to prevent issues like voltage drop and ensure optimal performance. ↩
-
Explore innovative solutions for concealing wires after construction for a neat and professional finish. ↩


