You’re staring at spec sheets for dozens of LED strips, and they all start to blur together. Picking the wrong one means a failed project, an unhappy client, and wasted money. You need clarity, not more options.
First, define the application’s goal: ambient, task, or accent lighting. Then, match the key specifications—brightness (lumens), color quality (CRI), and voltage (24V is best for long runs)—to that specific goal. This turns an overwhelming choice into a logical process.

I get emails every week from experienced people—lighting designers, contractors, project managers—all asking what seems like a simple question: "Which LED strip should I use?" But the answer is never simple, because the question is incomplete. It’s like asking a car dealer, "Which car should I buy?" Well, are you hauling lumber or driving in a city? The best product is only "the best" in the right context. I once had a client, an architect, who bought thousands of meters of a very bright, cool white LED strip for a hotel lobby. He thought brighter was better. But the result was a space that felt cold and clinical, like a hospital, not warm and welcoming. They had the right quality, but the wrong application. This guide is designed to prevent that mistake. It will walk you through the key decisions in the right order, so you can specify the perfect strip for your project with confidence every time.
Should You Use Single-Color or Color-Changing Strips?
Your project needs lighting, but you’re stuck on the most basic choice. Do you provide the simple elegance of white light, or the dynamic versatility of color-changing RGB? Choosing the wrong one can ruin the intended mood of the space.
Use single-color white strips for 90% of architectural and ambient lighting to create a specific, consistent mood. Use RGB/W or pixel strips for dynamic, attention-grabbing applications like bars, entertainment venues, or branding accents.
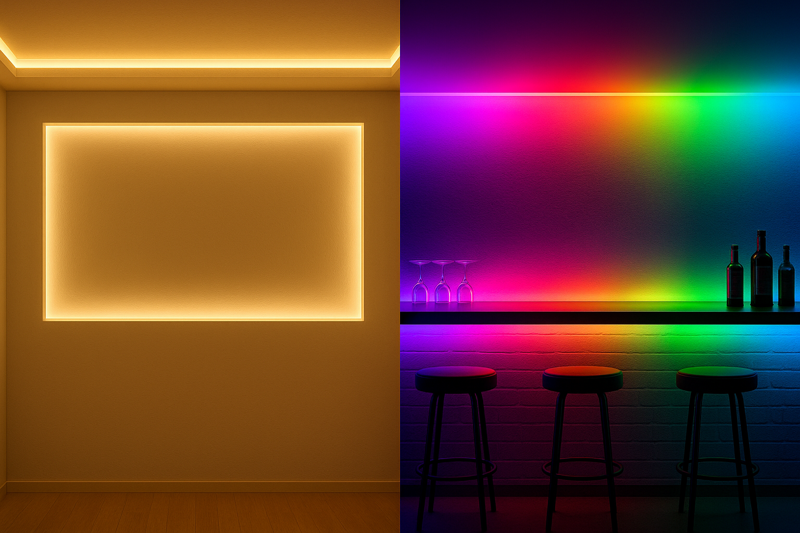
I was working with a restaurant designer on a new project. She was designing a large space with a dining area and a separate bar. For the main dining area, she was clear: "I need warm, inviting light, like candlelight. It needs to be consistent, dimmable, and make the food and people look good." The choice was easy: a high-CRI, 2700K single-color white strip. It delivered the exact sophisticated ambiance she wanted. But for the bar area, she wanted energy and excitement. "This is where the night comes alive," she said. "I want to be able to change the color for holidays or special events." For that, we chose an RGBW addressable pixel strip. It gave her the ability to create slow color fades, energetic chases, or even just a static vibrant blue. By using two different types of strips, she matched the lighting to the function of each space perfectly. The project was a huge success because she didn’t try to make one product do everything.
The Purpose of White Light
Single-color white LED strips are the workhorse of the professional lighting world. Their job is to create a specific atmosphere and provide functional light. The primary decision here is choosing the right Correlated Color Temperature (CCT)1.
- Warm White (2700K – 3000K): This is the color of traditional incandescent bulbs. It’s calming, inviting, and intimate. It is the standard for residential spaces, high-end restaurants, and hotel lobbies where comfort is key.
- Neutral White (3500K – 4000K): This light is more balanced and clean. It’s excellent for office spaces, retail stores, and kitchens where you need good visibility without the harshness of cool white. It feels modern and professional.
- Cool White (5000K – 6500K): This is a very bright, crisp, blue-tinted light that mimics daylight. It’s ideal for task-heavy environments like workshops, garages, hospitals, and warehouses where maximum alertness and visibility are the main goals.
The Power of Dynamic Color
Color-changing strips (RGB, RGBW) are for creating visual interest and dynamic effects. "W" in RGBW stands for a dedicated white chip, which is crucial for when you need a decent quality white light from a color strip.
- RGB: Good for creating saturated, vibrant colors. However, they create "white" by mixing red, green, and blue, which often results in a poor-quality, purplish-tinted white.
- RGBW: The superior choice. It has all the color-changing ability of RGB, plus a dedicated white LED (e.g., 3000K). This allows you to create both vibrant colors and a high-quality functional white light from the same strip.
- Addressable (Pixel) aRGB/RGBW: As discussed in previous posts, this is for creating dynamic flowing and chasing effects. This is a specialty product for high-impact feature lighting.
Here’s how to decide:
| Lighting Goal | Recommended Strip Type | Why? | Typical Application |
|---|---|---|---|
| Primary Ambient Lighting | Single-Color White | Provides a consistent, high-quality atmosphere. More cost-effective. | Living rooms, hallways, hotel lobbies, coves. |
| Primary Task Lighting2 | Single-Color White | Delivers the brightest, cleanest light for visibility. | Under cabinets, workshops, offices. |
| Dynamic Feature Lighting3 | RGBW / Addressable RGBW4 | Offers versatility for branding, events, and entertainment. | Bars, nightclubs, media rooms, building facades. |
| Accent & Mood Lighting | Both can work | White can create sophisticated accents; RGB can add drama. | Highlighting art, backlighting screens. |
For a professional, single-color strips will likely make up the bulk of your orders. They are the foundation of good lighting design. RGB/W strips are the powerful accent pieces you use to make a statement.
How Do Brightness and LED Density Affect Your Lighting Design?
You installed an LED strip in a large cove, but the light is dim and you can see ugly "dots" of light instead of a smooth glow. The client is unhappy, and now you have to fix it.
Brightness, measured in lumens per meter/foot, determines the light’s intensity. LED density, the number of LEDs per meter, determines the smoothness of the light. For smooth, dot-free architectural lighting, choose a high-density strip (120+ LEDs/m) and use a diffused channel.
I remember a call from a contractor in a panic. He had installed hundreds of feet of LED strips for a cove lighting project in a luxury home. He bought the strips based on price, choosing a standard 60 LEDs/meter strip. When he turned it on, the effect was terrible. Instead of an elegant, indirect glow filling the room, they saw 60 distinct dots of light reflected on the ceiling above the cove. It looked cheap and amateurish. He had under-specified the product. I explained that for indirect lighting where the strip’s reflection is visible, high density is key. We sent him a sample of our 240 LEDs/meter strip. He tested it in the same cove, and the difference was night and day. It created a beautifully smooth, continuous line of light. He had to replace the entire job, a costly lesson in the importance of LED density.
Lumens: Specifying Total Light Output
Brightness is the most fundamental specification after color. It’s not measured in Watts, but in Lumens5.
- Low Output (300-600 lumens/meter): This is for subtle accent lighting. Think of small decorative features, shelf lighting where you don’t want to overwhelm the objects, or gentle toe-kick lighting.
- Medium Output (800-1200 lumens/meter): This is the sweet spot for most ambient and cove lighting applications. It’s bright enough to contribute significantly to a room’s overall light level without being harsh or overpowering.
- High Output (1500-2500+ lumens/meter)6: This is for task lighting or spaces with very high ceilings. Use this for under-cabinet lighting in kitchens, workshop lighting, or when you need to indirectly light a very large room. High-output strips often require aluminum channels to help dissipate heat.
LED Density7: The Key to Smoothness
The number of LEDs per meter directly impacts the visual quality of the light.
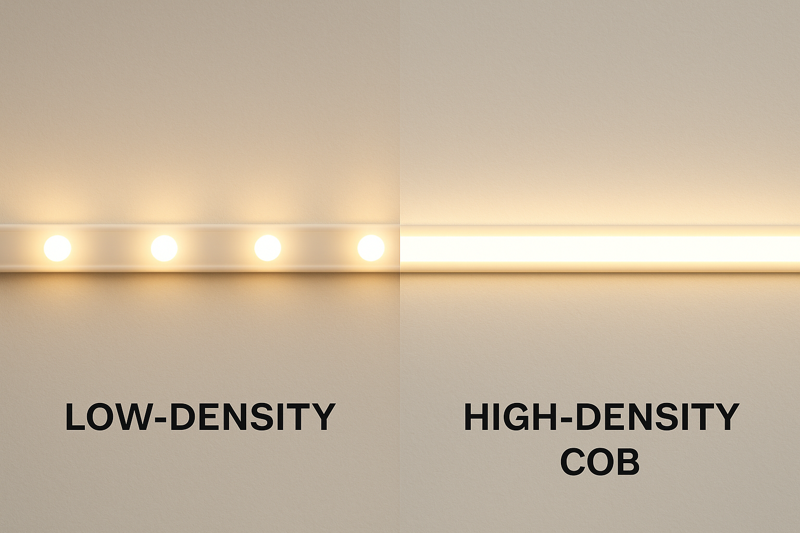
- Low Density (30-60 LEDs/m): These are entry-level strips. The large gap between LEDs creates visible "hot spots" or "dotting." They are only acceptable if the strip itself is completely hidden from view and is lighting a surface from a distance.
- High Density (120-240 LEDs/m): The smaller gap between LEDs helps the light blend together, creating a much smoother line of light. This is the professional standard for most architectural applications, especially when used inside a channel with a frosted diffuser.
- COB (Chip on Board) Strips8: This is the latest technology. COB strips have no visible dots at all. They use tiny LEDs bonded directly to the PCB and covered in a continuous line of phosphor, creating a completely seamless line of light even without a diffuser. They are the ultimate choice for applications where the light source itself is visible or is reflecting off a nearby glossy surface.
Here’s a guide for matching density to application:
| Application | Recommended Density | Why? |
|---|---|---|
| Indirect Cove Lighting | 120+ LEDs/m or COB | Prevents "dotting" reflection on the ceiling. |
| Under-Cabinet Task Lighting | 120+ LEDs/m or COB | Provides even, smooth light on the countertop, avoiding spots. |
| Exposed Linear Lighting | COB Strips ONLY | COB is the only technology that looks like a clean, finished fixture. |
| Hidden Accent Lighting | 60 LEDs/m may be acceptable | If the strip is fully hidden and backlighting a feature, dots may not be visible. |
For a quality-sensitive buyer like Tom, understanding and specifying the right density is a simple way to guarantee a high-end result and avoid client complaints.
When Should You Choose 24V Strips Over 12V?
You’ve installed a long 40-foot run of 12V LED strips, but the end of the strip is noticeably dimmer and has a yellowish tint. Your client points it out, and the flawless installation now looks defective.
Always choose 24V LED strips for any run longer than 5 meters (16 feet). 24V systems suffer from significantly less voltage drop, allowing for longer runs, more consistent brightness, and the use of smaller, less expensive wiring.
This is one of the most common technical support questions I get, and the answer is always the same. A hotel project manager called me, frustrated. He had purchased 12V strips from another supplier for the hallways of a new hotel, which required 15-meter continuous runs. His installers powered each run from one end, and the result was a disaster. The first few meters were bright white, but by the end, they were a dim, muddy yellow. His supplier told him he had to run new power wires to the strip every 4 meters, which meant tripling his wiring and labor costs. I explained that if he had started with a 24V strip, he could have likely gotten away with a single power injection in the middle of the run. For his next project, he ordered only 24V strips from us. He later told me it saved him thousands of dollars in copper wire and labor hours.
The Science of Voltage Drop
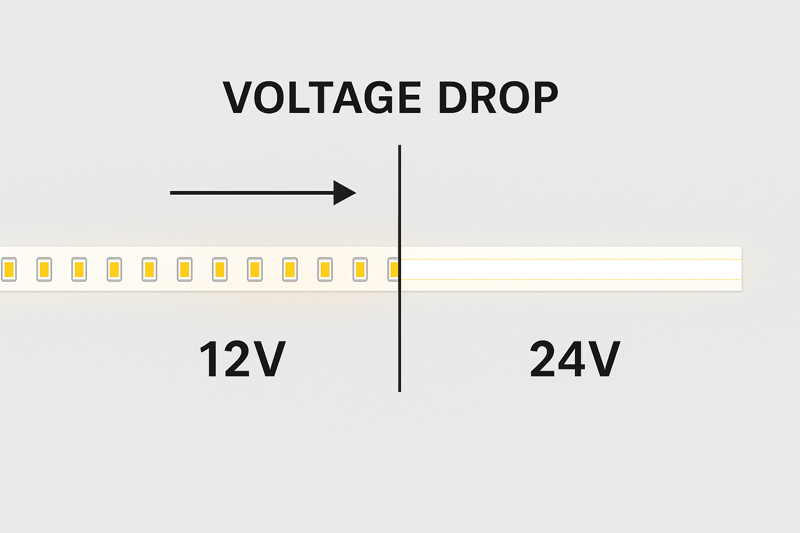
Voltage drop is a law of physics. As electricity travels along a conductor (the copper on the LED strip), it loses energy, causing the voltage to decrease.
- *Ohm’s Law (P=VI):** Power (Watts) = Voltage (Volts) x Current (Amps). For a strip with the same power output, a 24V system will draw only half the current of a 12V system.
- Voltage Drop is Proportional to Current9: The higher the current, the greater the voltage drop. Since 24V systems run at half the current, they experience much less voltage drop over the same distance.
This has two visible effects:
- Dimming10: As voltage drops, the LEDs receive less power and become dimmer.
- Color Shift: In a white LED, the blue diode requires the most voltage to operate. As voltage drops, the blue diode’s output falls off faster than the red and green, causing the white light to shift to a warmer, yellowish color.
The Professional’s Choice: 24V as the Default
For any serious commercial or architectural project, 24V should be your default choice. The benefits are overwhelming.
| Feature | 12V DC System | 24V DC System | Advantage for Professionals |
|---|---|---|---|
| Max Run Length (before injection) | ~5 meters (16 ft) | ~10 meters (32 ft) | Fewer power supply connections, less labor. |
| Current (Amps) | Double (e.g., 8A) | Half (e.g., 4A) | Allows for thinner, cheaper wiring. Less heat on connectors. |
| Brightness Consistency11 | Poor on long runs. | Excellent on long runs. | Delivers a consistent, professional look without dim ends. |
| Power Supply Size12 | Requires larger (higher amperage) power supplies for the same wattage. | Can use smaller (lower amperage) power supplies. | More flexibility in hiding smaller power units. |
| Cutting Segments | Shorter (e.g., every 2.5cm) | Longer (e.g., every 5cm) | 12V offers slightly more precision for cutting to length. |
The only minor advantage of 12V strips is that they often have shorter cut-points, which can be useful for very precise applications like custom sign fabrication. However, for 99% of architectural lighting (coves, hallways, facades), the superior performance of 24V makes it the clear professional standard. Choosing 24V simplifies installation, lowers wiring costs, and ensures a better final result.
Why is High CRI Crucial for Professional Lighting Projects?
You’ve lit a high-end retail store with standard LED strips. The white light looks fine, but the colorful merchandise—the rich red fabrics, the vibrant blue jeans—looks dull and lifeless under the light. Sales are suffering.
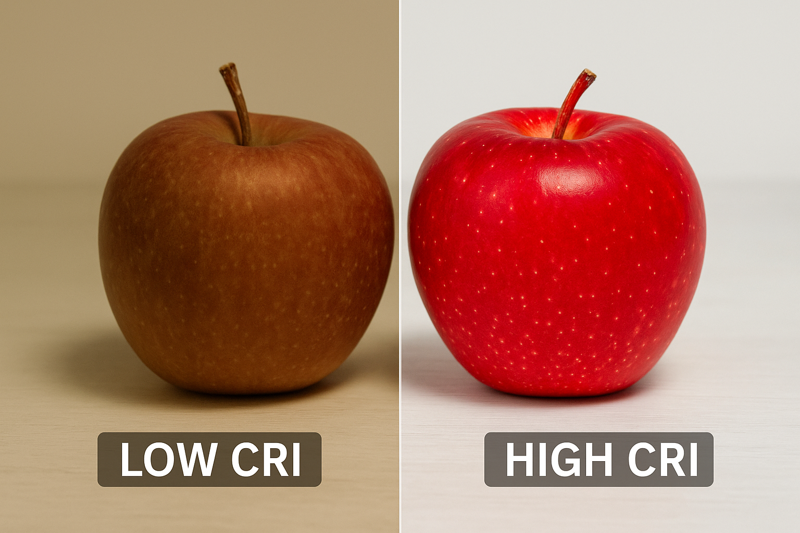
Color Rendering Index (CRI) measures a light’s ability to reveal the true colors of objects. For any project where color accuracy matters—retail, art galleries, high-end homes—you must use high-CRI (90+) strips to ensure products and environments look their best.
I work with a lot of OEM clients who build finished lighting fixtures for retail brands. One of them was creating a fixture for a luxury cosmetics company. During the prototyping phase, they used a standard 80 CRI LED strip because it was cheaper. When they presented the fixture, the cosmetics company rejected it immediately. The foundation makeup looked pale and unnatural, and the lipstick shades all looked slightly "off." The light was literally making their products look bad. We provided them with our 95+ CRI strips with a high R9 value (for rendering reds). They rebuilt the prototype. Under the new light, the colors were perfect—vibrant, accurate, and appealing. They won the contract. The small extra cost for high-CRI lighting made the difference between winning and losing a huge deal. It’s a detail that professional clients will notice and pay for.
What is CRI and Why Does it Matter?
Sunlight has a perfect CRI of 100. It contains a full spectrum of color. Cheaper LED lights often have "spikes" in their spectrum, meaning they are missing certain shades of color. CRI measures how much of the spectrum is missing.
- Low CRI (70-80): This is basic, functional light. Colors may appear washed out or have their hue shifted. Fine for a garage or storage area, but unacceptable for most commercial and residential spaces.
- Good CRI (80-90): This is the industry standard for most mid-range commercial lighting. It’s a significant improvement, and most colors will look good.
- High CRI (90+): This is professional-grade lighting. Colors appear rich, saturated, and true-to-life, almost as they would in natural daylight. This is essential for any color-critical application.
R9: The Secret to Great Reds
Within the CRI score is a specific value called R9, which measures how well a light source renders deep, saturated reds. This is critically important for many applications:
- Retail: Makes clothing, produce, and packaging look more appealing.
- Restaurants: Enhances the appearance of food, especially meats and vegetables.
- Healthcare: Allows for accurate assessment of skin tones.
- Residential: Makes wood tones and skin tones look warm and healthy.
Many manufacturers will claim a "90 CRI" strip but have a very low or even negative R9 value. Always ask for the R9 score when color quality is a priority.
Here’s where CRI is mission-critical:
| Application | Required CRI | Why? |
|---|---|---|
| Retail Stores (Apparel, Food) | CRI 90+, High R9 | True product colors drive sales. |
| Art Galleries & Museums | CRI 95+ | Must render the artist’s intended colors without degradation. |
| High-End Residential | CRI 90+ | Makes interiors, finishes, and people look their best. |
| Photography/Videography Studios | CRI 95+ | Accurate color is a technical requirement for production. |
| Warehouses & Parking Garages | CRI 70-80 | Color accuracy is not the primary goal; efficiency and cost are. |
For a buyer like Tom, offering high-CRI lighting is a major competitive advantage. It shows a commitment to quality that goes beyond just brightness and allows him to sell a premium product to discerning clients who understand that good light is a crucial investment.
Conclusion
Choosing the right LED strip isn’t about finding the "best" one, it’s about a methodical process: define the mood with color, specify the output with lumens and density, ensure reliability with 24V, and guarantee quality with high CRI.
-
Understanding CCT is essential for choosing the right lighting for your space, ensuring comfort and functionality. ↩
-
Discover the significance of primary task lighting for visibility and productivity in workspaces and other environments. ↩
-
Learn how dynamic feature lighting can enhance branding and create stunning visual effects in various settings. ↩
-
Explore the advantages of RGBW strips for versatile lighting solutions that combine vibrant colors with high-quality white light. ↩
-
Understanding Lumens is crucial for selecting the right lighting for your space, ensuring optimal brightness without harshness. ↩
-
Discover when to use High Output lighting for effective task illumination in large spaces or high ceilings. ↩
-
Exploring LED Density helps you choose the best lighting for your needs, ensuring a smooth and professional appearance. ↩
-
Learn about COB technology to achieve seamless lighting solutions that enhance aesthetics in any application. ↩
-
Understanding this relationship is crucial for optimizing electrical systems and ensuring efficiency. ↩
-
Explore how voltage drop affects LED performance and learn to mitigate dimming issues in your projects. ↩
-
Discover the importance of voltage in maintaining consistent brightness for professional lighting applications. ↩
-
Learn how smaller power supplies can enhance flexibility and efficiency in your lighting designs. ↩


