Ever wondered about the magic behind those sleek, vibrant outdoor LED strip lights illuminating modern landscapes and buildings? The technology might seem complex, but understanding the basics is surprisingly straightforward and essential for any lighting project.
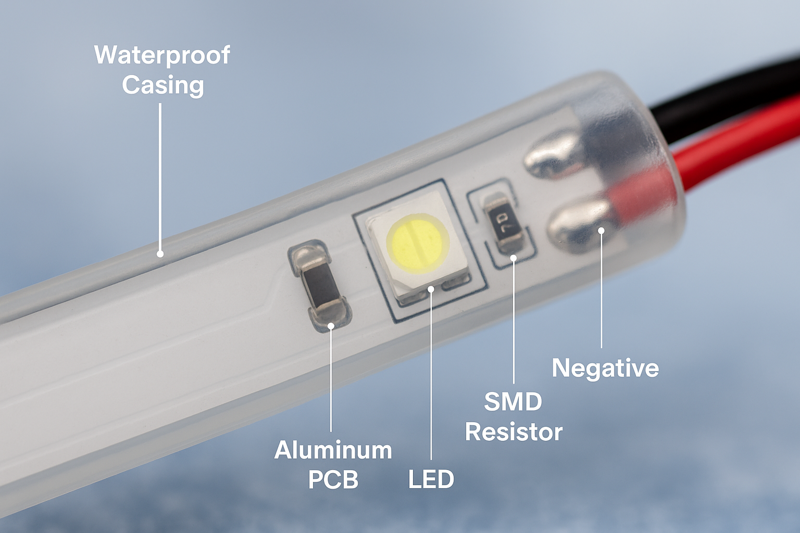
Outdoor LED strip lights work by passing a low-voltage electrical current through tiny semiconductor chips called Light Emitting Diodes (LEDs). These LEDs are mounted on a flexible printed circuit board (PCB) and then encased in a durable, weatherproof material to protect them from the elements.
As the owner of Rhlite, a factory specializing in LED strip solutions, I often talk with clients like Tom, who are lighting designers, contractors, or OEM buyers. They know the aesthetic and practical benefits of outdoor LED strips, but sometimes the "how they work" part, especially the technology that makes them suitable for harsh outdoor conditions, is a bit of a black box. Knowing the fundamentals helps in selecting the right product, ensuring longevity, and even troubleshooting. Let’s break it down.
What Are the Core Components Inside an Outdoor LED Strip Light?
Puzzled by what makes up the slim profile of an LED strip, yet allows it to produce brilliant light? It seems like there’s not much there, but each part plays a vital role in its performance and reliability.
The core components are the Light Emitting Diodes (LEDs) that produce light, a Flexible Printed Circuit Board (PCB) that carries power and mounts the LEDs, and current-limiting resistors to protect the LEDs.
When you look at an LED strip, it appears deceptively simple. But inside that slender band, several key components work together. Understanding these parts is crucial, especially for my B2B clients who, like Tom, are sourcing products for projects or for rebranding. The quality of these individual components directly impacts the overall performance, lifespan, and color consistency of the final LED strip light – something we at Rhlite take very seriously in our manufacturing process.
The Light Emitting Diodes (LEDs) – The Stars of the Show
At the very heart of any LED strip are the LEDs themselves. These are tiny semiconductor devices. When a suitable low voltage (typically 12V or 24V DC for strips) is applied, electrons within the semiconductor material release energy in the form of photons – and that’s the light we see!
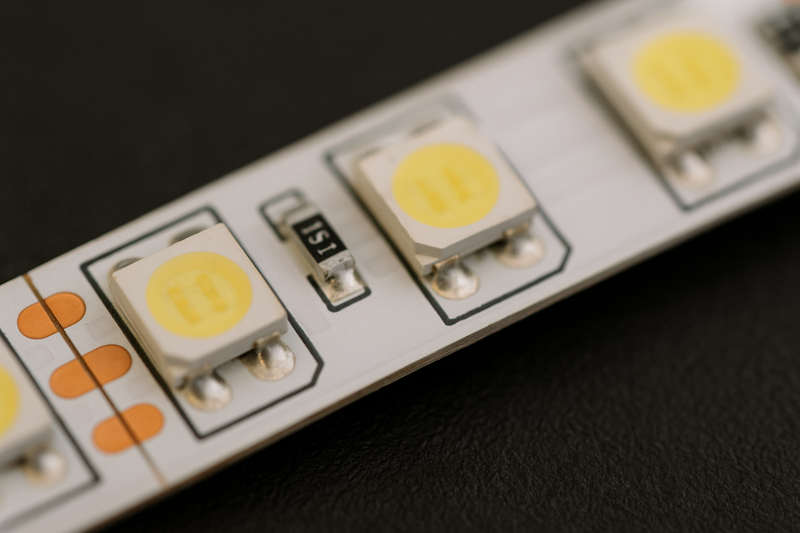
- SMD Chips: Most LED strips use Surface Mount Device (SMD) LEDs. You’ll often see numbers like "SMD 50501" or "SMD 2835." These numbers refer to the physical size of the LED chip (e.g., 5050 is 5.0mm x 5.0mm). Different chip sizes and types offer varying brightness levels (lumens) and light distribution characteristics.
- Color & CCT: LEDs can be manufactured to produce specific colors (like red, green, blue for RGB strips) or various shades of white, defined by Correlated Color Temperature (CCT)2, from warm white (e.g., 2700K) to cool white (e.g., 6500K).
- CRI: The Color Rendering Index (CRI)3 indicates how accurately the light reveals the true colors of objects. For applications where color accuracy is important, a high CRI (90+) is desirable.
The Flexible Printed Circuit Board (PCB) – The Backbone
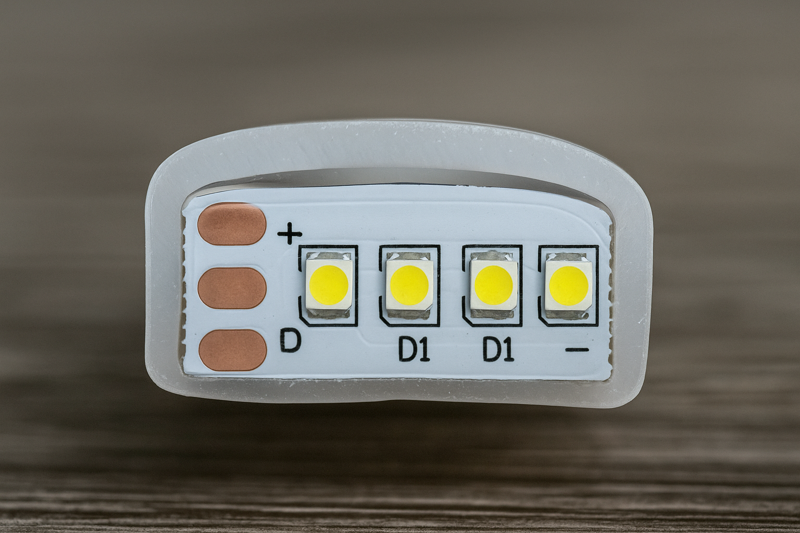
The LEDs are not just floating in space; they are mounted onto a Flexible Printed Circuit Board (PCB).
- Conductive Pathways: The PCB has copper tracks that conduct electricity from the power source to each LED segment. The thickness of this copper (measured in ounces, e.g., 2oz or 3oz) is important. Thicker copper can handle more current and helps dissipate heat better, contributing to the strip’s longevity.
- Flexibility: The "F" in FPCB allows the strip to bend and conform to curves, which is a major advantage over rigid lighting solutions.
- Cut Points: PCBs are designed with designated cut marks, usually every 3 or 6 LEDs. This allows users to shorten the strip to the exact length needed for their installation.
Resistors – The Unsung Heroes
You’ll also see small resistors mounted on the PCB, typically one for each segment of LEDs.
- Current Regulation: LEDs are sensitive to overcurrent. Resistors are crucial for limiting the electrical current flowing through each LED segment, preventing them from burning out prematurely.
- Voltage Drop Management: In longer runs, voltage can drop. Resistors help ensure each LED segment receives the appropriate operating current despite minor voltage variations.
I often explain to clients that skimping on the quality of the PCB copper or using undersized resistors can lead to premature failures or inconsistent brightness along the strip. This is why our factory quality control at Rhlite includes verifying these critical component specifications.
| Component | Primary Function | Key Considerations for Outdoor Use | Impact on Performance & Reliability |
|---|---|---|---|
| LEDs (SMD Chips) | Light generation | Brightness (lumens), CCT, CRI, chip brand, LM-80 data | Light quality, lifespan, efficiency |
| PCB (Flexible) | Mounts components, conducts power, allows flexibility | Copper thickness (e.g., 2oz, 3oz), flexibility, layout | Heat dissipation, durability, current handling |
| Resistors | Limits current to LEDs | Proper sizing, quality | LED protection, lifespan consistency |
| Outer Casing | (Covered next) Weather protection | Material (Silicone/PU), IP rating | Outdoor durability, safety |
Understanding these internal parts helps appreciate why not all LED strips are created equal, especially when destined for challenging outdoor environments.
How Is Weatherproofing Achieved for Outdoor Use?
Wondering how delicate electronics like LEDs survive rain, dust, and temperature swings outdoors? Standard indoor LED strips would fail quickly if exposed to the elements. The secret lies in specialized protective measures.
Weatherproofing for outdoor LED strip lights is achieved by completely encapsulating the LED strip (LEDs, PCB, resistors) in a durable, UV-resistant material like silicone or polyurethane (PU), earning it an Ingress Protection (IP) rating (e.g., IP65, IP67, IP68).
This is perhaps the most critical differentiator for outdoor LED strip lights. Without robust weatherproofing, moisture ingress, dust accumulation, and UV degradation would quickly lead to failures. For clients like Tom, who might be specifying lights for projects in varying climates, from humid Singapore to snowy North America, understanding the different weatherproofing methods and IP ratings is essential. At Rhlite, we offer various IP-rated outdoor LED strips, and the method of protection is a key part of their design and manufacturing.
Understanding IP Ratings (Ingress Protection)
IP ratings consist of two digits:
- First Digit (Solid Particle Protection): Ranges from 0 (no protection) to 6 (dust-tight). For outdoor use, you’ll typically want a 6.
- Second Digit (Liquid Ingress Protection): Ranges from 0 (no protection) to 9 (high-pressure, high-temperature water jets). Common ratings for outdoor strips are:
- IP65: Protected against water jets from any direction. Suitable for areas that might get splashed or rained on but not submerged.
- IP67: Protected against temporary immersion in water (up to 1 meter for 30 minutes). Excellent for most outdoor applications, including ground-level installations.
- IP68: Protected against continuous immersion in water under specified conditions (depth and duration defined by the manufacturer). Ideal for underwater use in pools, ponds, or very wet environments.
Common Weatherproofing Methods and Materials
Several methods are used to achieve these IP ratings:
- Silicone Coating/Sleeve: A clear silicone coating is applied over the top of the strip, or the strip is inserted into a silicone sleeve. This typically achieves an IP65 rating. It offers good flexibility but might not be suitable for prolonged direct water exposure.
- Silicone Extrusion: The LED strip is fully encased by extruding silicone around it, forming a solid, seamless protective layer. This method often achieves an IP67 rating and offers better durability and UV resistance.
- Polyurethane (PU) Potting/Filling: The LED strip is placed in a channel or mold, and liquid polyurethane is poured over it, then cured. PU offers excellent water resistance, clarity, and UV stability, often used for IP67 and IP68 ratings. It tends to be more rigid than silicone extrusion.
- Silicone Injection Molding: For specific sections or end caps, silicone injection molding can provide a precise and robust seal.
Why Material Quality Matters for Longevity
The quality of the encapsulating material is just as important as the method.
- UV Resistance4: Outdoor strips are constantly exposed to sunlight. Low-quality silicone or PU can yellow, crack, or become brittle over time when exposed to UV radiation, compromising the weather seal and aesthetics. We specify UV-stabilized materials for our Rhlite outdoor strips.
- Thermal Conductivity5: The material should allow some heat from the LEDs to dissipate. If it traps too much heat, it can shorten the lifespan of the LEDs.
I always advise clients to be wary of unusually cheap outdoor LED strips. Often, the cost-cutting comes from using inferior weatherproofing materials6 or less robust application methods, which will inevitably lead to problems down the line – a pain point Tom mentioned with previous suppliers.
| Weatherproofing Method | Typical IP Rating Achieved | Material Used | Flexibility | UV Resistance (Good Quality Material) | Common Rhlite Application |
|---|---|---|---|---|---|
| Silicone Coating/Sleeve | IP65 | Silicone | High | Good to Very Good | Sheltered outdoor areas, soffits |
| Silicone Extrusion | IP67 | Silicone | Good | Very Good | General outdoor use, landscape, facade lighting |
| PU Potting/Filling | IP67 / IP68 | Polyurethane (PU) | Moderate | Excellent | Ground burial, wet locations, signage |
| Nano-Coating | IP65 (sometimes higher) | Specialized Polymer | High | Good | Where minimal profile change is key |
Choosing the right IP rating and weatherproofing method ensures the LED strip will perform reliably for its intended lifespan, even in challenging outdoor conditions.
How Do Power Supplies and Controllers Integrate with Outdoor LED Strips?
So you have a weatherproof LED strip, but how does it actually light up and how can you control it? Simply plugging it into a wall socket won’t work and could be dangerous. This is where power supplies and controllers come into play.
Outdoor LED strip lights require a specific low-voltage DC power supply (driver) to convert mains AC voltage. Controllers can then be added between the power supply and the strip for dimming, color changing (RGB/RGBW), or smart automation.
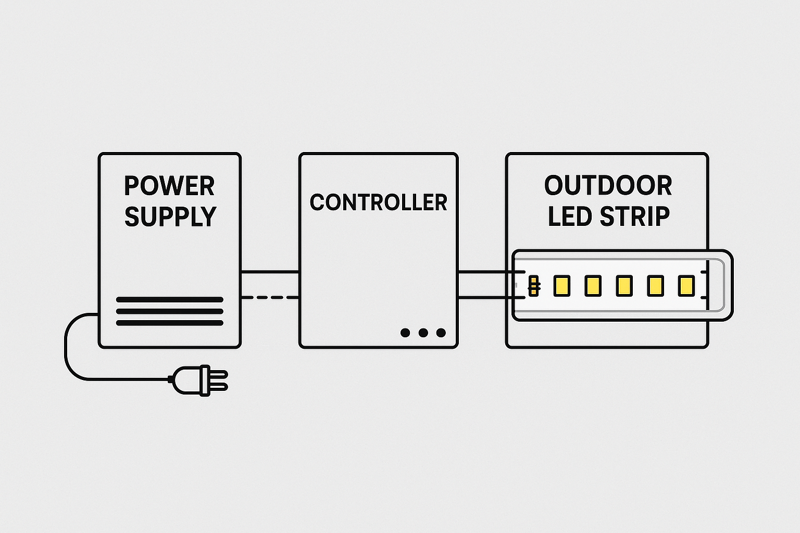
Understanding the power and control aspect is crucial for any successful LED strip installation, especially outdoors where safety and reliability are paramount. For my clients, whether they are contractors like Tom installing complex systems or OEM clients needing to specify compatible accessories for their branded strips, getting this right is key. At Rhlite, we not only manufacture LED strips but also high-quality LED power supplies and controllers designed to work seamlessly together.
The Role of the LED Power Supply (Driver)
LED strip lights typically operate on low voltage Direct Current (DC), usually 12V or 24V. Mains electricity, however, is high voltage Alternating Current (AC) (e.g., 110-240V AC). An LED power supply, often called an LED driver, performs several vital functions:
- Voltage Conversion: It steps down the high AC voltage to the required low DC voltage.
- Current Regulation (in some types): Constant Current drivers maintain a steady current, while Constant Voltage drivers (most common for strips) maintain a steady voltage. Strips generally use Constant Voltage drivers because the resistors on the strip handle current regulation for each segment.
- Safety: A good quality, certified power supply provides electrical isolation and protection against over-voltage, over-current, and short circuits.
- Weatherproofing (for outdoor drivers): Power supplies intended for outdoor use must also have an appropriate IP rating (e.g., IP67) to protect their internal components.
Connecting Controllers for Enhanced Functionality
While a power supply is essential to light up the strip, controllers add the "smart" features:
- Dimming Controllers: Allow you to adjust the brightness of single-color LED strips.
- RGB/RGBW Controllers: Enable you to change colors, select pre-programmed effects, and control the intensity of RGB (Red, Green, Blue) or RGBW (RGB + White) LED strips. These controllers often come with remote controls (RF or IR) or can be Wi-Fi/Bluetooth enabled for app control.
- Tunable White Controllers: For strips with adjustable color temperature, these controllers allow you to shift between warm white and cool white.
- DMX Decoders/Controllers: For professional and large-scale installations, DMX is a standard protocol for complex lighting control, allowing synchronization of many lights and integration with lighting consoles.
Ensuring Compatibility: Voltage and Wattage
Two critical things to match:
- Voltage: The voltage of the power supply must match the voltage of the LED strip (e.g., a 12V strip needs a 12V power supply). Mismatching voltage can destroy the strip or the power supply.
- Wattage: The power supply must have enough wattage capacity to power the total length of the LED strip connected to it. It’s recommended to choose a power supply with about 20% more wattage capacity than the total wattage of the strip(s) to ensure longevity and prevent overheating. (Total Strip Wattage = Watts per meter/foot x Total length).
I always emphasize to clients the importance of using certified power supplies and compatible controllers, especially for outdoor projects where safety and reliability are non-negotiable. This is why we often provide one-station solutions at Rhlite, ensuring all components are designed to work together. One client, an OEM distributing in North America, significantly reduced their customer support issues once they started bundling our certified power supplies with their branded LED strips, as it eliminated many compatibility problems.
| Component | Function | Key Considerations for Outdoor LED Strips | Importance for System Performance |
|---|---|---|---|
| Power Supply (Driver) | Converts AC to low voltage DC, powers the strip | Correct Voltage (12V/24V), Sufficient Wattage, IP Rating | Essential for operation, safety, longevity of strip |
| Dimmer Controller | Adjusts brightness of single-color strips | Compatibility with strip/PSU, dimming range, control type | User comfort, energy saving, ambiance control |
| RGB/RGBW Controller | Changes colors, selects effects for multi-color strips | Compatibility, control modes (RF, Wi-Fi), color accuracy | Dynamic lighting, aesthetic appeal, branding |
| DMX Decoder/Controller | Professional, complex lighting control | Protocol compatibility, channel capacity | Large-scale synchronization, advanced effects, integration |
| Connectors/Wiring | Connects components, carries power | IP-rated for outdoor use, correct gauge, secure connections | System integrity, safety, prevents voltage drop |
Properly selected and installed power supplies and controllers are the brains and brawn behind a functional and impressive outdoor LED strip lighting system.
Conclusion
Outdoor LED strips work through a synergy of LEDs, PCBs, and robust weatherproofing, powered and controlled by specialized accessories. Understanding this makes choosing and using them much easier.
-
Explore this link to understand the features and applications of SMD 5050 LEDs, enhancing your knowledge about LED technology. ↩
-
Learn about CCT to choose the right LED lighting for your needs, ensuring the perfect ambiance in your space. ↩
-
Discover the significance of CRI in lighting to ensure color accuracy in your projects, making informed choices for your lighting needs. ↩
-
Understanding UV resistance is crucial for ensuring the longevity and performance of outdoor LED strips. Explore this link to learn more. ↩
-
Thermal conductivity plays a vital role in LED performance. Discover how it impacts lifespan and efficiency by checking this resource. ↩
-
Choosing the right weatherproofing materials is essential for durability. This link provides insights into the best options available. ↩


