You finish a high-end kitchen remodel, but the lighting feels flat. The countertops lack sparkle, and the cabinets look dull. Bad lighting ruins expensive architecture, leaving clients disappointed and withholding final payments.
To create a luxury kitchen atmosphere, you must combine three specific elements: high-density COB strips for seamless reflection, High CRI 90+ chips to enhance food and wood colors, and 24V hardwired drivers for stable, flicker-free dimming.

I have seen this scenario play out dozens of times in my years running a manufacturing factory in China. A distributor like you imports a container of standard LED strips. You sell them to a contractor for a premium kitchen project. Two weeks later, the contractor calls you screaming because the homeowner hates the "cheap dots" reflecting off their new quartz countertop. Lighting is not just a utility anymore. In the US market, it is a design feature. If you get the specifications right, you build a reputation as a lighting expert. If you get them wrong, you are just another commodity seller. Let me share the exact technical formula we use for our top-tier OEM clients.
Why Is the "Dot-Free" Look Non-Negotiable?
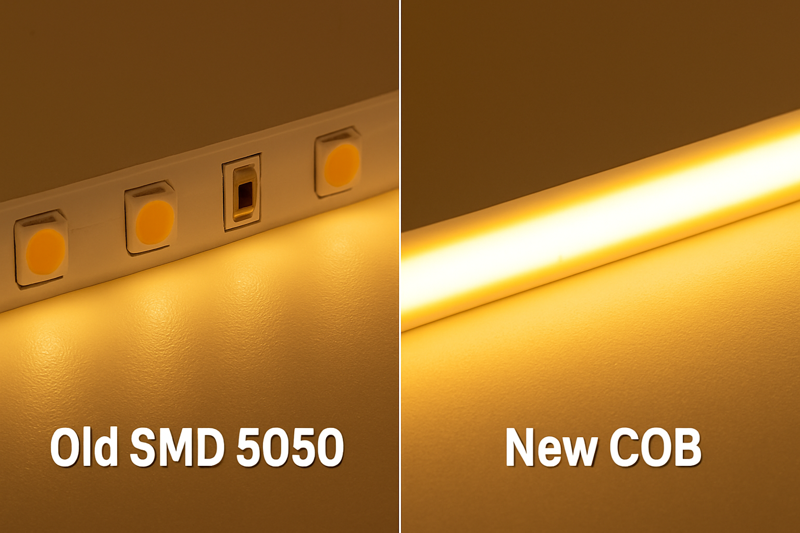
Nothing creates a "cheap DIY" look faster than seeing individual points of light reflecting on a polished surface. It looks like a runway strip, creating visual clutter that distracts from the clean lines of modern cabinetry.
The industry standard has shifted to COB (Chip on Board) LED strips. By mounting chips directly to the board and covering them with a continuous phosphor layer, COB strips create a solid, laser-like neon glow that eliminates all spotting, even without deep diffuser channels.

The demand for "dot-free" lighting involves more than just aesthetics; it involves fundamental engineering changes in how we manufacture LEDs. As a factory owner, I have watched the market transition rapidly. Three years ago, 80% of my orders were for SMD (Surface Mounted Device) strips. Today, COB (Chip on Board) dominates the kitchen sector. Let’s break down why this is critical for your business using critical thinking.
The Engineering Flaw of Legacy SMD Strips
In traditional SMD strips, like the 2835 or 5050 models you might still have in your warehouse, the light source is a discrete component. We solder a white LED package onto the circuit board. Even with high-density versions, like 120 LEDs per meter, there is a physical gap between each light source.
When you install this under a cabinet, the counter acts as a mirror. If the counter is polished granite or quartz, it reflects the source image perfectly. The homeowner sees "dot, dark space, dot, dark space." To fix this with SMD, you need a very deep aluminum profile with a thick frosted cover. But deep profiles are ugly. They stick out from the bottom of the cabinet. Architects hate them.
The COB Manufacturing Advantage
COB technology1 solves this at the root. Instead of packaging the LED first, we bond the bare LED chip directly to the PCB (Printed Circuit Board). We pack them incredibly tight—usually 480 chips per meter. That is one chip every 2 millimeters.
Then, we pour a continuous layer of silicone2 mixed with phosphor over the entire line. This is the secret. The phosphor layer diffuses the light before it leaves the strip.
For you as a buyer, this means you can sell a "glare-free" guarantee. It allows your clients to use ultra-slim (7mm height) aluminum channels that are practically invisible.
Beam Angle and Shadow Reduction
There is another hidden benefit to COB that many people miss. An SMD LED is recessed inside a plastic square, which limits its beam angle3 to about 120 degrees. A COB strip has a domed phosphor surface. This increases the beam angle to 180 degrees.
Why does this matter in a kitchen?
A wider beam spreads light more evenly across the backsplash. It reduces the harsh shadows that form behind countertop appliances like coffee makers or toasters. It creates a wash of light rather than a spotlight.
Comparison of Technology for Kitchen Application:
| Feature | Standard SMD 2835 | Premium COB Strip | Impact on Your Client’s Project |
|---|---|---|---|
| Light Source | Discrete Diodes | Continuous Phosphor | COB looks like a high-end neon tube; SMD looks like a generic kit. |
| Typical Density | 60 – 120 LEDs/m | 320 – 528 Chips/m | Higher density ensures zero spotting on glossy granite. |
| Beam Angle | 120 Degrees | 180 Degrees | COB covers more of the workspace, eliminating dark corners. |
| Profile Need | Deep (>15mm) | Shallow (<7mm) | COB allows for sleek, invisible installation details. |
| Flexibility | Moderate | Extreme | COB can bend around tight cabinet corners without breaking. |
How Do You Select the Correct Color Quality?
Have you ever seen a kitchen where the expensive cherry wood cabinets looked grey and lifeless? Or where a steak looked purple? This is not a cooking problem; it is a Color Rendering Index (CRI) problem.
You must specify a CRI of 90+ and an R9 value greater than 50. High CRI ensures faithful color reproduction, while a high R9 specifically enhances red tones, which are essential for making wood finishes, skin tones, and food look vibrant and appetizing.
I often argue with purchasing managers who want to save $0.50 per meter by choosing CRI 80 led strips. I tell them: "You are saving pennies to ruin a dollar." In a warehouse or a garage, CRI 80 is fine. But in a kitchen, color is everything. The kitchen is the heart of the home. It is where people gather, eat, and entertain.
The Science of CRI and R9
The Color Rendering Index (CRI)4 measures how accurately a light source reveals colors compared to natural sunlight. Most standard LEDs manage to render blues and greens okay. However, the standard CRI calculation only averages the first 8 pastel colors (R1-R8). It ignores the saturated colors, specifically R9 (Strong Red).
This is the trap. A cheap LED strip can have a CRI of 82 but an R9 value5 of negative 10.
If the R9 is low, red tones basically disappear.
- The Meat Test: Fresh beef looks brown or greyish.
- The Wood Test: Rich mahogany or cherry cabinets look flat and muddy.
- The Skin Tone Test: Your guests look pale or sickly.
By specifying CRI >90 and R9 >50, you ensure that the red spectrum is strong. This makes the kitchen feel warm, inviting, and expensive.
Color Temperature Strategy (CCT)
Getting the color accuracy right is step one. Step two is the "whiteness" of the light, measured in Kelvin.
- 3000K (Warm White)6: This is my recommendation for 70% of residential projects, especially in the US. It matches traditional incandescent bulbs. It pairs beautifully with wood cabinets, brown granite, and warm paint tones. It creates a cozy atmosphere.
- 4000K (Natural White): Use this for ultra-modern kitchens. If the design features high-gloss white cabinets, grey concrete counters, or stainless steel, 3000K can look too yellow. 4000K is crisp, clean, and energizing.
- Avoid 6000K: Never use cool white in a residential kitchen. It looks clinical, like a hospital.
The Hidden Danger of Poor Binning (SDCM)
This is a topic most factories won’t tell you about. It is called MacAdam Ellipses7, or "Binning."
Imagine you buy 100 reels of light strips from me. You install them in a large kitchen. Two weeks later, you realize you need 5 more meters for the pantry. You order the same product.
If the factory has poor binning standards, the new strip might look slightly pink, while the old one looks slightly green. They are both "3000K," but they don’t match.
This is a disaster for high-end projects.
We use a 3-Step MacAdam Ellipse standard. This means the color variance is so small that the human eye physically cannot see the difference. You need to demand this stability from your supplier.
Color Quality Breakdown for Buyers:
| Metric | Minimum Acceptable | Professional Standard | Why it Matters |
|---|---|---|---|
| CRI (Ra) | 80 | 90+ | General color fidelity. Prevents the room from looking "washed out." |
| R9 Value | 0 | >50 | Critical for wood grains, skin tones, and food presentation. |
| SDCM (Binning) | 5-Step | 3-Step | Ensures batch-to-batch color consistency for large projects. |
| Main CCT | Variable | 3000K / 4000K | 3000K for traditional/warm; 4000K for modern/task. |
Why Must You Use a 24V Hardwired System?
Amateur installations use plug-in power adapters that take up valuable outlet space. Professional systems are invisible; the lights simply turn on with the wall switch, with no visible wires or clunky boxes.
For cabinet lighting, 24V DC is superior to 12V because it allows for longer runs without voltage drop (dimming at the ends). When paired with a triac-dimmable driver, the system integrates seamlessly with standard wall dimmers like Lutron or Leviton.

The power supply system is the backbone of the installation. I have seen distributors lose clients because they sold a beautiful light strip but paired it with a cheap, buzzing power supply. Or worse, they sold a 12V system for a large kitchen, and the lights at the end of the counter were 30% dimmer than the lights at the start.
The Physics of Voltage Drop
Every wire has resistance. As electricity travels down the copper PCB of the LED strip, it loses energy. This is called voltage drop8.
- 12V Systems: The current is higher. Higher current meets more resistance. In a 12V strip, you will see a visible drop in brightness after just 5 meters (16 feet). If you have a large kitchen island or a U-shaped counter, 12V will fail. You will have to run multiple power feeds, which means more labor and more wire.
- 24V Systems: By doubling the voltage, we cut the current in half. Less current means less resistance and heat. A 24V strip can run up to 10 meters (32 feet) with perfect uniformity from a single power source. This simplifies the wiring diagram significantly for the electrician.
Hardwiring for Control
In the US market, convenience is king. Homeowners do not want to use a plastic remote control that gets lost in a drawer. They want to walk into the kitchen and use the wall switch.
To achieve this, you need a Triac Dimmable Driver9.
This driver acts as a bridge. On the input side, it accepts the standard 110V AC from the house wiring—the same wire that goes to the ceiling lights. On the output side, it delivers smooth 24V DC10 to the strips.
This allows the use of standard, high-quality wall dimmers. When the homeowner dims the wall switch, the driver interprets that signal and dims the LEDs smoothly. No flickering, no buzzing.
Thermal Management with Profiles
Finally, we must discuss the mounting hardware. LED strips produce heat. It is not radiant heat like a halogen bulb, but the chip itself gets hot. If that heat cannot escape, the phosphor degrades. The light will turn blueish and lose brightness over time.
Sticking an LED strip directly onto a wooden cabinet is a mistake. Wood is a thermal insulator. It traps the heat.
You must use an aluminum profile11.
The aluminum acts as a heat sink, drawing thermal energy away from the LED chips and dissipating it into the air. This can double the lifespan of the installation.
Furthermore, using a 45-degree corner profile is an expert move. Instead of shooting light straight down onto the counter, a corner profile shoots light at a 45-degree angle. This illuminates the backsplash and the center of the workspace, putting the light exactly where the user realizes they need it.
System Component Checklist:
| Component | specification | Technical Note |
|---|---|---|
| Voltage | 24V DC | Reduces voltage drop; allows for longer, uniform lighting runs. |
| Driver Type | Triac / Phase-Cut | Ensures compatibility with standard residential dimmer switches. |
| Safety | Class 2 / UL | Mandatory for passing electrical inspections in the US. |
| Mounting | Aluminum V-Channel | Essential for heat dissipation and 45-degree light distribution. |
| Wire Gauge | 18 AWG | Prevents power loss between the driver and the start of the strip. |
Conclusion
To master kitchen lighting, simply stick to COB strips for seamless beams, High CRI 90+ for vibrant colors, and 24V hardwired drivers for professional reliability.
-
Explore how COB technology enhances LED lighting performance and design, offering glare-free solutions and sleek installations. ↩
-
Find out how a continuous layer of silicone enhances light diffusion and quality in LED strips, leading to superior lighting solutions. ↩
-
Discover how beam angle affects lighting distribution and ambiance, crucial for effective kitchen and workspace illumination. ↩
-
Understanding CRI helps you choose lighting that accurately represents colors, enhancing the ambiance of your space. ↩
-
Exploring R9 value will reveal its crucial role in rendering rich colors, especially reds, for a vibrant environment. ↩
-
Discover the benefits of 3000K lighting for creating a cozy atmosphere in residential spaces. ↩
-
Learn about MacAdam Ellipses to ensure color consistency in your lighting projects, preventing mismatched hues. ↩
-
Discover the factors contributing to voltage drop and how to mitigate its effects in your electrical projects. ↩
-
Explore this link to understand how a Triac Dimmable Driver enhances LED lighting control and efficiency. ↩
-
Find out how 24V DC systems improve lighting performance and reduce installation complexity. ↩
-
Learn why using an aluminum profile is crucial for heat management and longevity of LED installations. ↩


