You install beautiful, expensive architectural finishes, but the lighting makes them look cheap. Your projects lack that "wow" factor, and you suspect the culprit is your approach to LED lighting.
Professional design isn’t about using the brightest strips. It’s about mastering light quality (CRI/RDM), layering light for depth, integrating fixtures seamlessly into the architecture, and implementing smart control systems for dynamic and emotional impact.
I remember walking through a newly opened luxury hotel lobby with a potential client. They had spent a fortune on Italian marble and rich walnut panels. But the lighting was awful. They used low-CRI strips that made the warm wood look dull and greenish. The expensive marble looked flat and lifeless. The client, the project manager, pointed this out himself. He said, "We paid for A-grade materials, but it looks like B-grade." This is the core problem. The final 5% of the project—the lighting—can devalue the other 95%. Professional design principles are not just about aesthetics; they are about protecting the client’s investment and making their vision a reality. This is what separates a mere installer from a true lighting professional.
Why Does Light Quality Matter More Than Brightness?
Your client complains that the colors in their space look "off" or dull, even with new, bright lights. You chose the right color temperature, but the red woods look brown and skin tones look sickly. You’re losing their confidence.
Focus on the Color Rendering Index (CRI) and R values, especially R9 for reds. A high CRI (90+) ensures colors appear vibrant and true to life, which is far more important for high-end aesthetics than raw lumen output.
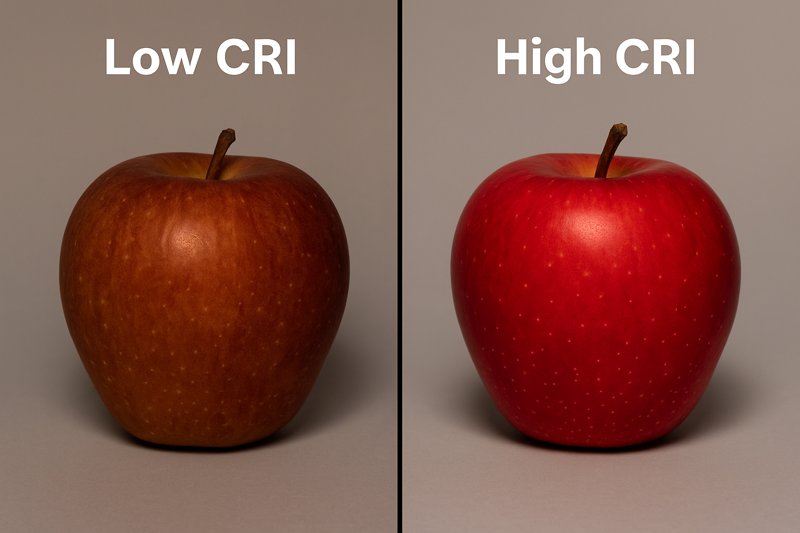
I had a designer, Tom, who was very data-driven. He always specified lights based on lumens per watt. He thought more efficiency was always better. For one project, a high-end retail boutique, he chose some very efficient strips, but they had a CRI of only 80. When the store’s red logo and vibrant merchandise were lit, they looked muted. He was frustrated. I brought a sample of our CRI 95+ strip, which was slightly less efficient in terms of lumens per watt. We lit the same display. The difference was night and day. The reds were deep and saturated, the brand colors were perfect. He realized right then that his customers weren’t buying lumens; they were buying a look. From that day on, his first question was always, "What’s the CRI and the R9 value?" He learned that the quality of light is the most important specification.
Decoding the Metrics of Quality Light
For a professional like Tom, who deals with clients sensitive to quality, understanding the technical metrics of light is a superpower. It allows you to explain why one strip is superior to another, justifying the cost and delivering predictable, high-end results. It moves the conversation from "How much per foot?" to "Will this make my materials look their best?" Brightness, measured in lumens, is only a small part of the story. The true markers of quality are invisible until the light is turned on, and by then, it’s too late. Mastering these concepts—CRI, R9, and SDCM—is what elevates your work. It’s the technical foundation for all great lighting design.
| Metric | What It Is & Why It Matters for Tom | The Professional Standard | Rhlite’s Commitment & Advice |
|---|---|---|---|
| CRI (Color Rendering Index)1 | Measures how accurately a light source renders colors compared to natural sunlight. A low CRI makes everything look washed out. It’s the difference between a steak looking delicious or unappetizing. | CRI 80+ is the absolute minimum for commercial use. CRI 90+ is the standard for retail, hospitality, and residential projects. For art galleries or high-fashion retail, CRI 95+ is required. | We consider CRI 90+ to be our baseline for professional architectural lighting. We provide full photometric reports2 for our strips so you can show your client the data. Don’t just take our word for it; prove it. |
| R9 (Red Rendering)3 | R9 is one of the specific test colors in the extended CRI measurement. It’s crucial because many LED chips struggle to render deep reds accurately. It heavily impacts the appearance of wood grains, skin tones, and many food items. | A standard CRI 80 light might have an R9 value near zero. For quality lighting, you need R9 > 50. For premium results in hospitality or retail, demand R9 > 90. | This is a key differentiator for quality suppliers. We use specific phosphors in our LEDs to boost the R9 value. I always tell my clients to ask for the R9 spec. If a supplier can’t provide it, they are not serious about quality. |
| SDCM (Standard Deviation of Color Matching)4 | Also known as a "MacAdam Ellipse," this measures the color consistency between different LEDs or strips. A high SDCM value means you’ll see noticeable color differences, making a long run look patchy or "off-color." | A <5-step SDCM is acceptable for some applications. For architectural lighting where strips are adjacent, you must demand <3-step SDCM. A <2-step SDCM is the gold standard for perfectly uniform color. | This is a factory process issue. Cheaper factories buy LEDs from different production bins to save money, leading to high SDCM. We source all LEDs for a single project from the same bin, guaranteeing a <3-step SDCM. This ensures your 100-meter installation looks perfectly uniform from end to end. |
How Do You Layer Light for Maximum Visual Impact?
You’ve lit a room, but it feels flat and boring, like an office. There’s no mood, no focal points, no visual interest. It’s functional, but it’s not a space anyone will love or remember.
Create visual hierarchy by layering four distinct types of light: Ambient (overall), Task (functional), Accent (dramatic), and Architectural (integrative). Using LED strips for architectural and ambient layers adds depth and sophistication.

A restaurant owner once told me, "I want my place to feel intimate but also high-energy." This seems like a contradiction, but it’s the perfect problem for layered lighting to solve. We designed a scheme where the main ambient light came from our warm, dimmable LED strips hidden in ceiling coves, providing a soft, general glow. Then, we used focused, narrow-beam spotlights as the accent layer, making each table a private "pool" of light. Finally, we used RGBW strips as an architectural layer behind the bar to create a vibrant, energetic focal point that could change color. The result? The space felt cozy and intimate at the tables, but the room a whole had a dynamic buzz. You couldn’t achieve that with just one type of lighting.
The Four Essential Layers of Professional Lighting Design
Layering is the art of lighting design. It’s a concept that instantly separates professional work from amateur attempts. Instead of trying to light a room with a single, uniform source, you paint with light, creating pools of brightness, soft glows, and dramatic highlights. This approach gives a space a high-end, custom feel. For a contractor or designer like Tom, explaining this concept to a client demonstrates expertise and justifies a more sophisticated, and often more profitable, lighting plan5. Each layer has a specific job, and LED strips6 are uniquely suited for several of these roles, especially when it comes to creating the foundational layers that define the architecture of a space.
| Light Layer | Purpose | Primary Application with LED Strips | Jermey’s Pro Tip (Your Expertise) |
|---|---|---|---|
| 1. Ambient Layer7 | The general, overall illumination that makes a space safe and navigable. It sets the foundational mood. It should be soft and generally indirect. | Cove Lighting: Place strips in ceiling coves to wash the ceiling in a soft, even glow. This is the most common and effective use. Valance Lighting: Bounce light off both the ceiling and the wall. Under-cabinet lighting in large kitchens can contribute to the ambient layer. | Use a wider beam angle (120°) strip. The goal is diffusion, not a hard line of light. For coves, always aim the strip away from the direct line of sight. Pointing it up and slightly back into the cove creates the softest effect. |
| 2. Task Layer8 | Focused, functional light for specific activities like reading, cooking, or working at a desk. It’s brighter than the ambient layer and is confined to a specific area. | Under-Cabinet Lighting: This is the classic example. It provides focused light on kitchen counters. Integrated Desk Lighting: Routing a channel into a custom desk or bookshelf for a seamless task light. Mirror Lighting: Using strips around a bathroom mirror for even facial illumination. | For task areas, prioritize function. Use a slightly cooler CCT (3000K-4000K) for better concentration and visibility. For under-cabinet use, our COB strips are ideal because they provide a perfectly uniform line of light with no dots on reflective countertops. |
| 3. Accent Layer9 | This is the drama layer. It’s used to highlight focal points like artwork, architectural features, or retail displays. It creates contrast and directs the eye. Typically 3-5 times brighter than the ambient level. | While typically done with spotlights, strips can be used to backlight translucent materials (like onyx panels) or to create a "halo" glow around a piece of art or a headboard. This is a subtle, high-end accent. | Accent lighting is about precision. If using a strip for backlighting, ensure the diffusion material is far enough away from the LEDs to prevent hot spots. We offer specialized lensing on some channels to shape the light for these precise applications. |
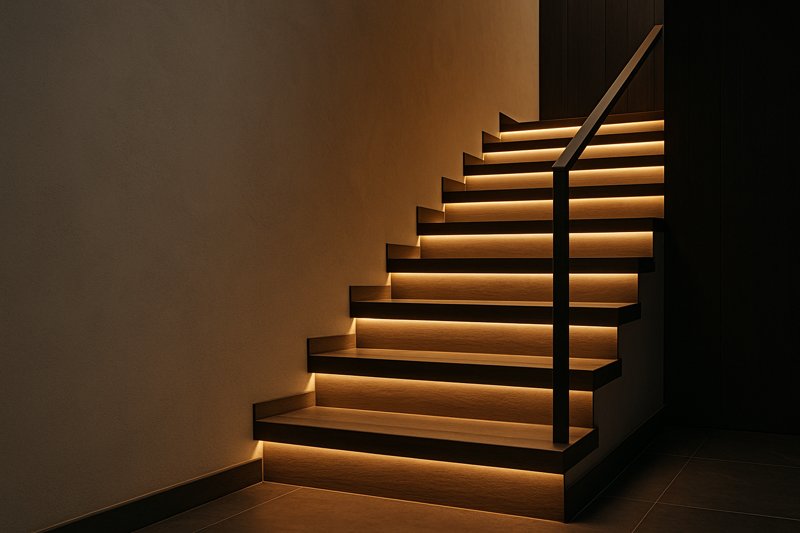
| 4. Architectural Layer10 | This layer’s sole purpose is to define the architecture itself. It’s about using light to highlight form, structure, and line. It’s light as a building material. | This is the specialty of LED strips. Use them in floor-level channels to graze a textured wall, trace the curve of a ceiling detail, "float" a staircase by lighting the risers, or outline a soffit. It turns the architecture into a design element. | Concealment is everything. The goal is to see the effect of the light, not the fixture. This requires meticulous planning with the architect and builder. We supply ultra-slim channels and custom-length strips to make this integration seamless. This is where a factory partner who can customize is invaluable. |
What Are the Best Techniques for Seamlessly Integrating LED Strips?
You’ve specified the perfect LED strip, but the final installation looks tacked-on and unprofessional. You can see the individual LED dots, the aluminum channel is obtrusive, and the whole thing ruins the clean architectural lines.
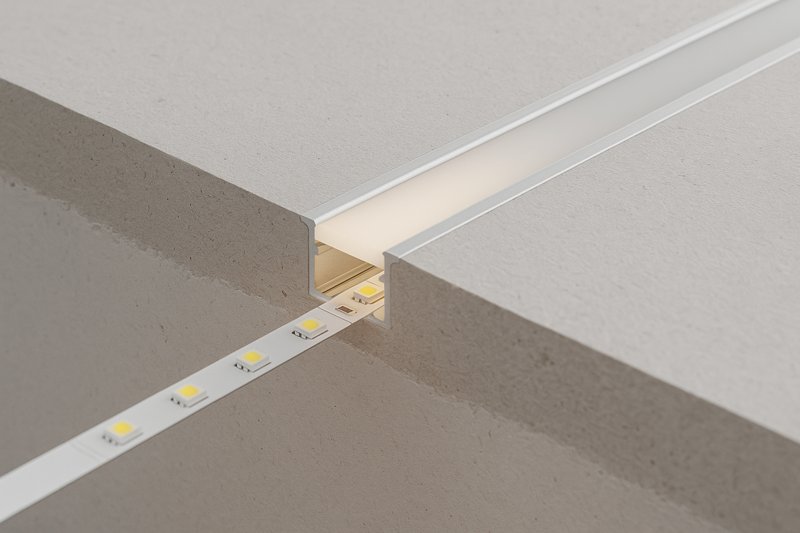
Always mount LED strips inside an aluminum channel with a diffuser. For truly seamless integration, recess the channel so it sits flush with the surface. Meticulous planning during the construction phase is mandatory.
I was working with a contractor on a minimalist home. The architect’s drawings showed clean lines of light appearing from nowhere. The contractor was just going to stick the LED strip in the corner where the wall met the ceiling. I had to stop him. I explained that the architect’s vision required more. We worked together to specify a trimless, plaster-in aluminum channel. The electrical contractor ran the wires, the drywall team installed the channel, and the plasterer skimmed right up to the edge of the lens. When we finally snapped the COB strip and diffuser into place, the effect was magical. It was a perfect, unbroken line of light embedded in the wall. The contractor learned that integration isn’t an afterthought; it’s a core part of the construction process.
A Guide to Professional Mounting and Concealment
For Tom and his clients, the difference between a good project and a great one often comes down to the details of execution. Anyone can stick a bare LED strip to a surface, but a professional integrates it thoughtfully11. The goal is to make the light source disappear, leaving only its beautiful effect. This requires the right hardware—specifically, channels and diffusers12—and the right techniques. Understanding these methods allows you to guide the construction process, collaborate effectively with other trades, and deliver the clean, high-end aesthetic13 your clients are paying for. It’s a skill that builds trust and sets you apart from competitors who take shortcuts.
| Integration Technique | Description & Use Case | Best Channel Type | Jermey’s Pro Tip (Your Expertise) |
|---|---|---|---|
| Surface Mounting | The most basic method. The aluminum channel is screwed or taped directly onto the surface (e.g., under a cabinet, inside a closet). It’s simple and effective but the channel remains visible. | Standard U-Shape Channel: A basic, shallow profile. Good for heat dissipation and provides a clean housing. Angled (45-degree) Channel: Perfect for corners, directing light out into the space rather than straight down. | Never mount a bare strip. Even in hidden locations, a channel is non-negotiable. It protects the strip from dust and damage and, most importantly, acts as a heat sink, dramatically extending the LED’s lifespan. A channel is not an accessory; it’s a requirement for a professional job. |
| Recessing | The channel is set into a routed or pre-cut groove so the top of the channel sits flush with the surrounding material (wood, stone, etc.). This creates a much cleaner, more integrated look. | Recessed Channel with "Wings" or "Lips"14: These small flanges on the side of the channel help cover any imperfections in the routed groove, creating a very clean edge. Choose a channel depth that matches your material thickness. | Plan your depths! Make sure the material is thick enough to accept the depth of the channel. For countertops, I always recommend our shallow-recess channels. Also, test your strip/diffuser combo. A high-density or COB strip with a frosted, deep diffuser gives the most seamless "line of light" look. |
| Trimless (Plaster-In)15 | The ultimate in seamless integration, used primarily in drywall. A special channel with a perforated flange is installed before the final plaster skim. The plaster is then applied over the flange, hiding the channel entirely. | Plaster-In or "Trimless" Channel: These have wide, perforated flanges that allow the mud/plaster to adhere securely. The only thing visible in the end is the narrow light-emitting diffuser. | This requires collaboration. You must coordinate with the drywall and plastering trades. The channel goes in with the drywall, not after. Ensure the electricians have run the low-voltage wires to the correct location before the walls are closed up. This method is all about planning. |
| Specialty & Architectural | Unique channels designed for specific purposes, such as flooring, stair nosing, or creating suspended light fixtures. | Floor-Rated Channels16: Walk-over rated with thick, durable diffusers. Stair-Nosing Channels: Integrate the light and the protective edge of a stair tread in one piece. Suspension Channels: Wider, more substantial profiles designed to be hung from cables to create linear pendants. | When using floor-rated channels, IP rating and durability are paramount. Ensure the channel and the strip are at least IP67. For suspended fixtures, consider using our up/down lighting channels that can hold two strips, providing both functional downlight and ambient uplight from a single-hanging fixture. |
Conclusion
Mastering architectural lighting means focusing on light quality, layering, and seamless integration. These professional principles will elevate your projects and solidify your reputation as an expert.
Understanding CRI helps you choose lights that render colors accurately, enhancing the visual appeal of your space. ↩
Photometric reports provide data on light performance, helping you make informed decisions and justify lighting choices to clients. ↩
R9 is crucial for rendering deep reds accurately, impacting the appearance of materials and food, making it essential for quality lighting. ↩
SDCM measures color consistency, ensuring uniformity in lighting installations, which is vital for professional results. ↩
A well-crafted lighting plan is key to professional design. Learn the elements that contribute to its success. ↩
LED strips are versatile tools in lighting design. Find out how they can enhance each layer of lighting effectively. ↩
Understanding the Ambient Layer is crucial for creating a comfortable and inviting space. Explore this link for in-depth insights. ↩
The Task Layer is essential for functionality in spaces. Discover how to optimize it for better productivity and comfort. ↩
The Accent Layer adds drama and focus to your design. Learn how to effectively use it to highlight key features. ↩
The Architectural Layer transforms spaces by highlighting structure. Explore its importance in modern design. ↩
Understanding thoughtful integration can elevate your lighting projects, ensuring a seamless and aesthetic finish. ↩
Exploring the best channels and diffusers can enhance your lighting design, providing both functionality and style. ↩
Discovering techniques for a high-end aesthetic can set your projects apart and impress clients. ↩
Learning about this channel type can help you create a flawless integration of lighting into various materials. ↩
Understanding Trimless lighting can help you achieve a seamless look, enhancing the overall design of your space. ↩
Exploring Floor-Rated Channels can ensure safety and durability in your lighting installations, especially in high-traffic areas. ↩


