You’ve just completed a beautiful installation, but when the client tries to dim the lights for the first time, they flicker and buzz. The smooth, elegant dimming you promised is a strobe-like mess, and your professional work now looks amateurish and faulty.
Flickering during dimming is almost always caused by an incompatibility between the wall dimmer, the LED power supply (driver), and the strip itself. The entire system must be designed to work together to achieve smooth, flicker-free performance.

I get calls about this every week. A contractor once told me he was about to rip out an entire ceiling of cove lighting because he couldn’t stop it from flickering at low levels. He had used a top-quality LED strip and a high-end Lutron wall dimmer. The problem? He had paired them with a standard, non-dimmable LED power supply. He was trying to "chop" the high-voltage AC power going into the power supply, but the power supply wasn’t designed for it. It was starving for power and creating the flicker. We replaced it with a proper TRIAC-dimmable power supply of the same size. The problem vanished instantly. It’s a crucial lesson: the power supply is the heart of your dimming system.
Is My Wall Dimmer Incompatible with My Power Supply?
You’ve connected your new LED strip and dimmable power supply to the client’s existing wall dimmer, but the lights hum, flicker, or won’t dim smoothly. You start to worry that the power supply or the LEDs are defective.
The issue is likely an electrical mismatch. Standard wall dimmers (leading-edge/TRIAC) are designed for old incandescent bulbs and are often incompatible with LED power supplies. You must use a dimmer and power supply that are explicitly designed to work together.
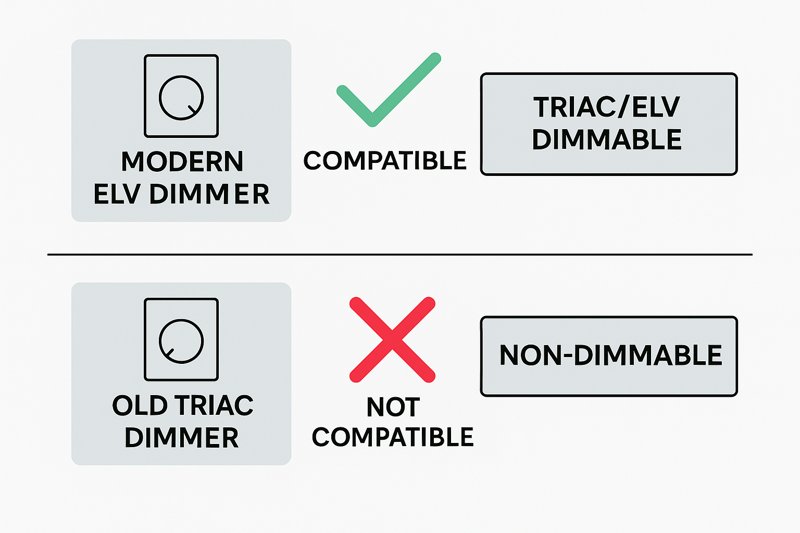
Think of it this way: an old TRIAC dimmer works by crudely chopping off the front of the AC power wave. This worked fine for a simple incandescent filament, but it’s a huge shock to the sensitive electronics inside an LED power supply that’s not designed for it. The power supply’s circuits get confused by this "dirty" power, causing them to output an unstable DC voltage, which results in flicker. As a factory supplier, we always stress to our B2B clients that they must either sell a complete, tested dimming "kit" (dimmer + driver) or provide a clear compatibility list. Just selling a "dimmable power supply" without specifying which type of dimmer to use is setting your customer up for failure.
The Deep Dive: Understanding AC Dimming Methods
For any installation using a wall dimmer, you are dimming on the "high-voltage" side, before the power gets to the power supply. Understanding the main technologies is critical.
TRIAC (Leading-Edge) vs. ELV (Reverse-Phase) Dimming1
These are the two primary types of mains dimming. Getting this right is 80% of the battle.
| Feature | TRIAC (Leading-Edge) Dimming2 | ELV (Reverse-Phase) Dimming |
|---|---|---|
| Technology | Older, simpler, more common. "Chops" the front of the AC sine wave. Designed for resistive loads like incandescent bulbs. | Modern, more complex. "Chops" the back of the AC sine wave. Designed for capacitive loads like electronic transformers and LED drivers. |
| Pros | Inexpensive, widely installed in older homes. | Smoother dimming, no buzzing or humming, better performance at low light levels. The modern standard for high-quality LED lighting. |
| Cons | Often causes buzzing, flickering, and a "pop-on" effect with LEDs. Has a high Minimum Load requirement3 (e.g., 40W), which a single LED strip may not meet. | More expensive. Less common in existing installations. |
| Compatibility | Requires a "TRIAC Dimmable" LED Power Supply. | Requires an "ELV Dimmable" LED Power Supply. Many high-quality drivers are compatible with both. |
As a professional, you should always push for an ELV dimming system for the best results. However, if you must work with an existing TRIAC dimmer, you have to ensure you are using a power supply specifically labeled as "TRIAC Dimmable." Also, be aware of the minimum load. If your LED strip only draws 20W, but the TRIAC dimmer needs 40W to function, it will never work correctly.
The Professional Alternative: 0-10V Dimming4
For commercial projects or high-end residential jobs, an even better option exists. 0-10V dimming is a low-voltage control method used in professional lighting.
- How it Works: In addition to the high-voltage AC wires, a separate pair of low-voltage wires runs from a special 0-10V dimmer switch directly to the power supply. The dimmer sends a simple DC voltage signal from 0V to 10V. The power supply reads this signal and dims the lights accordingly: 10V is 100% brightness, 5V is 50%, and 1V is 10%. 0V signals the driver to turn off.
- Why it’s Better: It’s an exact, flicker-free, and standardized communication protocol. It provides incredibly smooth dimming all the way down to 1% or even 0.1% with high-quality drivers. It is the gold standard for architectural lighting.
Why Won’t My LED Strips Dim Down Smoothly?
The lights turn on and they dim, but it’s not a smooth experience. They seem to jump from 100% brightness down to 50%, and then they just turn off completely. You can’t get that subtle, low-level glow the client wants.
This "stepping" or poor dimming range is typically caused by a low-quality or mismatched power supply. The driver’s internal components are not capable of resolving the dimming signal smoothly at the low end of the curve.
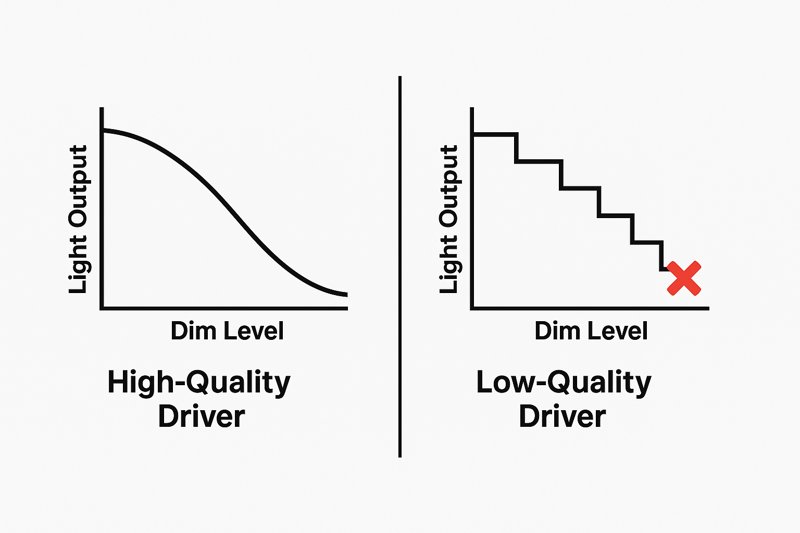
This is a classic example of "You get what you pay for." I’ve tested hundreds of power supplies in our R&D lab. The cheap ones use very basic components. They can output a stable 24V at full power, but when you give them a complex dimming signal, their internal circuitry can’t cope. They can’t maintain a clean, stable output at low power levels, so they "step" between the levels they can manage or simply shut off below a certain threshold (e.g., 30%). A high-quality power supply from a reputable manufacturer like Mean Well uses superior components and more sophisticated circuitry to interpret the dimming curve precisely, allowing for a smooth, continuous fade all the way down to black.
The Deep Dive: PWM Frequency5 and Resolution
The secret language of LED dimming is Pulse Width Modulation (PWM). Understanding it helps you understand why some drivers are better than others.
What is PWM?
Your LED strip is not actually getting "less voltage" when it dims. Instead, the power supply is switching the DC power on and off thousands of times per second.
- 100% Brightness: The power is constantly ON.
- 50% Brightness: The power is ON for half the time and OFF for half the time.
- 10% Brightness: The power is ON for 10% of the time and OFF for 90% of the time.
Your eye is too slow to see this switching and perceives it as a solid, continuous dimming effect. The number of times it switches per second is the PWM Frequency.
Why It Matters for Smooth Dimming
Two factors in the power supply determine the dimming quality:
- PWM Frequency: Low-frequency PWM (below a few hundred Hertz) can sometimes be perceived as a subtle, subliminal flicker, especially in peripheral vision or when captured on a phone camera. High-quality drivers use frequencies in the thousands of Hertz (kHz) to be completely imperceptible to the human eye and cameras. If a client complains of eye strain or headaches, a low PWM frequency6 could be the culprit.
- PWM Resolution (Bit Depth)7: This is how many "steps" of brightness the driver can create between 0% and 100%.
- Low Resolution (e.g., 8-bit): Gives you 256 steps. This sounds like a lot, but our eyes are very sensitive to changes at low light levels. At the bottom end, a jump from step 2 to step 3 might be a very noticeable change in brightness, causing the "stepping" effect.
- High Resolution (e.g., 16-bit): Gives you 65,536 steps. The difference between each step is so infinitesimally small that the dimming appears perfectly smooth and analog, even at very low levels. This is what you find in architectural-grade and broadcast-quality drivers.
When you invest in a quality dimmable power supply, you’re paying for high-frequency, high-resolution PWM circuitry8 that delivers the flawless dimming a professional project demands.
How Does Voltage Drop Affect Dimming Performance?
You have a long run of LED strip, maybe 10 meters (33 feet). You’ve used the right dimmer and a high-quality power supply. However, the start of the strip is bright, but the end is noticeably dimmer and has a slightly different color.
This is a classic case of voltage drop. The electrical resistance of the long copper strip causes the voltage to decrease along its length, leading to reduced brightness and inconsistent dimming performance at the far end.

Voltage drop is the silent killer of large LED strip projects. I’ve seen contractors try to power a 15-meter run from one end, and they are shocked when the last 5 meters barely light up. The problem gets even worse with dimming. The section of the strip at the beginning might dim smoothly because it’s receiving the correct voltage and PWM signal. However, the end of the strip is already "starving" for voltage. When you try to dim it, the effect is exaggerated, and it may flicker or cut out long before the start of the strip does. It makes the entire installation look cheap and faulty. This is not an optional "nice-to-know"; it’s a fundamental law of physics you have to design around.
The Deep Dive: Calculating and Preventing Voltage Drop9
You don’t need to be an electrical engineer, but you do need to follow two simple rules to defeat voltage drop on every job.
Rule 1: Power in the Middle or from Both Ends
Never power a run longer than 5 meters (16 feet) from a single end. For longer runs, you must change your wiring strategy.
- For a 10-meter run: Place your power supply in the middle and connect a 5-meter strip going left and another 5-meter strip going right. This ensures the furthest point from the power supply is only 5 meters away.
- For a 15-meter run: Run separate parallel power wires from your power supply to the start of each 5-meter section.
| Wiring Method | Max Recommended Run Length | Voltage Drop Effect |
|---|---|---|
| Powered from one end | 5 meters (16 ft) | Minimal |
| Powered from the middle | 10 meters (33 ft) | Minimal |
| Powered from both ends | 10 meters (33 ft) | Minimal |
| Parallel "home runs" to each 5m section | Virtually unlimited | Best performance for very large projects |
Rule 2: Use Thicker Gauge Wire10
Voltage drop doesn’t just happen in the LED strip; it happens in the wire between the power supply and the strip. The longer the distance and the thinner the wire, the more voltage you will lose before it even gets to the LEDs.
- The Problem: Many installers use thin 22-gauge or 20-gauge wire because it’s easy to hide. But for a run of 10-15 feet, this can cause significant voltage drop, especially on a heavy-load RGBW strip.
- The Solution: Always use the thickest wire that is practical for the job. For most interior runs up to 20 feet, 18-gauge wire is a good minimum standard. For longer or higher-power runs, move to 16-gauge. It might seem like overkill, but it’s cheap insurance against dimming problems and callbacks. When in doubt, go one size thicker on the wire. You will never regret it.
Conclusion
Achieving perfect, flicker-free dimming is not about luck; it’s about system design. By choosing a compatible dimmer and driver, investing in a power supply with a quality dimming curve, and engineering your wiring to eliminate voltage drop, you can guarantee a flawless result on every project, every time.
Learn about the benefits of ELV dimming, including smoother performance and compatibility with modern LED technology. ↩
Explore this link to understand the basics of TRIAC dimming and its applications in lighting systems. ↩
Find out why understanding the Minimum Load requirement is crucial for successful LED dimming installations. ↩
Discover the advantages of 0-10V dimming for commercial projects and its role in achieving precise lighting control. ↩
Understanding PWM Frequency is crucial for achieving smooth dimming in LED applications, ensuring a flicker-free experience. ↩
Learn about the potential flicker and eye strain caused by low PWM frequency, which can affect user experience. ↩
Exploring PWM Resolution helps you grasp how brightness steps impact visual comfort and quality in lighting. ↩
Discover how high-resolution PWM circuitry enhances dimming quality, making it essential for professional lighting projects. ↩
Understanding voltage drop is crucial for ensuring efficient electrical installations. Explore this link for in-depth insights. ↩
Using thicker gauge wire can prevent voltage drop and enhance performance. Discover more about its benefits in this resource. ↩


