You’ve completed a stunning architectural lighting project. The light is clean, the lines are perfect, and the client is thrilled. But a year later, you get a call: parts of the strip are dim, the color has shifted, or sections are failing. How do you prevent this degradation and protect your work for years to come?
Proactive maintenance is key to maximizing LED strip lifespan. This involves more than just the LEDs; it requires managing heat through proper installation, providing clean and stable power, and performing regular physical inspections and cleaning to prevent environmental damage.
As a manufacturer, I talk to lighting professionals like Tom every day. The most successful ones don’t just "install and forget." They build systems designed for longevity and educate their clients on simple maintenance. An LED strip doesn’t have moving parts, but it is an electronic device susceptible to heat, power surges, and environmental factors. Its rated lifespan of 50,000 hours is not a guarantee; it’s a potential that can only be reached under ideal conditions. By managing these conditions, you shift from simply selling a product to delivering a long-term, reliable lighting solution. This is how you build a reputation that wins repeat business and high-value referrals. Let’s explore the professional strategies to ensure your installations last.
Can Poor Heat Management Destroy Your LEDs?
You installed a high-output LED strip directly onto a wooden cabinet. A year later, the strip has noticeable discoloration, some LEDs are dim, and the client is complaining about the color shifting towards a murky yellow. What went wrong?
Absolutely. Heat is the number one killer of LEDs. Installing a strip without an adequate heat sink traps the thermal energy produced by the diodes, causing them to overheat, which drastically shortens their lifespan and leads to permanent color degradation (lumen depreciation).
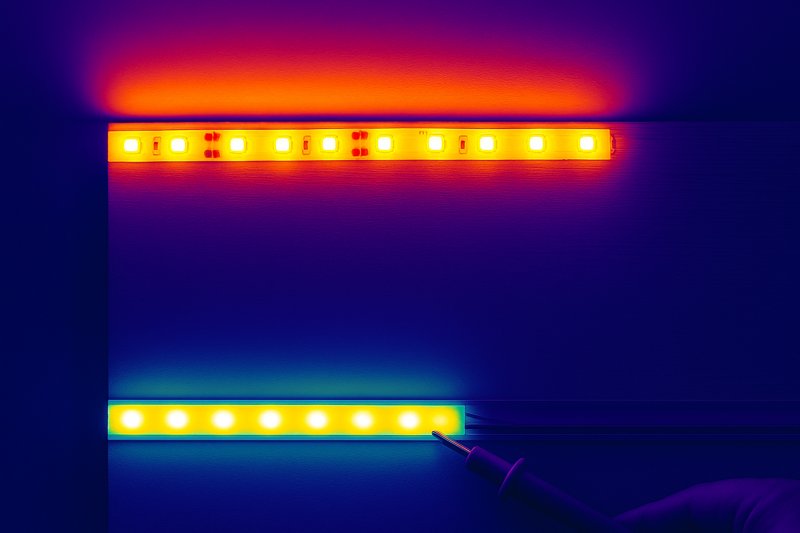
This is the most critical and most frequently misunderstood aspect of professional LED installation. While LEDs are far more efficient than incandescent bulbs, they still convert a portion of electrical energy into heat. Unlike an old-fashioned bulb that radiates heat away, this thermal energy is trapped at the base of the LED chip. If that heat has nowhere to go, its temperature skyrockets. This excessive heat accelerates the aging of the phosphor coating on the LED, causing it to produce less light (lumen depreciation) and shift its color output (color shift). Sticking a powerful strip directly to a surface like wood, drywall, or plastic is a guaranteed recipe for premature failure.
A Deeper Dive into Thermal Management
For a quality-conscious buyer like Tom, understanding thermal management is the difference between a project that lasts 10 years and one that fails in under two. It’s not an optional upgrade; it’s a fundamental requirement for professional work.
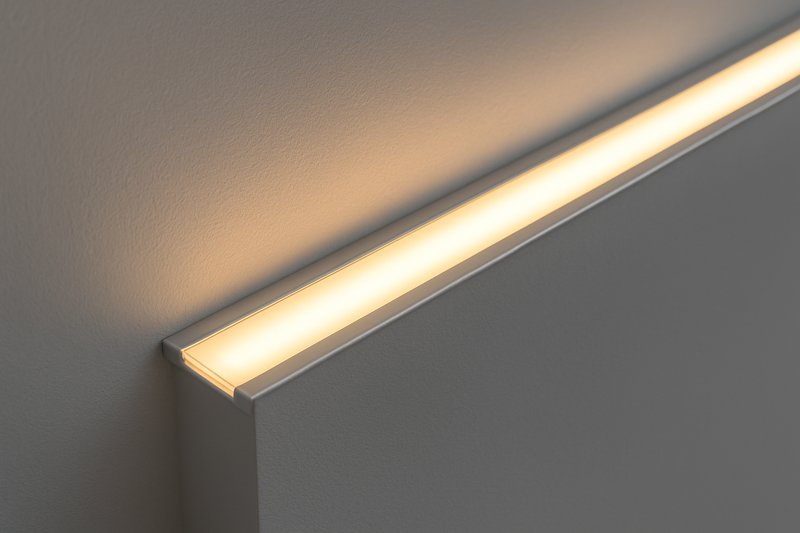
The Role of the Aluminum Channel
An aluminum channel1 or extrusion is not just for aesthetics or diffusion. Its primary technical purpose is to act as a heat sink2.- How it Works: Aluminum is an excellent thermal conductor. When you mount the LED strip inside the channel, the heat from the LED chips is transferred from the flexible PCB into the large metal mass of the channel. The channel then dissipates this heat into the surrounding air through convection.
- The Impact: This process keeps the operating temperature of the LED chips well within their safe limits, preserving their lifespan and color integrity. A strip running at 60°C might last 15,000 hours, while the exact same strip running at 40°C inside a channel could achieve its full 50,000-hour potential.
Choosing the Right Channel
Not all channels are created equal. The size and mass of the extrusion directly correlate to its ability to dissipate heat.- Matching Channel to Strip Wattage: A low-power accent strip (e.g., 2 watts/foot) needs only a small, standard-profile channel. However, a high-output primary illumination strip (e.g., 8+ watts/foot) requires a deeper, heavier channel with more surface area to effectively manage the higher heat load. As a manufacturer, we provide specifications on the minimum channel size required for our high-output strips. Ignoring this is a common failure point.
| Strip Wattage (per foot) | Recommended Channel Type | Mounting Surface | Expected Outcome |
|---|---|---|---|
| < 3 Watts | Not strictly required, but advised | Any surface | Minimal heat, long life expected. |
| 3 – 6 Watts | Standard Aluminum Channel | Wood, Drywall, Plastic | Prevents premature failure, ensures rated life. |
| > 6 Watts | Deep/Heavy Aluminum Channel | Any surface (especially wood/insulation) | CRITICAL for preventing rapid lumen decay. |
- Ambient Temperature Matters
Remember that the channel dissipates heat into the surrounding air. Installing a strip in a location with a high ambient temperature3 (e.g., inside a poorly ventilated display case, near other heat-producing equipment, or in direct sunlight) reduces the effectiveness of the heat sink. In these hot environments, a larger heat sink or even active cooling (fans) might be necessary.
Does Unstable Power Affect LED Longevity?
Your installation looks great at first, but over months, you notice individual LEDs starting to flicker and fail randomly along the strip. The client reports that other electronics in the building sometimes fail. Could this be related?
Yes. An unstable power supply delivering "dirty" power with voltage spikes, sags, and AC ripple puts immense stress on the delicate electronic components on the strip, leading to random, premature failures of individual LEDs and resistors.
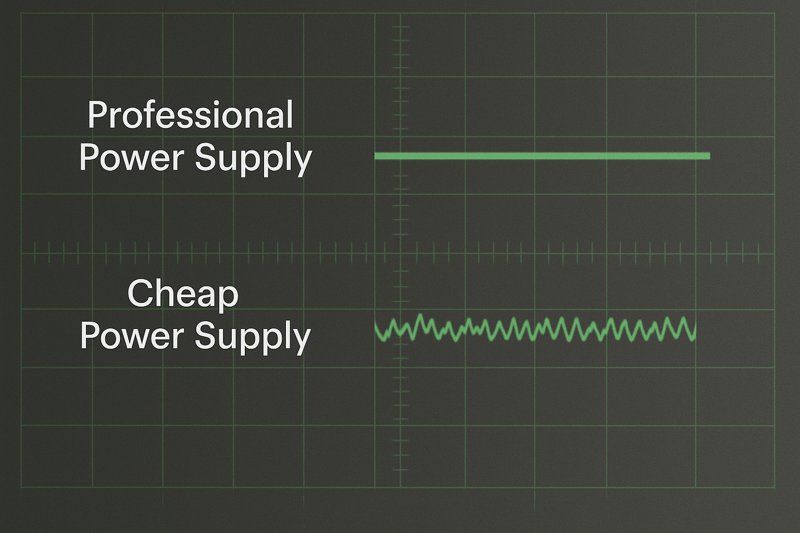
We’ve discussed how an overloaded power supply causes flickering, but the quality of the power itself has a major long-term impact. An LED strip is not just a light bulb; it’s a circuit board populated with sensitive components. A cheap, non-certified power supply can be like a faulty dam, letting through surges and turbulence. While the strip might work initially, this constant electrical stress slowly breaks down the internal workings of the LED chips and the tiny surface-mounted resistors in each segment. This leads to a "death by a thousand cuts," where individual components fail randomly over time, creating dark spots along your strip. For a professional striving for perfection, this kindis unacceptable. It makes the entire installation look cheap and unreliable.
A Deeper Dive into Power Quality4 and Protection
A client like Tom, who values quality, will understand the importance of investing in the "unseen" parts of the system. The power supply is the foundation of the entire installation’s reliability.
UL Listed Class 2 Drivers5: The Professional Standard
A power supply with a UL Class 2 listing has been independently tested and certified to meet high safety and performance standards.- What it Means for You:
- Stable Output: They provide a clean, regulated DC voltage with minimal AC ripple, which is gentle on the LED components.
- Built-in Protections: They have integrated circuits for over-voltage, over-current, and short-circuit protection. If there’s a surge from the main power line, the driver will sacrifice itself to protect the much more expensive and difficult-to-replace LED strip installation. A cheap driver will pass that surge right through, destroying the strip.
- Reliability: The components used in certified drivers are rated for a much longer and more reliable operational life, which is why brands like Mean Well offer 5-7 year warranties.
- What it Means for You:
The 80% Loading Rule6 Revisited
We discussed this rule for preventing flicker, but it’s equally important for longevity. Running a power supply at 100% capacity not only produces unstable power but also generates excessive heat within the power supply itself. This heat degrades the driver’s internal components, causing it to fail years before its time. Adhering to the 80% rule keeps the driver cool and stable, extending the life of both the driver and the LED strip it’s powering.
| Power Supply Choice | Power Quality | Protection Features | Expected LED Strip Lifespan |
|---|---|---|---|
| Cheap, Non-Certified PSU | "Dirty" – High ripple, unstable | None or unreliable | Unpredictable. Prone to random failures within 1-2 years. |
| UL Class 2, 100% Loaded | Stable at first, degrades quickly | Yes | Reduced. Driver may fail early, stressing the strip. |
| UL Class 2, <80% Loaded | "Clean" – Stable, low ripple | Yes | Maximized. Achieves full rated 50,000-hour potential. |
- External Surge Protection7
In environments with known power quality issues (e.g., industrial facilities, older buildings, areas with frequent thunderstorms), adding a dedicated surge protection device (SPD) on the AC line before your LED power supply provides an additional layer of insurance. It’s a small upfront cost that can prevent the catastrophic failure of an entire lighting system.
How Do You Clean and Inspect LED Strip Lights?
The installation is in a kitchen, underneath cabinets. After a couple of years, the light output seems noticeably lower than when it was new. The client says they’ve never touched it.
Dust, grease, and grime accumulating on the surface of an LED strip can block a significant amount of light. Worse, this layer can trap heat, leading to overheating and reduced lifespan, just like a poor heat sink.
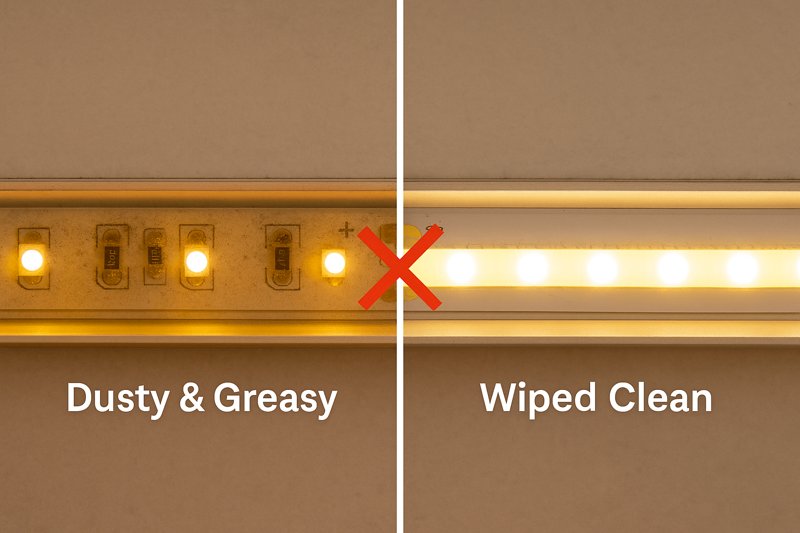
This is the most straightforward aspect of maintenance, but it’s often completely overlooked. LEDs themselves don’t dim significantly from use alone (when properly powered and cooled). What people perceive as the strip "getting old" is often just a physical buildup on the surface. In a clean office, this might take years to become noticeable. But in a kitchen, workshop, or commercial space, the buildup can be rapid. The layer of grime not only blocks light, reducing the perceived brightness, but it also acts as an insulating blanket, trapping heat and contributing to the very lumen depreciation the client is trying to avoid. Regular cleaning is not just about aesthetics; it’s a critical part of thermal management.
A Deeper Dive into Cleaning and Inspection Protocols
Educating your client on a simple maintenance schedule is a value-added service that reinforces your professionalism. For a hands-on business owner like Tom, having a clear protocol for his own team is essential.
The Safe Cleaning Procedure8
You must be gentle; an LED strip is still a flexible circuit board.- Power Off: Always disconnect power to the strip before cleaning. This is a critical safety step.
- Use a Soft Cloth or Brush: For dry dust, a soft microfiber cloth or a soft-bristled paintbrush is ideal. Gently wipe or brush along the length of the strip.
- For Grease or Grime: Lightly dampen a microfiber cloth with a solution of mild soap and water, or use an isopropyl alcohol (IPA) wipe. Wring the cloth out so it is damp, not wet.
- Wipe Gently: Gently wipe the surface of the strip or the diffuser of the aluminum channel. Do not apply heavy pressure.
- Dry Thoroughly: Use a dry cloth to wipe away any moisture before restoring power. Never spray cleaning liquids directly onto the strip or power components.
The Periodic Inspection Checklist9
A quick visual inspection can catch problems before they become critical failures. This should be done annually or semi-annually in demanding environments.
| Inspection Item | What to Look For | Action if Problem is Found |
|---|---|---|
| Physical Connections10 | Loose wires at terminals, connectors pulling away. | Power down, re-seat wires, tighten terminals. |
| Strip Adhesion | Sections of the strip peeling or sagging away from the surface. | Power down, use a compatible adhesive or clips to re-secure. |
| Discoloration | Any browning or yellowing on the strip PCB or LEDs. | This is a sign of severe overheating. Investigate heat sinking. |
| Water Intrusion11 | Moisture, condensation, or corrosion (for outdoor installs). | Power down immediately. Find and seal the point of water entry. |
| Power Supply | Signs of overheating (discoloration), buzzing or humming sounds. | Check ventilation around the PSU. Ensure it’s not covered. |
By providing your client with this simple checklist, you empower them to protect their investment. It shows that you care about the long-term performance of your work, solidifying their trust in you as a true lighting professional.
Conclusion
Maximizing LED lifespan isn’t about finding a magic product. It’s a professional strategy. Manage heat with channels, deliver clean power with quality drivers, and perform regular inspections. This ensures your projects last and your reputation shines.
Explore how aluminum channels enhance heat dissipation, crucial for maintaining LED performance and lifespan. ↩
Understanding heat sinks is crucial for effective thermal management, ensuring longevity and performance of LED systems. ↩
Learn about the impact of ambient temperature on thermal management to optimize LED installations. ↩
Understanding Power Quality is crucial for maintaining reliable and efficient electrical systems. ↩
Explore this link to understand how UL Listed Class 2 Drivers ensure safety and performance in power supplies. ↩
Learn about the 80% Loading Rule to enhance the longevity and reliability of your power supply systems. ↩
Discover how External Surge Protection can safeguard your lighting systems from power quality issues. ↩
Explore this link to learn effective and safe cleaning methods for LED strips, ensuring longevity and performance. ↩
This resource will provide you with a comprehensive checklist to maintain LED lighting systems, preventing costly failures. ↩
Understanding how to inspect physical connections can help you avoid common issues and ensure reliable performance. ↩
Learn effective strategies to protect your LED installations from water damage, enhancing their durability and safety. ↩


