Struggling to choose the right brightness for your outdoor project? The wrong choice can ruin the ambiance or fail to provide a safe environment. Let’s solve this.
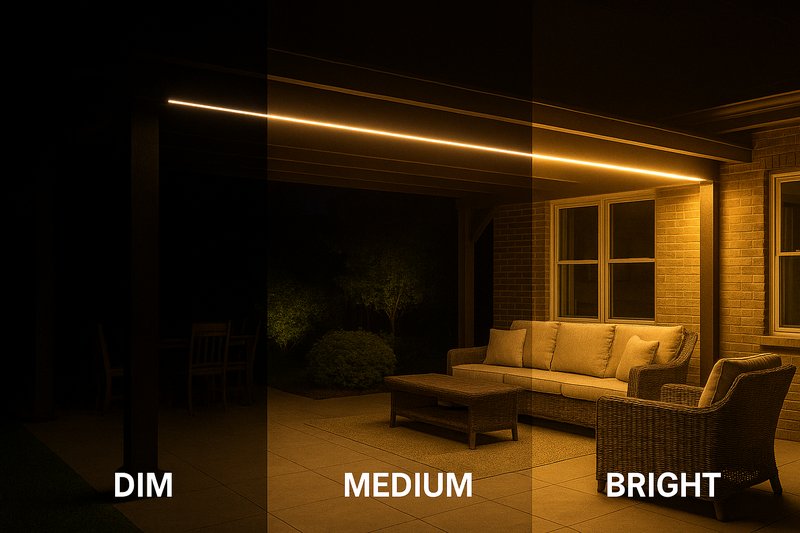
For outdoor LED strips, the ideal lumen count depends on the application. Use 100-300 lumens/meter for accent lighting, 300-700 for path and stair lighting, and 700-1500+ for security or task areas. Choosing correctly ensures both beautiful effects and functional safety.
Choosing the right lumen value is one of the most critical decisions for any outdoor lighting project. It’s not just about making a space bright; it’s about creating the right mood, ensuring safety, and highlighting architectural features effectively. I’ve seen many projects fall short because the client either underestimated or overestimated their lumen needs. In this guide, I’ll walk you through the exact standards my team at Rhlite uses to help clients like you make the perfect choice every time.
What Are Lumens and Why Do They Matter More Than Watts for Outdoor Lighting?
Confused by lighting jargon like lumens and watts? You might be focusing on the wrong metric for brightness, leading to poor lighting outcomes and wasted energy for your projects.
Lumens (lm) measure the total amount of visible light from a source; it’s a direct measure of brightness. Watts (W) measure energy consumption. With efficient LED technology, a lower wattage can produce high lumens, making lumens the most accurate metric for choosing LED strip brightness.

For years, we all bought light bulbs based on wattage. A 100-watt incandescent bulb was the standard for a bright room. But with the rise of LED technology, that thinking is outdated and can lead to costly mistakes. I remember a client, a developer from the US much like you, who kept specifying his outdoor projects in watts. He was used to the old halogen systems. When we first sent him a sample of a 14W/meter LED strip, he was skeptical. He thought it wouldn’t be bright enough. He was shocked when he saw it was actually brighter and more vibrant than his old 50W/meter halogen setup. This is because LEDs are incredibly efficient. They convert more electricity into light and less into heat. That’s why we focus entirely on lumens.
Understanding the Shift from Watts to Lumens
The key is to understand what each unit measures.
- Watts (W): This tells you how much power the light source consumes. It’s a measure of energy use, not light output. In the past, with inefficient technologies like incandescent bulbs, higher wattage consistently meant a brighter light.
- Lumens (lm): This is the real measure of brightness. It quantifies the total light output your eyes can see. A higher lumen value means a brighter light, regardless of the power consumed.
For you as a buyer, architect, or designer, focusing on lumens per meter1 (or per foot) is the only reliable way to specify and compare LED strip lights for your outdoor projects. It ensures you get the exact visual effect you’re planning for.
Practical Implications for Outdoor Projects
When you’re planning a large-scale project, the difference is huge. Using a more efficient, high-lumen-per-watt LED strip means you can achieve the desired brightness with less power. This has several direct benefits for your business:
- Lower Running Costs2: Less wattage means lower electricity bills for the end client, a strong selling point.
- Simpler Installation: Lower power requirements can mean using smaller, less expensive power supplies and thinner gauge wiring, reducing material and labor costs.
- Better Heat Management3: High-efficiency strips produce less heat. For outdoor applications, especially when enclosed in channels or silicone tubes, this is critical for longevity and performance. Overheating is a primary cause of premature LED failure.
Here is a simple table to illustrate the efficiency difference. This is what I show my clients to make the point clear.
| Light Source | Typical Power (Watts) for 800 Lumens | Efficacy (Lumens per Watt)4 |
|---|---|---|
| Incandescent Bulb | 60W | ~13 lm/W |
| Halogen Bulb | 42W | ~19 lm/W |
| Rhlite LED Strip | 8W | 100 lm/W |
As you can see, to get the same amount of light, our LED strip uses a fraction of the power. When you’re sourcing products for a big project, this efficiency translates directly into a competitive advantage for you. You can offer a superior, more durable, and more cost-effective solution.
How Do I Choose the Right Lumens for Different Outdoor Applications?
Have you ever installed landscape lighting that looked weak or security lighting that created harsh glare? This often happens when a one-size-fits-all approach is taken for lumen selection.
Match lumen output to the specific function. Use low lumens (100-300 lm/m) for subtle accents, medium lumens (300-700 lm/m) for defining paths and steps, and high lumens (700-1500+ lm/m) for tasks and security where clear visibility is essential.

The most common mistake I see is treating all outdoor lighting the same. A lighting designer from North America once came to us for a luxury resort project. He initially wanted to use the same bright, 1200 lm/m strip for everything—the garden pathways, under the eaves, and around the pool deck. I knew this would be a disaster. The garden would look like an airport runway, and the pool deck would have an uncomfortable glare. We spent some time on a video call, and I walked him through our application-based approach. We ended up specifying three different brightness levels. The result was a sophisticated, layered lighting design that won his firm an award. He became one of our most loyal clients because we didn’t just sell him a product; we provided a solution.
A Framework for Application-Based Lumen Selection
To avoid these mistakes, you need a clear framework. Here’s the one we use at Rhlite. I’ve broken it down into the three main categories of outdoor lighting.
1. Accent and Decorative Lighting5 (Low Brightness)
This is about creating mood and highlighting beauty. The goal is to draw the eye, not to illuminate a large area. You want a soft, gentle glow.
- Applications: Underneath railings, highlighting garden beds, outlining architectural details (like eaves or window frames), soft cove lighting on a covered patio.
- Recommended Lumens: 100 – 300 lumens per meter (approx. 30 – 90 lumens per foot).
- Why this range? It’s bright enough to be seen and define a shape, but not so bright that it overwhelms the scene or causes glare. It creates ambiance and a high-end feel. Using anything brighter for these applications will look harsh and cheap.
2. Pathway and Safety Lighting6 (Medium Brightness)
Here, the primary goal is safety and navigation. You need enough light to see where you’re going, identify steps, and avoid obstacles, but you still want to maintain a pleasant atmosphere.
- Applications: Along walkways, illuminating individual stairs, defining the edge of a deck or patio, lighting under-cap on retaining walls.
- Recommended Lumens7: 300 – 700 lumens per meter (approx. 90 – 215 lumens per foot).
- Why this range? This provides clear, functional light on the ground where it’s needed. It’s bright enough for safe footing without causing upward glare that can ruin the view of the property or the night sky. In my experience, around 500 lm/m is often the sweet spot for most pathway applications.
3. Task and Security Lighting8 (High Brightness)
For these areas, function and visibility are the top priorities. You need strong, clear light to perform tasks safely or to deter intruders and provide a clear view for security cameras.
- Applications: Above an outdoor grilling station or kitchen, lighting up a main entrance or garage door area, perimeter lighting on a commercial building, general illumination for a large patio used for entertaining.
- Recommended Lumens: 700 – 1500+ lumens per meter (approx. 215 – 450+ lumens per foot).
- Why this range? This level of brightness floods an area with light, minimizing shadows and ensuring everything is clearly visible. For security, bright, uniform light is a powerful deterrent. For task areas like an outdoor kitchen, it ensures you can see what you’re doing clearly and safely.
Here is a quick reference table I give to my clients:
| Application Category | Common Uses | Recommended Lumens (per meter) | Desired Effect |
|---|---|---|---|
| Accent Lighting | Garden beds, under railings, architectural details | 100 – 300 lm/m | Soft glow, ambiance, highlighting |
| Safety/Pathway | Walkways, stairs, deck perimeters | 300 – 700 lm/m | Clear navigation, safe footing, definition |
| Task/Security | Outdoor kitchens, entryways, building perimeters | 700 – 1500+ lm/m | Bright, clear visibility, deterrence |
By using this application-based approach, you move from guessing to making strategic decisions. This not only results in a better final project but also demonstrates a high level of expertise to your own clients.
Do Factors Like Color Temperature and CRI Affect Perceived Brightness?
Are you finding that two LED strips with the same lumen rating look different in brightness on-site? This frustrating issue can be caused by other light quality factors you might be overlooking.
Yes, they have a significant impact. Cooler color temperatures (like 5000K) often appear brighter to the human eye than warmer temperatures (3000K) at the same lumen value. A high Color Rendering Index (CRI) makes colors look more vibrant, which can also enhance the perception of brightness.

Lumens are a raw measure of light output, but they don’t tell the whole story of how we perceive that light. This is a subtle but crucial point that separates the experts from the amateurs. I learned this the hard way years ago. A client in Japan ordered a 4000K strip for a retail facade. The sample looked great. For the final order, the factory we used back then made a mistake and produced it in 2700K at the exact same lumen output. The client was furious. He said it looked "dim and yellow." Technically, the brightness was the same, but the perception was completely different. That’s when I made it our policy at Rhlite to triple-check every specification, especially CCT and CRI, because they are vital to the client’s vision.
How Color Temperature (CCT) Changes Everything
Correlated Color Temperature (CCT)9 is measured in Kelvin (K) and describes the color appearance of the light, from warm yellow to cool blue.
- Warm White (2700K – 3000K)10: This light is cozy and inviting, similar to a traditional incandescent bulb. It’s excellent for creating a relaxing atmosphere on patios or in gardens. However, our eyes perceive this yellowish light as softer and less bright.
- Neutral White (4000K): This is a clean, balanced white light. It’s often used for general outdoor lighting and pathways because it provides good visibility without feeling too harsh or clinical.
- Cool White (5000K – 6500K)11: This light is crisp and energizing, similar to daylight. Because it has more blue light content, the human eye perceives it as significantly brighter than a warm white light of the exact same lumen value. This is known as the Kruithof curve effect12. It’s great for security and task lighting where maximum perceived brightness is the goal.
So, if you have a project that needs to feel safe and look very bright, choosing a 5000K strip might allow you to use a slightly lower lumen package than if you chose 3000K, saving energy while achieving the desired psychological effect.
The Hidden Role of Color Rendering Index (CRI)13
CRI measures how accurately a light source reveals the true colors of objects, on a scale of 0 to 100. The sun has a CRI of 100. For outdoor use, this is more important than you might think.
- Low CRI (below 80): A low CRI light can make colors look dull, washed out, or even distorted. A beautiful green lawn might look grayish, and red brick could appear brownish. This can make the entire space feel dim and lifeless, even if the lumen count is high.
- High CRI (90+)14: A high CRI light makes everything pop. Colors are rich, vibrant, and true to life. This clarity and vibrancy make the entire scene feel brighter and higher in quality. I always recommend a CRI of 90 or higher for any high-end residential or commercial project, especially for landscape lighting where rendering the colors of plants and materials correctly is paramount.
Here is a breakdown to help you decide:
| Factor | How It Affects Perceived Brightness | Best For |
|---|---|---|
| Warm CCT (2700K-3000K) | Appears softer, less bright | Creating a cozy, relaxing ambiance for patios and social areas. |
| Cool CCT (5000K+) | Appears starker, brighter, and more alert | Security lighting, task areas, and modern architectural designs where a crisp look is desired. |
| High CRI (90+) | Makes colors vibrant, enhancing clarity and overall perception of quality and brightness | Landscape lighting, architectural details, outdoor dining areas—anywhere color accuracy is important. |
When you specify your next order, don’t just state the lumens. Specify the CCT and CRI as well. This ensures there are no surprises on-site and the final result matches your design intent perfectly. It’s this attention to detail that protects your reputation.
What Are the Technical Considerations Beyond Lumens for Outdoor Strips?
Are you focused so much on brightness that you forget about the factors that ensure an outdoor LED strip actually survives? A bright light that fails in six months is a disaster for your reputation and budget.
Beyond lumens, you must verify the IP (Ingress Protection) rating for water and dust resistance—IP67 or IP68 is essential for outdoor use. Also, check the quality of the jacketing material (silicone is better than PVC) and the PCB (Printed Circuit Board) thickness for durability and heat dissipation.

This is where my experience as a factory owner really comes into play. I’ve seen firsthand what happens when contractors choose a product based only on lumens and price. One of my current clients, a distributor in the US, used to source from another supplier. He had a huge hotel project where the installed outdoor strips started failing after one rainy season. The jacketing, a cheap PVC, had yellowed and cracked, allowing water to get in and corrode the electronics. The financial loss and damage to his relationship with the hotel were immense. He came to us because he needed a partner who understood that for outdoor products, durability is not negotiable. The lumen count means nothing if the strip can’t withstand the elements.
The Non-Negotiable: IP Rating
The IP rating is a two-digit number that tells you how well a product is sealed against solids (first digit) and liquids (second digit). For outdoor use, you should not even consider anything less than IP65, and frankly, I always recommend higher.
- IP65: Protected against dust and low-pressure water jets from any direction. This is the absolute minimum, suitable for covered areas like a porch ceiling where it won’t be directly exposed to rain or standing water.
- IP67: Fully protected against dust and can be temporarily submerged in water up to 1 meter deep. This is a robust choice for most landscape, pathway, and facade lighting. It can handle heavy rain, sprinklers, and puddles.
- IP68: Fully protected against dust and can be continuously submerged in water under conditions specified by the manufacturer. This is necessary for underwater applications like in pools or fountains.
Always ask for the official IP rating test report from your supplier. This is a pain point for many buyers like Tom, my target audience, who have been shown fake certificates. A reliable supplier will provide this without hesitation.
Material Science: Jacketing and PCB Quality
The materials used in the LED strip are just as important as the electronics.
Jacketing Material: This is the protective outer layer.
- PVC/Epoxy: Cheaper, but a terrible choice for outdoor. It yellows and becomes brittle when exposed to UV sunlight and temperature changes. It will crack and fail.
- Silicone: This is the industry standard for high-quality outdoor strips. It is UV-stable, remains flexible in a wide range of temperatures, and does not yellow or crack. It provides long-term protection. We at Rhlite only use high-grade silicone for our outdoor products.
PCB (Printed Circuit Board) Quality: The LEDs are mounted on a PCB.
- Thickness: A thicker PCB, typically 2 or 3 ounces of copper, is better at dissipating heat. Heat is the number one enemy of LEDs; it reduces their brightness and lifespan. A cheap, thin PCB will cause the LEDs to run hot and fail prematurely.
- Consistency: A quality PCB ensures that the current is distributed evenly to all the LEDs, which means you get consistent brightness along the entire length of the strip.
Here is a checklist for evaluating the technical quality of an outdoor LED strip:
| Technical Feature | Poor Quality | High Quality (Rhlite Standard) | Why It Matters |
|---|---|---|---|
| IP Rating | IP20, IP65 claimed without a report | IP67 or IP68 with valid test report | Ensures long-term survival against water and dust. |
| Jacketing Material | PVC, Epoxy Resin | UV-stable, food-grade Silicone | Prevents yellowing, cracking, and water ingress. |
| PCB Thickness | 1oz Copper | 2oz or 3oz Copper | Better heat dissipation, leading to longer LED lifespan. |
| LED Binning | Wide binning, inconsistent color | Tight 3-Step MacAdam binning | Guarantees uniform color and brightness across different reels. |
When you discuss your next project with a supplier, ask about these technical points. Their answers will quickly tell you if they are a quality-focused factory or just a trading company moving cheap products.
How Can I Ensure the Lumens I Buy Are the Lumens I Get?
Worried that the LED strips you receive won’t be as bright as the datasheet claims? This is a common problem in the industry, caused by misleading specs and poor quality control, leading to inconsistent and underperforming projects.
To ensure accurate lumen output, always request a third-party IES test report for the specific product you’re buying. Also, work with reputable suppliers who have their own integrating sphere for in-house quality control and can guarantee tight LED binning for consistent brightness.

Trust is a major issue when sourcing from overseas. One of my clients, a lighting designer, shared a story with me. He had specified a 1000 lm/m strip from a new supplier for a commercial project. When the strips arrived and were installed, the entire building facade looked dim. His crew measured the output, and it was barely 600 lm/m. The supplier had either outright lied on the datasheet or had terrible quality control. The project was delayed, and he had to rush-order replacements from us to fix the problem. This experience taught him a valuable lesson: verifying claims before placing a large order is not optional; it’s essential for protecting your business.
The Power of Third-Party Verification
The most reliable way to verify a supplier’s lumen claims is to ask for an IES (Illuminating Engineering Society) test report.
- What it is: This is a standardized file generated by a special piece of equipment called a goniophotometer, usually operated by an accredited third-party lab. It provides a complete data set on the light’s performance, including total lumen output, beam angle, and intensity.
- Why it’s important: It’s an unbiased, scientific measurement. A supplier who is confident in their product quality will have these reports readily available. If a supplier hesitates or gives you a generic report that doesn’t match the exact product model, that’s a major red flag.
In-House Quality Control: The Integrating Sphere
For our clients at Rhlite, we go a step further. We have our own integrating sphere in our factory.
- What it does: This machine allows us to test the lumen output of our LED strips right off the production line. We don’t have to guess or rely solely on the LED chip manufacturer’s data.
- How it benefits you: We can perform batch testing to ensure every reel of a specific model has a consistent lumen output. If you order 50 reels of our 1200 lm/m strip, we can guarantee that reel #1 and reel #50 will be virtually identical in brightness. This consistency is crucial for large projects where multiple strips are visible near each other.
The Importance of LED Binning
Another critical factor is "LED binning." LED chips are produced in large wafers, and there are always slight variations in their brightness and color. The process of sorting these chips into "bins" based on their performance is called binning.
- Poor Binning: A cheap supplier might use LEDs from many different bins in the same strip. This results in visible differences in brightness and color from one section of the strip to another.
- Tight Binning (e.g., 3-Step MacAdam Ellipse): A high-quality manufacturer like us invests in tightly binned LEDs. This means all the LEDs on your strip are so similar in color and brightness that the human eye cannot detect any difference. This ensures perfect uniformity along the entire length and across multiple reels.
Here is a checklist to use when vetting a new supplier:
| Verification Method | What to Ask For | Why It Matters | Red Flag |
|---|---|---|---|
| Third-Party Testing | "Please provide the IES test report for this specific model number." | Provides unbiased proof of lumen output and other key metrics. | The supplier can’t provide a report or sends a generic one. |
| In-House QC | "What equipment do you use for in-house lumen testing, like an integrating sphere?" | Shows the supplier is invested in quality control and consistency. | "We trust our LED supplier’s data." (This is not enough) |
| Consistency Control | "What is your LED binning standard? Can you guarantee 3-Step MacAdam?" | Ensures uniform brightness and color across your entire order. | They don’t know what binning is or can’t provide a specific standard. |
By asking these sharp, technical questions, you take control of the conversation. You demonstrate your expertise and make it clear that you are a serious buyer who will not accept substandard products. This is the best way to build a relationship with a reliable factory partner and avoid the pain points that many buyers face.
Conclusion
Choosing the right lumens isn’t about finding one magic number. It’s about a strategic approach based on application, light quality, and robust technical verification to ensure lasting performance.
Understanding lumens per meter is crucial for achieving the desired brightness in outdoor projects. ↩
Exploring lower running costs can help you save money and enhance your project’s profitability. ↩
Effective heat management is vital for the longevity and performance of LED lights, especially outdoors. ↩
Learning about efficacy helps you choose energy-efficient lighting solutions that save costs and energy. ↩
Explore this link to understand how to create mood and highlight beauty effectively with lighting. ↩
This resource will guide you in selecting the right lighting for safety and navigation in outdoor areas. ↩
Discover the ideal lumen ranges for different outdoor lighting applications to enhance your projects. ↩
Learn about the importance of strong lighting for safety and visibility in outdoor tasks and security. ↩
Understanding CCT is crucial for selecting the right lighting for your space, enhancing ambiance and functionality. ↩
Warm White lighting creates a cozy atmosphere, perfect for relaxing spaces like patios and gardens. ↩
Cool White lighting enhances brightness perception, making it ideal for security and task-oriented areas. ↩
Understanding the Kruithof curve effect can help you optimize lighting choices for energy efficiency and brightness. ↩
Exploring CRI helps you choose lights that accurately represent colors, improving the overall aesthetic of your environment. ↩
A High CRI ensures vibrant colors and clarity, essential for high-end residential and commercial projects. ↩


