You love the idea of "free" solar power for outdoor lights, but the cheap, all-in-one solar products from hardware stores are dim, break easily, and fail after the first cloudy day, frustrating your clients.
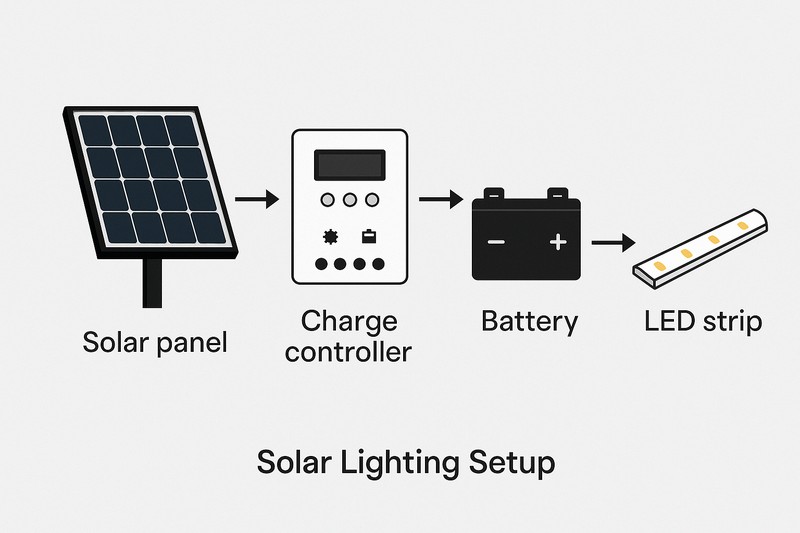
A reliable solar lighting system is built from four correctly balanced components: a properly sized solar panel, a charge controller, a deep-cycle battery, and an energy-efficient, low-voltage LED strip. Success depends on matching these parts to your specific light load.
As a factory that supplies LED lighting solutions, I know that solar power is not magic. It’s a science of energy balance. A professional, long-lasting solar installation isn’t something you buy in a single box. It’s a system you design. Getting this design right is the key to creating an off-grid lighting solution that actually works as promised.
What Are the Core Components of a Solar Lighting System?
You want to build a solar lighting setup, but looking at all the different parts—panels, batteries, wires, controllers—is confusing. You’re not sure how they all fit together or what each piece actually does.
Every proper solar system has four essential parts: the Solar Panel collects energy, the Charge Controller protects the system, the Battery stores the energy for nighttime use, and the low-voltage LED Strip produces the light.
Think of it like a tiny, personal power grid. The panel is the power plant, the battery is the reservoir, and the charge controller is the smart grid operator that prevents blackouts and equipment damage. Forgetting any one of these components, especially the charge controller, is a recipe for quick failure.
Understanding Each Component’s Role
A solar lighting system is only as strong as its weakest link.
1. The Solar Panel (The Collector)
This is the engine of your system. Its job is to convert sunlight into DC electrical energy. The panel’s power is measured in Watts. A larger, higher-wattage panel can generate more power in fewer hours of daylight, making it better for areas with less sun or for powering brighter lights.
2. The Charge Controller (The Brain)
This is the most critical component for system longevity. This small device sits between the solar panel and the battery. Its job is to regulate the voltage from the panel, preventing it from overcharging and damaging the battery. It also prevents the battery from being drained too low by the lights, which can also permanently harm it. A simple PWM controller is fine for small systems, while a more efficient MPPT controller is better for larger setups.
3. The Battery (The Bank)
This is your energy savings account. The system stores the power generated during the day in the battery for use at night. You should not use a regular car battery. You need a "deep-cycle" battery, like an AGM or LiFePO4 type, which is designed to be discharged and recharged many times. Its capacity is measured in Amp-hours (Ah).
4. The LED Strip (The Light)
This is the "load"—the part that actually uses the power. For solar applications, you must use low-voltage (12V or 24V DC)1 LED strips2. The key is to choose a strip that is highly efficient, meaning it produces a lot of light (lumens) for the amount of power it consumes (watts).
| Component | Primary Function | Key Metric to Look For |
|---|---|---|
| Solar Panel | Converts sunlight to electricity. | Watts (W) |
| Charge Controller | Protects the battery. | Amps (A), PWM vs. MPPT |
| Battery | Stores energy for later use. | Amp-hours (Ah), Voltage (V) |
| LED Strip | Consumes energy to make light. | Watts per meter, Lumens |
How Do You Correctly Size the Solar Panel and Battery?
Your new solar setup looks great, but after one cloudy day, the lights die before midnight. You underestimated your power needs, and now the system is unreliable and doesn’t meet your client’s expectations.
First, calculate your total daily energy use in Watt-hours (strip wattage x hours of use). Then, size your battery to be 3-4 times that daily load, and size your panel to fully recharge that battery in one day of average sun.
This is the step where most DIY solar projects fail. People guess. But as a professional, you must calculate. Oversizing slightly is a wise investment that buys reliability. An undersized system is a guaranteed failure and a source of client complaints.
The Sizing Calculation
Follow these three steps for a reliable system.
Step 1: Calculate Your Daily Load
First, figure out how much energy your LED strip will use per night. This is your "load."
- Formula: (Strip Power in Watts/meter) x (Length in meters) x (Hours of use per night) = Total Watt-hours (Wh)
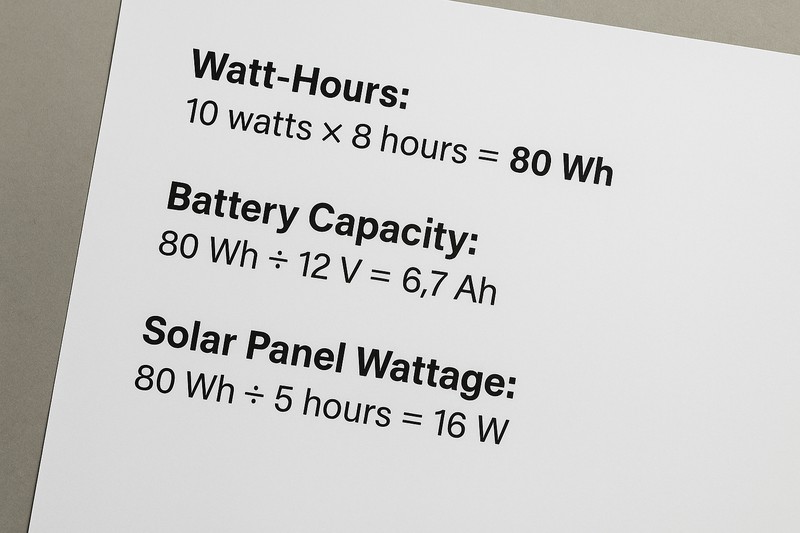
- Example: A 5-meter strip that uses 4 Watts/meter, running for 6 hours: 4 W/m 5 m 6 h = 120 Wh. Your system must provide 120 Watt-hours of energy every night.
Step 2: Size The Battery
The battery must store enough power for the nightly load, plus extra for cloudy days. This extra is called "days of autonomy." A professional system should have at least 2-3 days of autonomy.
- Formula: (Daily Watt-hours) x (Days of Autonomy) = Required Battery Capacity in Wh.
- Example: 120 Wh/night * 3 days = 360 Wh. You need a battery that can store 360 Wh. Convert to Amp-hours by dividing by voltage: 360 Wh / 12V = 30Ah. You need a 12V battery of at least 30Ah.
Step 3: Size The Solar Panel
The panel must recharge the battery fully after a normal night’s use. This depends on your location’s "peak sun hours"—the average number of hours per day your panel will produce its rated power.
- Formula: (Daily Watt-hours) / (Peak Sun Hours3) = Required Panel Wattage4.
- Example: Your location gets 4 peak sun hours. 120 Wh / 4 h = 30 Watts. You need a 30W panel at minimum. It’s wise to oversize by 25-50% to account for real-world inefficiencies, so a 40W or 50W panel would be a safer choice.
| System Part | Example Calculation | Professional Tip |
|---|---|---|
| Light Load | (5 W/m 10m 5h) = 250 Wh/night | Be realistic about how many hours the light will be on. |
| Battery Size | *(250 Wh 3 days) / 12V = 62.5 Ah** | Always plan for at least 2-3 cloudy days. |
| Panel Size | *(250 Wh / 4 sun hours) 1.25 = 78W** | Oversize the panel by at least 25% to ensure full charging. |
Which LED Strips Are Best for Solar-Powered Systems?
You connect a super-bright, high-density LED strip to your new solar setup. It works, but it completely drains your battery in just two hours, leaving the area dark for the rest of the night.
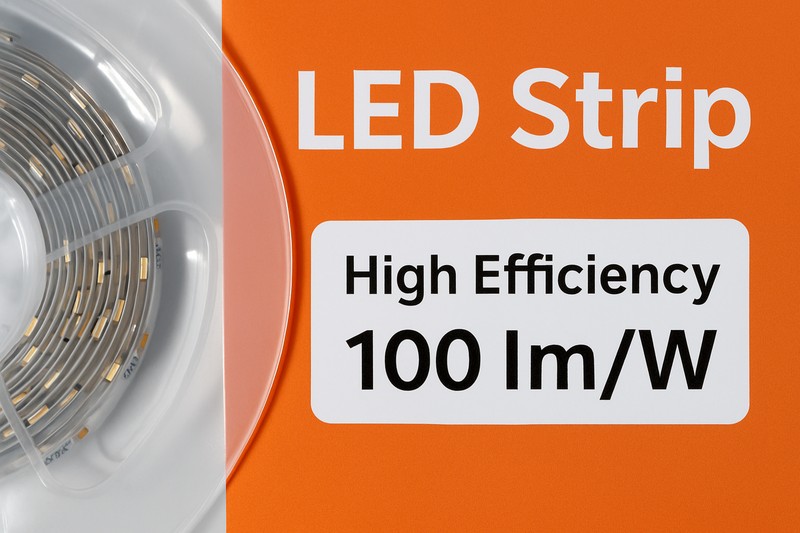
For solar applications, you must use highly efficient 12V or 24V DC LED strips. The key metric is high luminous efficacy (lumens per watt), which provides the most light for the least amount of energy consumed.
From the factory, I can tell you that not all LED strips are created equal. For a mains-powered project, you might choose a strip for maximum brightness. But for solar, energy efficiency is king. Every watt you save is one less watt you have to generate and store, allowing you to use a smaller, less expensive panel and battery.
Selecting the Right Light
The strip you choose directly impacts the size and cost of your entire system.
Efficiency is Everything: Lumens per Watt
Think of this like "miles per gallon" for light. A strip with high luminous efficacy might produce 120 lumens of light for every watt it consumes, while an inefficient one might only produce 70 lumens. Choosing the efficient strip means you get the same amount of brightness while using almost half the power. This is the single most important factor for solar lighting.
Voltage Choice: 12V vs. 24V
Both 12V and 24V DC strips work great for solar. However, 24V systems offer a small advantage. They experience less voltage drop over long wire runs. This means if your solar panel and battery are far from the actual light location, a 24V system will deliver power more efficiently with less energy wasted in the wire.
Durability for the Outdoors
Since the entire system lives outside, the LED strip must be built to survive. Do not compromise here. Insist on a strip with at least an IP67 rating5 for water resistance and a high-quality, UV-stabilized silicone jacket. A cheap PVC jacket will turn yellow and crack in the sun, allowing water to enter and destroy the LEDs.
| Strip Characteristic | What to Look For | Why It Matters for Solar |
|---|---|---|
| Efficiency | High Lumens per Watt (Lm/W)6 | Uses less battery power for the same amount of light. |
| Power Consumption | Low Watts per meter | Allows for longer runtimes or a smaller battery/panel. |
| Voltage | 12V or 24V DC | Standard for DC battery systems; 24V is better for long runs. |
| Protection | IP67/IP68 Rating, UV-Resistant | Ensures the strip survives years of rain and sun exposure. |
What Are the Key Steps for Installing the System?
You have all the right, perfectly sized components, but if you connect them in the wrong order or fail to protect them from the elements, your expensive system could be damaged before it’s even turned on.
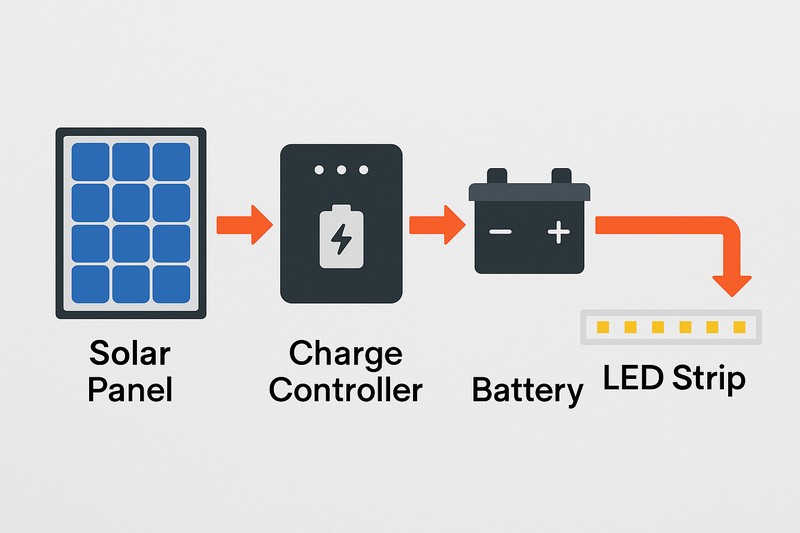
Mount the panel for maximum sun. House the battery and controller in a weatherproof box. Crucially, connect the battery to the controller first, then the panel to the controller, and finally the LED strip to the controller.

This sequence is critically important. As an engineer, I can tell you that connecting the panel to the controller before the battery can send unregulated voltage through the controller and damage it. Doing things in the right order and ensuring everything is waterproof is what separates a professional installation from a failed experiment.
A Professional’s Installation Checklist
A clean, safe, and logical installation is key.
1. Panel Placement is Paramount
Mount the solar panel where it will receive the most direct, unobstructed sunlight throughout the day. In the Northern Hemisphere, this means facing south. Angle it correctly (roughly equal to your latitude) to maximize sun exposure. Keep it away from shadows cast by trees or buildings.
2. The Critical Wiring Order
This sequence must be followed to avoid damaging the charge controller.
- Step A: Connect the battery’s positive and negative terminals to the battery inputs on the charge controller. The controller will power on and detect the system voltage (12V or 24V).
- Step B: Connect the solar panel’s positive and negative wires to the panel/PV inputs on the controller.
- Step C: Connect the LED strip’s positive and negative wires to the load outputs on the controller.
3. Weatherproof Everything
The battery and charge controller are the heart of your system and must be protected from rain, snow, and moisture. House them together in a NEMA 3R7 (or higher) rated weatherproof electrical enclosure. Use watertight cable glands8 where wires enter the box to create a proper seal. This step is not optional; it is essential for safety and system survival.
| Installation Step | Priority | Reason |
|---|---|---|
| Panel Placement | High | To maximize energy collection. |
| Wiring Order | CRITICAL | To prevent damage to the charge controller. |
| Weatherproof Enclosure | High | To protect electronics from moisture and damage. |
| Secure All Connections | Medium | To prevent loose wires and intermittent performance. |
Conclusion
Building a reliable solar lighting system is a science, not a guess. By carefully selecting and balancing the four core components, you create a powerful, dependable off-grid solution that works every night.
Learn why low-voltage options are crucial for safety and efficiency in solar-powered lighting. ↩
Explore this link to find top-rated LED strips that maximize efficiency and brightness for your solar projects. ↩
Understanding peak sun hours is crucial for optimizing solar panel performance and ensuring efficient energy production. ↩
Learning how to calculate required panel wattage helps in selecting the right solar panel size for your energy needs. ↩
Understanding IP67 ratings helps ensure you choose durable LED strips that withstand outdoor conditions. ↩
Learning about Lm/W can guide you to more efficient lighting solutions, saving energy and costs. ↩
Understanding NEMA ratings is crucial for selecting the right enclosure to protect your system from the elements. ↩
Learn about watertight cable glands to ensure a proper seal and enhance the longevity of your electrical installations. ↩


