Want to perfectly fit LED strip lights into your custom project but unsure if you can trim them? The fear of damaging your new lights by cutting them incorrectly can be a real roadblock.
Yes, you can cut most LED strip lights. They are designed with designated cut marks, usually indicated by a scissor icon or a line across copper pads, allowing you to customize their length safely.
As the owner of Rhlite, a factory specializing in LED strip light solutions, this is one of the most common questions I hear. And the good news is, tailoring LED strips to your exact needs is not only possible but also quite straightforward when done correctly. For my clients, whether they are lighting designers like Tom crafting intricate designs, or contractors needing precise lengths for installations, knowing how to cut strips properly is essential for a clean and functional outcome. Let’s look at how to do this right.
Where Exactly Can You Cut LED Strip Lights?
So you know LED strips can be cut, but where do you make the snip? Cutting randomly will definitely cause problems, so finding the right spot is key to success.
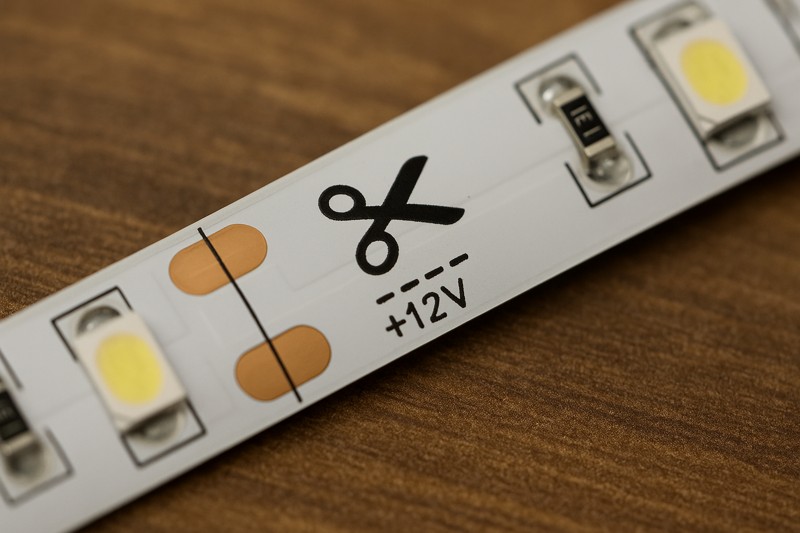
You can only cut LED strip lights at their designated cut points. These are clearly marked along the strip, usually with a scissor icon, a straight line across copper solder pads, or just the pads themselves.

The ability to customize length is a major advantage of LED strip lights. However, this flexibility depends entirely on respecting these pre-determined cut points. At Rhlite, we ensure these marks are very clear on all our customizable LED strips because we know how important this is for our B2B clients who value precision and efficiency. Cutting anywhere else will interrupt the circuit of that segment.
Understanding Cut Marks and Strip Segments
LED strip lights1 are essentially a series of small, independent circuits or segments. Each segment contains a few LEDs (often 3 for 12V strips or 6 for 24V strips) and current-limiting resistors.
- Identifying the Marks:
- Scissor Icon: The most obvious mark. If you see this, that’s your spot.
- Line Across Copper Pads: Often, you’ll see a straight line printed across a set of copper solder pads. This line indicates the center of the cuttable zone.
- Copper Solder Pads: Even without a line or icon, sets of exposed copper pads (usually 2 for single color, 4 for RGB, 5 for RGBW, etc.) indicate a connection point and therefore a cut point between segments. You cut right through the middle of these pads.
- Why Only at Cut Marks?
Each segment is wired in series internally. The copper pads at the cut marks are the start and end points of these individual circuits. Cutting anywhere else within a segment will break that segment’s circuit, and the LEDs in that damaged segment will not light up. The rest of the strip (beyond the damaged segment, if cut properly at the next mark) will usually still work. - Segment Length: The distance between cut marks2 (and thus the length of each segment) varies depending on the strip’s voltage and LED density.
- 12V strips typically have shorter segments (e.g., every 2.5cm, 5cm, or 3 LEDs).
- 24V strips often have longer segments (e.g., every 5cm, 10cm, or 6 LEDs). This is one reason 24V strips are good for longer runs with fewer connections, though it means less granular cutting.
I remember a new installer for one of my clients in North America who was rushing a job and accidentally cut an RGBW strip mid-segment. Only half of that small 10cm section worked, and the colors were off. It was a small mistake, but it meant replacing that piece, costing time. Always locate those copper pads or scissor marks!
| Cut Mark Feature | Description | Importance | Rhlite Design Focus |
|---|---|---|---|
| Scissor Icon | Clear visual guide for cutting. | Easiest mark to identify, user-friendly. | Often included for clarity. |
| Line on Copper Pads | Printed line bisecting solder pads. | Precise guide for cutting through pads. | Standard on many Rhlite strips. |
| Copper Pads | Exposed metal points for electrical connection. | Fundamental cut point, allows re-connection. | High-quality, solderable pads. |
| Segment Length | Distance between two cut marks. | Determines cutting precision. | Varies by voltage (12V/24V) & design. |
| Circuit Integrity | Each segment is an independent circuit. | Cutting outside marks breaks the local circuit. | Ensured by proper component layout. |
Respecting these designated cut points is the absolute foundation of successfully customizing your LED strip lights.
What Tools Do You Need to Cut LED Strip Lights Safely and Accurately?
You’ve found the designated cut marks on your LED strip. Now, what’s the best tool for the job to ensure a clean, precise cut without damaging the strip or yourself?
You need a pair of sharp scissors for most flexible LED strips. Alternatively, a sharp craft knife or box cutter on a cutting mat can provide very precise cuts, especially for thicker or more rigid strips.
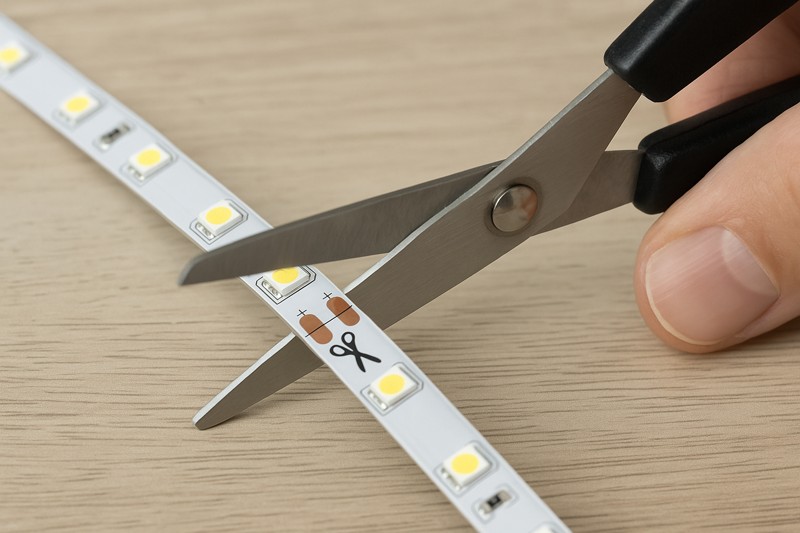
Using the right tool is important for a clean cut, which not only looks professional but also makes re-connecting the strip easier if needed. At Rhlite, we make our flexible strips easy to cut with standard sharp tools, a small detail that clients like Tom, who manage installation teams, appreciate for efficiency. You don’t need specialized, expensive cutters.
Choosing Your Cutting Tool and Technique
While it seems simple, the quality of your cut matters.
- Sharp Scissors (Most Common)3:
- Pros: Readily available, easy to use, provides good control for straight cuts on flexible PCB strips.
- Cons: Can sometimes slightly compress the strip if very dull, potentially making it a bit harder to insert into solderless connectors.
- Technique: Ensure the scissors are sharp. Align them carefully with the center of the cut mark/copper pads. Make a single, decisive snip. Standard office scissors usually work fine.
- Craft Knife / Box Cutter / Utility Knife4:
- Pros: Can achieve very clean and precise cuts, especially useful if the strip has a thicker silicone coating or if you are working with more rigid PCB material.
- Cons: Requires a cutting mat or a safe cutting surface underneath. Needs a steady hand and more care to avoid accidental slips and injury.
- Technique: Place the LED strip on a non-slip cutting mat. Align a metal ruler along the cut mark for a perfectly straight guide. Press firmly and draw the sharp blade through the strip in one or two smooth passes.
- Wire Cutters/Snips (Generally Not Recommended for the Strip Itself)5:
- While great for cutting wires, using them on the flat PCB of the strip can crush or deform it, potentially damaging the delicate copper pads or nearby components. Stick to scissors or a blade for the strip.
Safety First!
- Power Off: Always ensure the LED strip is disconnected from any power source before cutting. While it’s low voltage, it’s good practice and prevents any accidental shorting.
- Good Lighting: Work in a well-lit area so you can clearly see the cut marks.
- Stable Surface: Cut on a flat, stable surface.
I’ve seen people try to tear strips or use dull tools. This often results in jagged edges, lifted copper pads, or even damage to the LEDs near the cut. A clean cut is vital if you plan to use solderless connectors, as they need a neat end to make good contact with the copper pads.
| Tool Type | Best For | Pros | Cons | Rhlite Tip |
|---|---|---|---|---|
| Sharp Scissors | Most flexible LED strips (common) | Easy to use, readily available, good control | Can slightly compress if dull | Recommended for most Rhlite strips |
| Craft Knife/Box Cutter | Thicker strips, waterproof coatings, precision | Very clean cuts, no compression | Requires cutting mat, more care needed | Good for IP67/IP68 silicone tube strips |
| Wire Cutters | Wires only | Good for wires | Not for the strip PCB – can crush/damage | Avoid using on the strip itself |
| Dull Tools (Any) | Nothing | None | Jagged cuts, lifted pads, potential damage | Always use sharp tools |
A sharp, appropriate tool and a steady hand are all you need for a perfect cut every time.
What Happens if You Cut LED Strip Lights in the Wrong Place?
Mistakes can happen. What are the consequences if you accidentally miss the mark and cut your LED strip somewhere other than the designated cut line? Will the whole strip be ruined?
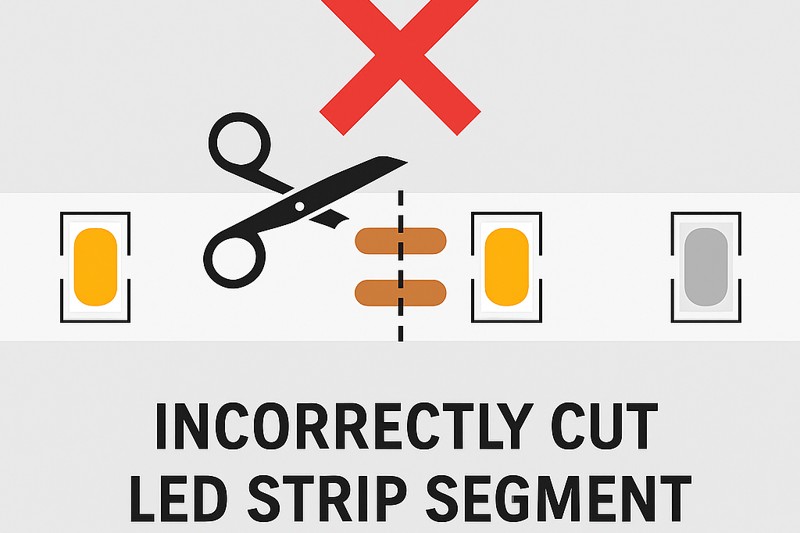
If you cut an LED strip light in the wrong place (not on a cut mark), the small segment of LEDs you cut into will likely not work. The LEDs up to the previous correct cut mark should still function, and the rest of the strip beyond the next correct cut mark should also work if properly connected.
This is a common concern, especially for those new to working with LED strips. While cutting in the wrong spot is not ideal, it usually doesn’t mean the entire strip is trash. As a supplier, Rhlite aims to make strips robust, but the basic electrical principles still apply. For a project manager like Tom, minimizing material waste due to cutting errors is important for cost control.
The Impact of an Incorrect Cut
Understanding the "why" helps prevent mistakes and manage them if they occur.
- Breaking the Circuit: As mentioned, LED strips are made of many small, independent series circuits (segments). Each segment has its LEDs and resistors connected in a line. The cut marks are essentially the terminals for these segments. If you cut between these terminals (i.e., mid-segment), you sever that series circuit. The LEDs within that specific, incorrectly cut segment will no longer have a complete path for electricity and will not light up.
- Damage is Localized:
- The good news is that the damage is usually confined to the segment you cut into.
- The portion of the strip before your bad cut6 (up to the last valid cut mark) should still be perfectly functional.
- The portion of the strip after your bad cut (starting from the next valid cut mark) should also be usable.
- What About the Badly Cut Piece?
The small piece where the incorrect cut was made is typically unusable. For example, if a segment is 5cm long and you cut 2cm into it, that 5cm segment is now broken. You cannot easily repair or use the 2cm piece or the remaining 3cm piece of that specific segment. - Potential for Short Circuits (Less Common with Clean Cuts): If the cut is very messy and copper traces from different polarities are accidentally bridged, it could theoretically cause a short, but this is less likely with a clean cut even if it’s in the wrong spot. The main issue is the open circuit for that segment.
Example Scenario:
Imagine you have a 1-meter strip with cut marks every 5cm. You intend to cut it at the 50cm mark but accidentally cut it at 52cm.
- The first 50cm of the strip (up to the correct cut mark) will work fine.
- The 5cm segment from 50cm to 55cm is where your bad cut occurred (at 52cm). This 5cm segment will not work.
- The rest of the strip from the 55cm cut mark to the 1-meter end will still work if you later cut it properly at the 55cm mark and connect power.
- The 2cm piece (from 50cm to 52cm) and the 3cm piece (from 52cm to 55cm) are likely unusable parts of that one damaged segment.
I always advise my clients to measure twice and cut once. If a mistake is made, don’t panic. Assess the damage. Often, you only lose that small segment, and the rest of the strip material is still perfectly good if you then make your next cut on a proper cut line.
| Aspect of Incorrect Cut | Consequence | What Still Works | What To Do Next |
|---|---|---|---|
| Target Segment | The segment where the incorrect cut was made will not light up. | LEDs in that specific segment are out. | This segment is likely unusable. |
| Strip Portion Before Bad Cut | Unaffected, works normally. | All segments up to the last valid cut mark. | Can be used as intended. |
| Strip Portion After Bad Cut | Unaffected, works if cut properly at the next valid cut mark. | All segments from the next valid cut mark onwards. | Make a new, correct cut at the next cut line. |
| Risk of Wider Damage | Very low for the rest of the strip if the bad cut is relatively clean. | Other segments remain independent. | Focus on salvaging the usable lengths. |
| Material Waste | The length of the one damaged segment is typically lost. | – | Minimize by careful measurement. |
While it’s best to avoid incorrect cuts, understanding that the damage is usually localized can save a lot of frustration and material.
Can You Reconnect LED Strips After Cutting Them?
You’ve successfully cut your LED strip to the desired length. But what if you need to join two cut pieces together, or connect a cut end to a power supply or controller? Is it possible to put them back together?
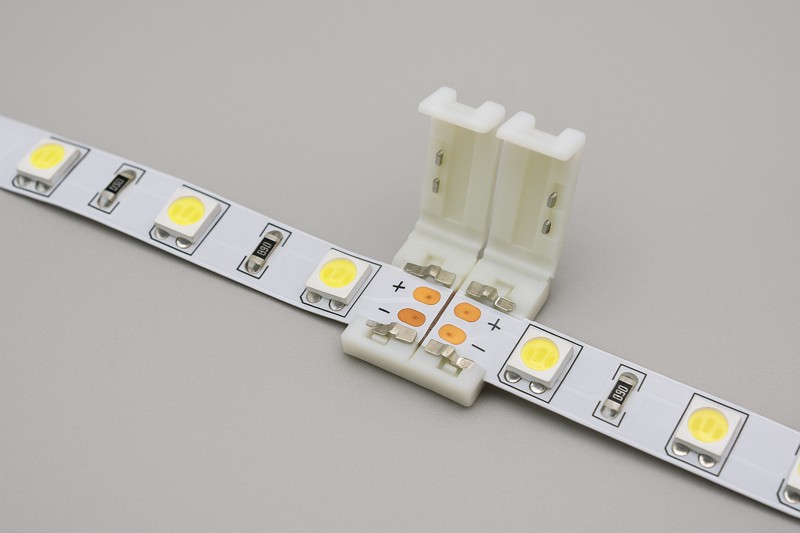
Yes, you can easily reconnect LED strips after cutting them. This is typically done using solderless LED strip connectors or by soldering wires directly to the copper pads on the strip.
This ability to cut and then reconnect is fundamental to the versatility of LED strips, allowing for custom configurations, navigating corners, or bridging gaps. For my Rhlite clients, particularly those doing complex installations or OEM/ODM product development like Tom might oversee, reliable reconnection methods are crucial. We ensure our strip pads are suitable for both types of connections.
Dive Deeper: Methods for Reconnecting Cut LED Strips
There are two primary ways to bring cut LED strip sections back into a circuit:
Solderless Connectors (Quick & Easy):
- How they work: These are small plastic clips or clamps that have metal contacts inside. You open the connector, slide the cut end of the LED strip under the contacts (ensuring the strip’s copper pads align with the connector’s contacts and polarity matches), and then snap the connector closed.
- Types:
- Strip-to-Strip Connectors: Join two pieces of LED strip directly.
- Strip-to-Wire Connectors: Have a connector for the strip on one end and pre-attached wires on the other, for connecting to power supplies, controllers, or bridging gaps.
- Pros: No soldering required, very fast, easy for anyone to use. Good for DIY projects or quick field repairs.
- Cons: Can be bulkier than soldered connections. The connection might not be as robust or vibration-resistant as solder over the very long term. For outdoor/wet locations, you need specific IP-rated waterproof connectors, which can be larger.
- Polarity is Key: Always match the
+and-(and R, G, B, W if applicable) markings on the strip to the connector.
Soldering (Strong & Reliable):
- How it works: Involves melting solder to create a direct, permanent electrical and mechanical bond between wires and the copper pads on the LED strip, or between two strips by soldering jumper wires.
- Pros: Creates a very strong, low-resistance, and reliable connection. The most compact connection method. Preferred for professional installations where longevity and robustness are paramount, and essential for making connections truly waterproof with heat shrink tubing.
- Cons: Requires soldering skills and equipment (soldering iron, solder, flux). Takes more time than using connectors.
- Technique:
- ‘Tin’ the copper pads on the LED strip and the ends of your wires (apply a small amount of solder to each).
- Position the tinned wire on the tinned pad and briefly apply heat with the soldering iron to fuse them.
- Ensure correct polarity.
- For outdoor use, cover the soldered joint with adhesive-lined heat shrink tubing to make it waterproof.
Many of my professional clients, especially those doing outdoor architectural lighting, prefer soldering for its reliability and ability to be perfectly sealed. However, for quick indoor setups or when soldering isn’t feasible, good quality solderless connectors are a great alternative. Rhlite produces strips with clear, easy-to-solder pads to facilitate this.
| Reconnection Method | Skill Level | Speed | Connection Strength | Profile/Size | Waterproofing Option | Rhlite Preferred Use Case |
|---|---|---|---|---|---|---|
| Solderless Connectors | Beginner | Fast | Good | Bulkier | Specific IP-rated connectors available | Quick indoor setups, DIY, easy field connections |
| Soldering | Intermediate | Slower | Excellent | Compact | Excellent with adhesive heat shrink | Professional, outdoor, long-term reliability |
Whether you choose solderless connectors or soldering, the ability to reconnect cut LED strips opens up a world of custom lighting possibilities.
Conclusion
Yes, you can cut LED strip lights at their designated marks using sharp scissors. This allows for great customization, and reconnecting pieces is also straightforward for truly tailored lighting solutions.
Discovering the workings of LED strip lights can enhance your DIY projects and lighting designs, making them more effective and efficient. ↩
Exploring cut marks helps you learn how to properly cut LED strips without damaging them, ensuring optimal performance. ↩
Explore the benefits of using sharp scissors for PCB cutting to ensure precision and control in your projects. ↩
Learn the best practices for using a craft knife to achieve clean cuts on PCB strips while ensuring safety. ↩
Understand the risks of using wire cutters on PCB strips to avoid damaging your components and ensure successful projects. ↩
Learning how to address bad cuts can save you time and resources in your electrical work. ↩


